She Makes and Bakes
  • Home
  • About
  • Ramblings
  • Recipe Index
  • What We're Eating
  • High-Altitude Baking

PPQ: Death by Chocolate Cake

8/26/2012

 
Picture
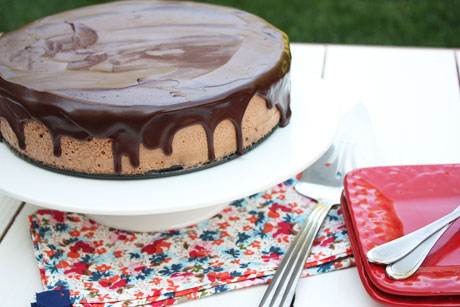
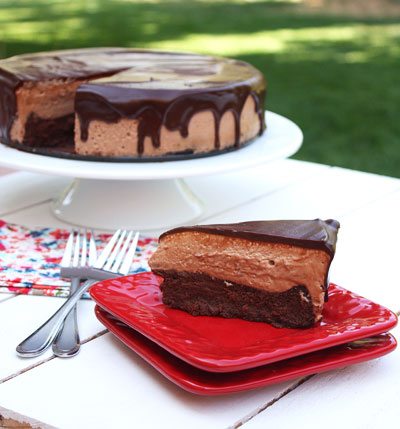
This is the last post of Project Pastry Queen, and I've really enjoyed cooking recipes out of The Pastry Queen Cookbook. You definitely should check it out if you haven't already--there are so many great recipes. This chocolate mousse cake was the perfect way to end the project. It starts with a dense, rich, flourless bittersweet chocolate cake. Then it's topped with a milk chocolate mousse that's light and silky, and the whole thing is topped with a bittersweet chocolate ganache. Bonus--if you use gluten free chocolate, you can make this cake gluten free. Sad thing--if you're pregnant or immunocompromised, no dice on this one. It has raw eggs in the mousse.

Rich really would be an understatement. I had three bites, and I was good. But those three bites were incredible. The other great thing about this cake is that you can freeze it. Technically, you're supposed to freeze it before you add the ganache and then add the ganache to the frozen cake before you serve it. However, I froze the entire thing (minus one piece) and will serve it at a party I'm throwing on Tuesday. I think it'll be fantastic. Don't make this for a cookout or BBQ as the cake needs to stay cold or it will melt.

Check out our grand hostess, Shawnda of Confections of a Foodie Bride, for the full recipe. I made the following changes:

1. I used Bailey's in the cake (yes, you can taste it and it's gooood).
2. I made my cake in a 9-inch springform pan, which I thought worked marvelously. Once the cake was cool, I poured the mousse on top and froze the whole thing. When I was ready to add the ganache, I didn't have to invert the cake out of the pan.
3. I had to bake the cake for 50 minutes, and it was still really fudgy. I'm not quite convinced it was fully cooked. You'll want to watch that.
4. The ganache is supposed to fully cover the sides, but I love the look of dripping ganache, so I went that route instead.

If you want to check out my other Project Pastry Queen recipes, check this out. Be sure to check out the Project Pastry Queen website to see everyone else's take on the recipe. Thanks Shawnda, for creating such a great project! What's up next?
Picture

PPQ: Cheddar Jalapeno Beer Bread

8/19/2012

 
Picture
This is the second to last week of Project Pastry Queen, and I chose to make something savory. I've been eyeing this beer bread for awhile, and it seemed like the perfect time to make it. If you've never had beer bread, you should. For one, it's incredibly easy to make. There's no dealing with yeast and waiting for dough to rise. It's a simple mixture of ingredients, pour the batter into a pan, and bake it. Also, you can adapt it how you like by using different beers, spices, veggies, cheese, etc. I decided to add some chunks of cheddar and jalapeno to the bread to spice it up a bit, which pairs nicely with the Sam Adams Octoberfest I used. The Pastry Queen recipe calls for a stick of butter to be added on the bottom and top of the pan, and let me tell you...it is an amazing addition. The edges get crispy and buttery. There's a hint of sweetness from the sugar, and the beer flavor really shines. The next time you're looking for a quick bread, look no further than here.  

Cheddar Jalapeno Beer Bread Recipe
Makes one 9-inch loaf
Print this recipe

3 cups all purpose flour
1 tablespoon baking powder
1 teaspoon salt
3 tablespoons sugar
1 1/2 cups cheddar, cubed
1 jalapeno, sliced and seeds removed
12 ounces good quality beer (I used Sam Adams Octoberfest)
1/2 cup butter, melted

Preheat your oven to 350 degrees.

In a large bowl, mix together the flour, baking powder, salt, and sugar. Add in the cubed cheese and sliced jalapeno. Pour in the beer and stir until combined.

Spray a 9-inch loaf pan with cooking spray. Pour half of the melted butter in the pan. Spoon the batter in the pan and pour the remaining butter on top. Place in the oven and bake for 50-60 minutes until the bumpy crust is golden brown.

Remove from the pan and serve immediately.

Source: The Pastry Queen
Picture

PPQ: Peach Kolache

8/11/2012

 
Picture
It's my turn to host Project Pastry Queen this week, and I chose to make peach kolache. Kolache was the kick-off project back in 2010 and something I've always wanted to make. From what I can tell, kolache are sweet, soft Czech or Danish pastries. They're very popular in Texas; I had never heard of them. I knew something was wrong when I made them because the dough is supposed to be sticky and wet. Mine was not. Not even close. My dough was tough and tacky, so I knew something was off. I figured it was a humidity/altitude thing until I was typing this recipe out and saw that I definitely did not add in the warm water. Well, that'll explain the tough dough part. When you make this, make sure you add in all the ingredients. Generally that helps make the recipe good. Other than being a little tough/dry, they were great. They have a really great flavor. I'll definitely be making these again, and this time I'll be sure to add in everything.

Another great thing about this recipe is how versatile it is. You can have sweet or savory variations. I'm looking forward to a peach/strawberry combo as well as a sausage/egg combo. I can tell this is going to be a great recipe!

Peach Kolache Recipe
Yield: 16-18 buns
Print this recipe

For the dough:
2 cups milk
2 1/4 teaspoons active dry yeast
1/2 cup lukewarm water
1/2 cup butter
2 eggs
1 1/4 cups sugar
2 teaspoons salt
8 1/2 cups all purpose flour

For the peach filling:
2 cups pitted and chopped peaches
1 cup peach jam

For the streusel topping:
1/2 cup all purpose flour
1/2 cup sugar
3 tablespoons butter, cut into small pieces and chilled

To make the dough, warm the milk in a medium saucepan set over medium heat until the milk starts to steam and forms a skin. Don't let it boil. Cool for 10-15 minutes until it's 110 to 115 degrees or warm to the touch. Dissolve the yeast in the warm water and let it sit until foamy (5 minutes). Melt the butter and let cool for about 5 minutes.

In a large bowl, combine the eggs, sugar, salt, and butter. Add in the cooled milk and the warm water/yeast. Add in the flour, two cups at a time, mixing in between. Use a wooden spoon or your hands to mix the dough until all the flour is fully incorporated. Don't overwork the dough or it'll be tough. It's going to be a sticky, light dough. Grease a large bowl lightly, and place the dough in the bowl. Cover with plastic, and let it rise until doubled in size (about 1-2 hours). Deflate the dough by pressing on it a couple of times, recover it with plastic wrap, and refrigerate at least four hours or overnight.

To make the filling, combine the chopped peaches with the peach jam.

Grease a 12x17 baking sheet with cooking spray or butter. Shape the dough into 2 1/2 inch diameter balls (they'll be the size of small limes). Arrange the balls on the baking sheet, three across and six down. Using your thumb, press down in the middle of each ball to form a well for the peach filling. Mound one tablespoons or so of the peaches in the middle of the ball. Cover them loosely with plastic wrap and let them rise in a warm place for about 1 hour until doubled.

Preheat your oven to 375 degrees.

To make the streusel topping, mix the flour, sugar, and butter together until crumbly. You can use your hands, two knives, or a pastry cutter to mix the butter. Scatter this over the kolaches before baking.

Bake them for 25-30 minutes until lightly browned on top. Cool for 20 minutes before serving.

Source: The Pastry Queen
Picture

PPQ: Cream Cheese Peach Tart

8/6/2012

 
Picture
I had every intention of posting this recipe on Sunday, but I just couldn't gather the wherewithal to do it after participating in my second triathlon. I was so tired yesterday, and today I'm so incredibly sore. I'm waddling around at work today. Yikes!

Therefore, this week's Project Pastry Queen post is late, but it's still good. We're down to the final four weeks, and I'm excited about these last recipes. This tart was picked by Emily of A Gilt Nutmeg. I have to say that it's not my personal favorite, but the hubs liked it, which was surprising. I took it to work today and had some rave reviews from coworkers. I was expecting a little more of a cheesecake-like filling, and it's more firm than that. It does has great flavor with the cream cheese, mascarpone, peaches, and cinnamon, and it's really pretty. Plus it's not super sweet (which could explain why I didn't like it as much and my husband liked it a lot). I made a few changes to the original recipe:
1. I used a different tart crust recipe (which wasn't that great so I'm not going to share it) because I have an eleven-inch tart pan.
2. Instead of using 5-6 peaches cut in half and scored, I used three peaches cut into slices. 
3. I left the peels on the peaches because I'm lazy.
 
Otherwise I made the recipe exactly as is. If I make it again, I would play around with the filling to make it a little less dense. Maybe one less egg or substitute it out for an actual cheesecake? Now that would be over the top! I realize I haven't exactly sold this recipe, but let me stress that other people absolutely loved it. Be sure to check out Emily's page for the full recipe and the Project Pastry Queen website for everyone's take on it. Next week I'm dishing up some peach kolache (on time)...and let me tell you, it's pretty tasty! Peach season is here friends!    
Picture

PPQ: Blueberry Pie Bars

7/15/2012

 
Picture
This week's Project Pastry Queen was picked by Amanda of Homekeeping Adventures: Blackberry Pie Bars. I'm not a huge fan of blackberries so I was thinking about what kind of berries to put in them when I went into Sam's Club and saw two pounds of blueberries for $5. Sold! In true form of The Pastry Queen, these bars were delicious. Soft, buttery, and a little tangy from the sour cream. You could adapt these in a variety of ways...different berries, nuts, chocolate. I love the buttery crust on top and bottom, and I know that I'll be making these again since they are easy to make (much easier than pie). I think these would be great on a road trip or picnic when you want something sweet and portable. Be sure to check out the Project Pastry Queen website to see everyone's take on the recipe and check out Amanda's page for the recipe.
Picture

PPQ: Individual Peach Cobbler

7/8/2012

 
Picture
I chose to make peach cobbler for this week's Project Pastry Queen. The recipe I was supposed to make was Shawnda's choice: Prosciutto Tostadas. You should head over to the Pastry Queen website to check out everyone's take on the recipe. I was intrigued by the tostadas part, but topping the tostada was shrimp and prosciutto. Since I'm not a seafood lover, I scanned the cookbook to find something else. Peaches usually aren't very good yet in Colorado, but when I walked into the grocery store, I could smell them. Maybe they're early this year like everything else. I grabbed a bunch of peaches and brought them home. 

This is a fantastic cobbler recipe, and it's really easy. You brown the butter, which gives it an awesome nutty quality and adds tremendous flavor. Then you mix a few other ingredients together and dump it on top of the butter. Finally, you slice your peaches (but you can leave the skin on) and arrange those on top. While it bakes, the batter moves to the top, forming a great crust. I halved the original recipe and made them in ramekins for individual cobblers. Also, since it's 800 degrees outside, I made these in my convection toaster oven, and I think that's why the batter spilled over the edges a bit. I think if I would have baked them in the regular oven, that wouldn't have happened. These left me wishing I had a big scoop of vanilla ice cream to put on top. 

Individual Peach Cobbler Recipe
Print this recipe
Serves 4

If you want to make this recipe for a crowd, double the ingredients and make it in one 8x8 pan, following the same directions. Bake it for 40-45 minutes. 

1/4 cup butter
1/2 cup sugar
1/2 cup all-purpose flour
1/2 tablespoon baking powder
1/8 teaspoon salt
1/4 teaspoon vanilla
1/4 cup + 2 tablespoons milk
1 peach, cut into 16 slices with the skin on
1/4 cup packed brown sugar

Four 7-ounce, oven-safe ramekins

Preheat your oven to 350 degrees. 

In a small saucepan, melt your butter over medium-high heat until it bubbles and turns brown. It'll start to smell nutty. Keep an eye on it because it will turn from brown to burned quickly. Remove from heat and divide evenly between the ramekins (about 1-2 tablespoons per ramekin). 

In a medium bowl, combine the flour, sugar, baking powder, and salt. Stir in the vanilla and milk until combined. Divide this evenly among the ramekins, but do not stir it in. Just place it on top of the butter. 

Wash and dry your peach and cut it into 16 slices (you'll want 4 slices per quarter). Arrange 4 slices on top of the batter in each ramekin. Again, do not stir the peaches in--just place them on top. 

Bake for 25-30 minutes until the tops turn golden brown. While baking, the batter will rise to the top and form the crust. Let cool slightly before serving. 

Slightly adapted from The Pastry Queen.
Picture

PPQ: Bloody Marys

6/24/2012

 
Picture
I love myself a good bloody mary--it's a salad in a glass! My uncle makes rocking bloody marys, and I texted him to find out what he put in them. His secret ingredient: lots of love. The secret ingredient to these is Guinness. That's right, a dark beer, which is what you see floating on the top of the glass. I think the Guinness is an awesome touch, but I also think these are fantastic bloody marys without it. There is something, actually a lot, to be said about making a bloody mary from scratch instead of using a mix. You get more texture and flavor, and most of these ingredients you probably have in your pantry/fridge already. These are one of my favorite afternoon drinks, especially after a day of skiing moguls. It just hits the spot!  

Funny thing is, I'm not a big Guinness fan. While I like dark beer, it's a little too dark for me. However, while you're reading this, I'm in Ireland hoping to change my mind about this beer. I heard it tastes different in its native country. We'll see. And, even though I'm not a huge fan, it tastes great in this drink. It adds a little sweetness, although I had to drink it through a straw so I wasn't tasting all beer at the top. My husband, who loves Guinness, also loved these, and he definitely loved drinking the leftover Guinness. How many times can I say love in one sentence. Geez. Profound.

This is a Project Pastry Queen recipe, one that I'll be making again. Be sure to check out the webpage to see everyone's take on it. I sure hope someone else made it and loved it!  

Bloody Marys Recipe
Makes 4
Print this recipe

4 cups tomato juice
Juice from 2 limes
4 shots vodka
2 teaspoons fresh or prepared horseradish
2 teaspoons worcestershire sauce
1 teaspoon celery salt
Hot sauce
Salt and freshly ground black pepper
Coarse salt for the glass rims
1 can (12 ounces) ice cold draft Guinness
Celery, limes, or green olives for garnish

Combine the tomato juice, lime juice, vodka, horseradish, worcestershire, celery salt, hot sauce (to taste), and salt/pepper (to taste) in a large pitcher filled with ice. Wet the rims of 4 glasses with water and dip them in a bowl of coarse salt. Divide the tomato juice mixture evenly among the glasses. Pour 3 ounces of the Guinness on the top of each glass and serve immediately with the garnishes of your choosing.

Source: The Pastry Queen Cookbook
Picture

PPQ: Lemon Blueberry Cake

6/17/2012

 
Picture
This week's Project Pastry Queen is celebrating the upcoming birth of Emily of Ruf Love's baby boy. Emily from A Gilt Nutmeg is kind enough to host this sailing-themed baby shower, so I decided to bring a lemon blueberry sailing cake. I wish my pictures were a little better for this one, but oh well. It was made with love.

We actually ate this cake last weekend since we were celebrating Father's Day early because today I'm arriving in Ireland! The hubs and I are spending two glorious weeks here. By the way, happy Father's Day to all the dads out there. I know I love mine more than anything so I hope all of you feel very loved today. My parents loved this cake (I'm not a fan of lemon), and they were very happy to take the rest of it home. I made this one with some vanilla bean frosting I had on hand, but I think cream cheese frosting would be best, so that's what I put in the recipe below. Also, this cake is for high altitude, so if you're at a regular altitude, use your favorite lemon cake recipe or box mix and add in blueberries. It's a great combination. By the way, I made a 6-inch cake and cut each cake in half, so that's why mine looks like it does. The recipe below is for a 9-inch cake; if you want to do 6-inch cakes instead, just halve the recipe.

Happy Father's Day and Happy Baby Shower Day, Emily. I hope everyone feels very loved on this special day! I'll have a Guinness for ya!  

Lemon Blueberry Cake Recipe (High Altitude)
Print this recipe

For the cake:
3 cups cake flour
2 1/2 teaspoon baking powder
1/2 teaspoon salt
1 cup butter, salted
1 1/2 cup plus 2 tablespoons sugar
5 eggs + 1 egg white
1 1/2 cups buttermilk
1/2 cup lemon juice
1/2 cup instant vanilla pudding mix
1 teaspoon lemon zest
1 cup fresh or frozen blueberries

For the Cream Cheese Frosting (any altitude):
1 1/2 packages cream cheese (12 ounces)
12 tablespoons butter
1 1/2 pounds powdered sugar
1/4 teaspoon salt
2 teaspoons vanilla

For the Filling:
1 vanilla pudding snack pack (we are going easy here people)
1/2 cup blueberries

Preheat your oven to 375 degrees and spray 2 9-inch cake pans with Baker's Joy.

To make the high-altitude cake, in a stand mixer, cream together the butter and sugar until light and fluffy. Add the eggs one at a time until incorporated. Add in the baking powder, salt, and lemon zest and mix. Combine the buttermilk and lemon juice. In three additions, add the cake flour and vanilla pudding mix, alternating with the buttermilk/lemon juice mixture. Mix until just incorporated. Pour half the mixture into your greased 9 inch pan. Fold the blueberries into the remaining batter and pour into the second pan.

Bake for 20-25 minutes or until a toothpick inserted in the center comes out clean. Cool your cakes completely before frosting.  

To make the cream cheese frosting, in your mixing bowl fitted with the paddle, cream together the butter and cream cheese until smooth. Add the vanilla and salt and mix until incorporated. Add the powdered sugar one cup at a time and mix until smooth. It's best to weigh your powdered sugar because your amount in cups will depend on your humidity. Store leftover frosting in the fridge or freezer.
 
To assemble the cake, if the cakes are rounded on top, slice the tops off. Place the first cake on the plate, bottom side down. Put some frosting in a piping bag or a ziploc bag with the corner cut off and pipe a circle of frosting around the edge of the cake (this will hold the filling in). Spread the vanilla pudding on top of the cake inside the frosting circle and sprinkle the blueberries over it. Place the second cake layer, bottom side up, over the blueberries. Press down slightly. Frost the cake using the remaining frosting. If you want to make the ruffles or waves, tint your frosting blue, place the frosting in a piping bag fitting with a wide flat tip and move the bag back and forth sideways about one inch in width. Start from the bottom and work your way to the top and then move to the next one-inch section. Continue until there are ruffles around the cake. Man, I hope that makes sense!

Souce: Cake adapted from Annie's Eats; frosting from The Pioneer Woman Cookbook.
Picture

Salted Caramel Brownies

6/3/2012

 
Picture
I'm having a hard time trying to express how incredibly awesome these salted caramel brownies are. I want to swim in them. I want to hide in my closet and eat all of them and then groan from pleasure when I feel sick from all the sugar. I want to eat them morning, noon, and night (and I have). These are probably one of the best desserts I've had in my almost 30 years of living and eating. They. Are. Good.

This week's Project Pastry Queen was chosen by Jen of Sweet Morris, and it's a savory shrimp and crab cheesecake. These brownies obviously aren't that...this girl is not a lover of seafood, and the hubs is lactose intolerant. Therefore, a seafood cheesecake is not going to go over well in this house. I'm very intrigued by it though, so I'm heading over to Jen's site and the Project Pastry Queen website to check out those who made it. You should do the same.

Instead of making the seafood cheesecake, I made these brownies and adapted them from The Pastry Queen cookbook. Her recipe, of course, include nuts (as every other dessert recipe does), and it doesn't have any sea salt. I personally think there is no point in eating the chocolate/caramel combo if there's no sea salt involved. It enhances the flavors 100-fold and solves the salty/sweet problem I always seem to have. When I eat these, I don't have the craving to eat popcorn or chips, too. One of the best parts is that the caramel layer stays gooey for as long as the brownies last (for me, that was two days before I devoured them). These take a tiny bit of time to make because you have to bake and cool a layer before you can finish them, but they are well worth the wait. I halved the original recipe because I certainly didn't need a 9x13 pan; if you're making for a large crowd, just double my recipe. P.S., 2 tablespoons plus 2 teaspoon is half of 1/3 cup.

Salted Caramel Brownies Recipe
Makes a 9x9 pan
Print this recipe

Update: I've had a few comments about the remaining brownie batter being a little stiff to work with after the first layer of brownies have baked and cooled. To remedy this, microwave the remaining batter for 5-10 seconds until it's spreadable again. 
 
1/2 cup butter
6 ounces bittersweet chocolate chips or coarsely chopped
3/4 cups sugar
2 eggs
1/2 tablespoon vanilla
1/2 cup + 2 tablespoons all-purpose flour
1/4 teaspoon table salt
7 ounces caramel candies, unwrapped (half of a 14 ounce bag)
2 tablespoons + 2 teaspoons heavy whipping cream
1/2-3/4 teaspoon sea salt, divided

Preheat your oven to 350 degrees. Line a 9x9 pan with aluminum foil, leaving a few inches hanging over the sides (this foil will turn into handles to lift the brownies out of the pan later). Spray the foil generously with nonstick spray, paying special attention to the corners and sides.

In a microwave-safe bowl, melt the stick of butter. Add the chocolate and let sit for 30 seconds to 1 minute. Stir and if the chocolate isn't fully melted, microwave for 30-second intervals until smooth, stirring in between. 

In a mixing bowl, mix together sugar, eggs, and vanilla until incorporated. Add in the butter/chocolate and mix until thick and glossy (about a minute). Stir in the flour and table salt until just combined.
 
Pour half this mixture into the greased pan and spread to corners. Bake for 20 minutes and let cool for 20 minutes. 

Place the caramels, cream, and 1/4 teaspoon sea salt In a microwave-safe bowl and heat in 30-second intervals, stirring in between, until smooth and creamy.  Pour this caramel over the cooked brownies and spread to the corners. Pour the rest of the brownie mixture evenly over the caramel (don't dump it all in the middle or it will be hard to spread) and spread to the corners. Sprinkle 1/4-1/2 teaspoon of sea salt on top of the brownie batter. Bake for 18-20 minutes or until the center is set. Cool completely before lifting the foil out of the pan.

Adapted from The Pastry Queen Cookbook.
Picture
You may also like:
Loading...

PPQ: Pralines

5/20/2012

 
Picture
This week's Project Pastry Queen was picked by Shawnda of Confections of a Foodie Bride. When I was in New Orleans a month ago, I had pralines for the first time, and they were fantastic. These reminded me of them...except that I got distracted during the last step and kind of ruined them. I hate it when that happens.

Pralines are very easy to make. You cook sugar and some other ingredients until it gets to the soft ball stage, and then the recipe says to mix it with a wooden spoon for 10 minutes. I really did not want to do that, so I used my mixer. While it was mixing, I was doing dishes, and I accidentally beat the heck out of it. It should be soft and smooth--almost caramely. Mine turned back into a soft sugar. I formed some of them into balls, and the rest of them became sugar-coated pecans. This is perfect for me because I can use those on salads this week.

I think pralines would make a great gift, so I'll probably make these again during the holidays. But this time I'll pay attention! Check out Shawnda's blog to get the recipe, and be sure to go to the Project Pastry Queen website to see everyone else's take on the recipe.  
Picture
<<Previous

     Welcome!

    Cooking is fun and easy at high altitude, but baking can be frustrating. About 90% of my recipes work everywhere, but some are adjusted so us mountain dwellers can enjoy baked goods from scratch. I hope you find great recipes on here for your family, and I'll let you know if any are adjusted for high altitude. 

    Stay Updated!

    Add to your Reader:

    Get new posts delivered to your inbox:

    Enter your email address:

    Delivered by FeedBurner

    Categories

    All
    Appetizers
    Bars
    Beef
    Bread
    Breakfast
    Brownies
    Cake
    Cheese
    Chicken
    Chocolate
    Cinnamon
    Cookies
    Crackers
    Cupcakes
    Dessert
    Do It Yourself
    Drinks
    Fruit
    Ground Beef
    High Altitude
    How To
    Ice Cream
    Italian
    Main Courses
    Mexican
    Muffins
    Oatmeal
    Pasta
    Pastry
    Pie
    Pizza
    Pork
    Project Pastry Queen
    Pumpkin
    Salad
    Sauces
    Side Dishes
    Snacks
    Soup
    Sourdough
    Steak
    Vegetables

    My featured recipes on NoshOnIt

    Some Good Reads!

    Annie's Eats
    Bake at 350
    Climbing Grier Mountain
    Confections of a Foodie Bride
    How Sweet It Is
    I Am Baker
    Macaroni and Chesecake
    Pinch of Yum
    Pink Parsley
    Smells Like Home
    Smitten Kitchen
    Sunny Side Up
    The Curvy Carrot
    The Marvelous Misadventures of a Foodie
    The Pioneer Woman Cooks
All content copyright 2012-2013 She Makes and Bakes.