She Makes and Bakes
  • Home
  • About
  • Ramblings
  • Recipe Index
  • What We're Eating
  • High-Altitude Baking

Homemade Ranch Dressing

9/11/2012

 
Picture
Even though I make a lot of things from scratch, I had never made my own ranch dressing. In fact, I had never really made my own salad dressings, period. I think it's because even though it's kind of gross, it's nice how long the bottles last. I'm not really one who eats salads every night or wants the same dressing time after time. I don't dip everything possible in ranch, either. So I like to have a dressing that lasts awhile.

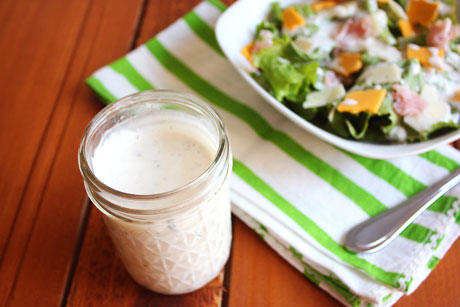
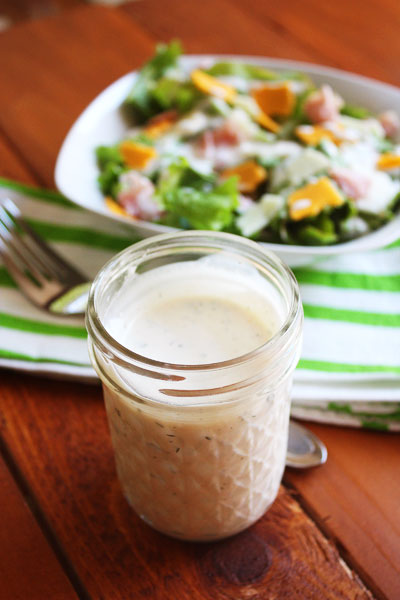
But I finally took the plunge and made my own ranch. It tastes great, and it's nice knowing exactly what's in it. The only downside is that it lasts for only four days. However, I took the leftover dressing and divided it into a mini muffin pan. I stuck that in the freezer and then popped the little dressings out when they were frozen, wrapped them in plastic wrap, and placed them back in the freezer. When I need some ranch, I can pull out a little cup of it, defrost it on the counter, and it's ready to go. It's so much better than having a bottle sit in my fridge for months (or maybe even a year-yikes). This is such a great recipe...the dressing tastes fresh and amazing. I love to add some cayenne pepper for a tiny kick, but that's up to you. 

Homemade Ranch Dressing Recipe
Yield: About 1 1/2 cups
Print this recipe

1/2 cup buttermilk
1/2 cup mayonnaise
6 tablespoons sour cream
1 tablespoon minced shallot
1 tablespoon minced fresh parsley
1 tablespoon minced fresh dill
1 garlic clove, minced
1 teaspoon lemon juice
Pinch sugar
1/2 teaspoon salt
1/4 teaspoon pepper
Pinch cayenne pepper (optional)

In a medium sized bowl, whisk together the mayonnaise, sour cream, shallot, parsley, dill, garlic, lemon juice, sugar, salt, pepper, and cayenne pepper (if using). Add the buttermilk slowly until it reaches your desired consistency (one half cup will yield a thin dressing). Store it covered for up to four days in the refrigerator; whisk it before using. 

Source: The America's Test Kitchen Family Cookbook 
Picture

Breaded Chicken Skewers with Grilled Romaine

9/6/2012

 
Picture
I realize that grilling season is "officially" over, but it was still 90 degrees in Colorado today. So let's fire the grill up and go! This is some of the best chicken I've had in quite some time. Instead of doing a typical flour, egg wash, bread crumb breading, you make a simple dressing, toss the chicken in that, and then add the bread crumbs. Then, instead of frying or baking the chicken, you grill it on skewers. Oh man, it was tender, juicy, and had great flavor and crunch from the bread crumbs. 

I realize that grilling romaine may seem a little strange. Even my husband looked at me like you're asking me to grill lettuce? But don't skip this step. It brings out the sweet smokiness of the lettuce and enhances the flavor. Plus, it's something different. I highly recommend you try this meal before it gets cold and dark outside!

Breaded Chicken Skewers with Grilled Romaine Recipe
Print this recipe

1/4 cup extra virgin olive oil, plus more for drizzling
2 tablespoons red wine vinegar, plus more for drizzling
2 tablespoons chopped fresh oregano
1 tablespoon minced shallot or red onion
1 teaspoon minced garlic
1/4 teaspoon red pepper flakes
Kosher salt
1 head Romaine lettuce, quartered lengthwise
1 1/2 pounds boneless, skinless chicken breasts, cut into chunks
1 1/2 cups breadcrumbs
1/4 cup grated parmesan cheese

Preheat a grill to medium high heat and soak 8 wooden skewers in water (so they don't burn on the grill).

In a medium bowl, stir together the oil, vinegar, oregano, shallot, garlic, red pepper flakes, and 1 1/4 teaspoons salt. Drizzle the cut sides of the lettuce with about 1 teaspoon of this mixture.

Add the chicken chunks to the rest of the mixture in the bowl and toss. Add the breadcrumbs and toss until the chicken is coated. Place the chunks on the skewers, leaving space between each piece. 

Grill the skewers until the chicken is cooked through, about 8-10 minutes. Also grill the romaine, turning it once, until marked and slightly wilted, about 1-2 minutes. Put the grilled romaine on plates and drizzle additional olive oil and red wine vinegar on top. Season with salt, add the chicken skewers, and sprinkle the parmesan on top of everything. 

Source: Food Network  
Picture

Cucumber Blueberry Salad

7/23/2012

 
Picture
If you're looking for ways to use up cucumbers from your garden, listen up...cucumbers, blueberries, cilantro, jalapeno, garlic, and olive oil. Interesting, right? We had our company BBQ a few weeks ago, and one of the girls brought this salad. I was intrigued by the combination of the seemingly strange combination of flavors, but it works. It's really refreshing, and it's a perfect summer salad. You can make it as spicy as you'd like--I used half of a seeded jalapeno and it wasn't very spicy. Next time I'd bump up the spice a bit. I recreated this based on what I tasted at the BBQ, but I googled it today and found it is a Rachel Ray creation. Her recipe has cumin in it, which I didn't use so I'll list it as optional. When I make this again, I'll try it with the cumin for some additional flavor. I have a sneaking suspicion that this would be great on some tortilla chips as a play on pico de gallo, but I forgot to try.  

Cucumber Blueberry Salad Recipe
Serves 4-6
Print this recipe

2 small/medium size cucumbers, peeled and sliced lengthwise
Salt
1 jalapeno, seeds and rib removed
1 tablespoon lime juice
1 clove garlic, minced
1/8 teaspoon cumin (optional)
2-3 tablespoons extra virgin olive oil
1 cup fresh blueberries
1/2 cup cilantro leaves

Once your cucumbers are peeled and sliced lengthwise, scrape the seeds out and cut into half moon slices. Season lightly with salt and set aside.
 
Give the cilantro a rough chop. Mince the jalapeno and combine it with the lime juice, minced garlic, 2 tablespoons of extra virgin olive oil, and cumin (if using). Add the sliced cucumbers, blueberries, and cilantro and toss to combine. If it looks dry, add the extra tablespoon of olive oil. Store in the refrigerator and serve cold. 

Adapted from Rachel Ray 
Picture

Macaroni Salad

5/24/2012

 
Picture
I have been eating this macaroni salad for pretty much my whole life, and I love it. I think it's perfect for most occasions, and almost everyone loves it (everyone except my husband who hates pasta). In fact, one of my friends requested a bowl of this as her Christmas present one year. I get requests for the recipe frequently, but it's one of those things that you throw together until it looks right. So I made it and measured everything out because I love you guys. It only requires six ingredients, it's a breeze to make, and it's pretty easily adaptable...although I never stray too far from the original. If I want to make this a main dish, I add a can of drained tuna. My parents add pickles to it, but that addition never makes it to my bowl because pickles are the devil!

There's a couple of things about this recipe. You want to cook your noodles past al dente because when you run cold water on them, they'll go back to al dente. Also, once it sits in the fridge, the noodles soak up the Miracle Whip. You can be smart and healthier by adding a couple tablespoons of hot water to loosen everything up, or you can be like me and add more Miracle Whip. It's just better. And no, you can't sub the Miracle Whip for mayo. It's gotta be the whip, and I prefer the light version. If you don't like Miracle Whip, you are not going to like this salad. But if you do, make this for your Memorial Day BBQ this weekend, and you'll have people asking for the recipe!

Macaroni Salad Recipe
Print this recipe

1 box pasta (12 ounces, I used bow ties)
1 cup Miracle Whip
1 cup cheddar cheese, shredded or cubed
1/4 cup green onions, diced
3 large celery stalks, diced
1/2 teaspoon garlic powder

Cook your pasta past al dente, drain, and rinse under cold water. Let it dry for about 10-15 minutes. In a large bowl, mix together the Miracle Whip, cheese, green onions, and celery. Add the pasta and stir until everything is combined. Sprinkle the garlic powder on top and stir once more. Place in the fridge until cold. Store in the fridge.

Optional ingredients: 1 can tuna, drained and/or diced pickles

A She Makes and Bakes Family Original
Picture

PPQ: Waldorf Salad with Rosemary Vinaigrette

4/28/2012

 
Picture
I love Waldorf salads, so when it was my turn to pick the recipe for this week's Project Pastry Queen, I was drawn to this recipe. The special things about this recipe include the fried wonton strips and the rosemary vinaigrette. I have to say that I'm a huge fan of rosemary, and I have a lot of it right now. It's the one herb that thrived during the winter inside our house. This dressing is a win. It has the hint of rosemary, and it's sweet and tangy. The recipe calls for white balsamic vinegar; I didn't have that, so I used regular balsamic vinegar. Since I've never had white balsamic vinegar, I guessed that it wasn't as strong as regular, and I halved the amount. I'm glad I did. I think that if I would have put in the full amount of regular balsamic vinegar, it would have been overwhelming.

The other thing I did different is I candied my pecans. This is really easy to do, and it's a treat I love in Waldorf salads. If you want to do this, that recipe is below. If not, you should toast your pecans to bring out the flavor, as the original recipe indicates. If you don't have pecans, walnuts would work great, too. The other thing I normally love in Waldorf salads is celery. That's not in this recipe, but I would add it next time. You also could add some chicken in and make it a full dinner.

The recipe calls for frying the wontons/egg roll wrappers in olive oil, but olive oil is expensive. I fried mine in vegetable oil, and they turned out great. Honestly, this adds a bit of time to the recipe, and I don't think it adds that much other than the wow factor. I would skip it next time unless I was trying to impress someone. You definitely should take the time to make the dressing though. It's great and much better than you'd get from a bottle! Be sure to check out Project Pastry Queen to see everyone else's take on this great recipe.

Waldorf Salad
Makes 4 servings
Print this recipe

Fried Wonton Strips
4 sheets packaged wonton strips or egg roll wrappers
Olive or vegetable oil for frying (be careful!)

Rosemary Vinaigrette
1/3 cup fresh rosemary leaves
2 cloves garlic
1/4 medium-sized red onion
1 tablespoon Dijon mustard
1/4 cup honey
1/2 cup white balsamic vinegar
1 1/2 teaspoons salt
Freshly ground black pepper to taste
1/2-1 cup extra virgin olive oil

Salad
1/2 cup pecans
3 sweet-tart apples, such as Braeburn, Medina, or Granny Smith
4 cups salad greens
1/2 cup crumbled bleu cheese

To make the fried wonton strips, use kitchen scissors or a knife to cut the wonton sheets into 3/4 inch strips. Pour 1/2 inch of oil into a deep frying pan or skillet and heat over medium-high. When the oil is hot, pinch off a piece of wonton and drop it in the oil. You'll know the oil is ready when the strip sizzles. It should brown in 8-10 seconds. Using tongs, flip the strips to the other side and fry for another 8-10 seconds. You can fry several at a time. Adjust the heat or time if your strips get too brown. Place the fried strips on a paper towel to drain.

To make the vinaigrette, blend the rosemary, garlic, onion, mustard, honey, vinegar, salt, and pepper in a food processor or blender for about 15 to 20 seconds or until smooth. Pour the oil through the feed tube or opening in a slow stream while the machine is running. Start with 1/2 cup, and if it's too thick, add more. Blend until it emulsifies; this shouldn't take much longer than it takes to add the oil.

To make the salad: (If you're toasting the nuts) Preheat the oven to 350 degrees. Spread the nuts on a baking sheet and toast for 7-9 minutes until golden brown. Cool the nuts and then coarsely chop.

(If you want the nuts candied) Place a silpat or parchment paper on a small baking sheet. Pour 1/4 cup sugar in a nonstick small skillet. Heat over medium high until the sugar melts. This takes about 5-10 minutes, and you'll want to keep an eye on it. Once it's melted and light brown in color, add the nuts and stir to cover them with the sugar. Once the nuts are covered, dump them on the baking sheet and quickly use two forks to separate the nuts from each other. Let cool.

Core and slice the apples into bite-sized pieces. In a large bowl, add the greens, apples, nuts, and blue cheese. Toss gently. If you're eating all of it immediately, pour half of the dressing on top and toss again (if desired). I personally like to dip my salad into dressing so I didn't do this step. Only dress what you'll be eating immediately or the greens will get soggy. Transfer to serving plates and top with the fried wonton strips. Leftover dressing will keep in the refrigerator for three days.

Source: The Pastry Queen
Picture

     Welcome!

    Cooking is fun and easy at high altitude, but baking can be frustrating. About 90% of my recipes work everywhere, but some are adjusted so us mountain dwellers can enjoy baked goods from scratch. I hope you find great recipes on here for your family, and I'll let you know if any are adjusted for high altitude. 

    Stay Updated!

    Add to your Reader:

    Get new posts delivered to your inbox:

    Enter your email address:

    Delivered by FeedBurner

    Categories

    All
    Appetizers
    Bars
    Beef
    Bread
    Breakfast
    Brownies
    Cake
    Cheese
    Chicken
    Chocolate
    Cinnamon
    Cookies
    Crackers
    Cupcakes
    Dessert
    Do It Yourself
    Drinks
    Fruit
    Ground Beef
    High Altitude
    How To
    Ice Cream
    Italian
    Main Courses
    Mexican
    Muffins
    Oatmeal
    Pasta
    Pastry
    Pie
    Pizza
    Pork
    Project Pastry Queen
    Pumpkin
    Salad
    Sauces
    Side Dishes
    Snacks
    Soup
    Sourdough
    Steak
    Vegetables

    My featured recipes on NoshOnIt

    Some Good Reads!

    Annie's Eats
    Bake at 350
    Climbing Grier Mountain
    Confections of a Foodie Bride
    How Sweet It Is
    I Am Baker
    Macaroni and Chesecake
    Pinch of Yum
    Pink Parsley
    Smells Like Home
    Smitten Kitchen
    Sunny Side Up
    The Curvy Carrot
    The Marvelous Misadventures of a Foodie
    The Pioneer Woman Cooks
All content copyright 2012-2013 She Makes and Bakes.