She Makes and Bakes
  • Home
  • About
  • Ramblings
  • Recipe Index
  • What We're Eating
  • High-Altitude Baking

Rosemary Parmesan Wheat Thins

3/11/2013

 
Picture
Do Wheat Thins come in a rosemary Parmesan flavor? If not, they should. Show of hands, when you hear wheat thins, do you automatically think of Stewie in the Family Guy Wheat Thins commercial? Whhheat Thins. Or is that just me? I swear. Every.time. Now that's good marketing!

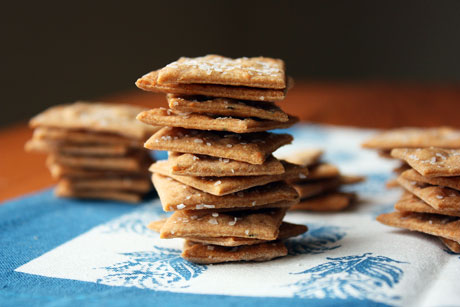
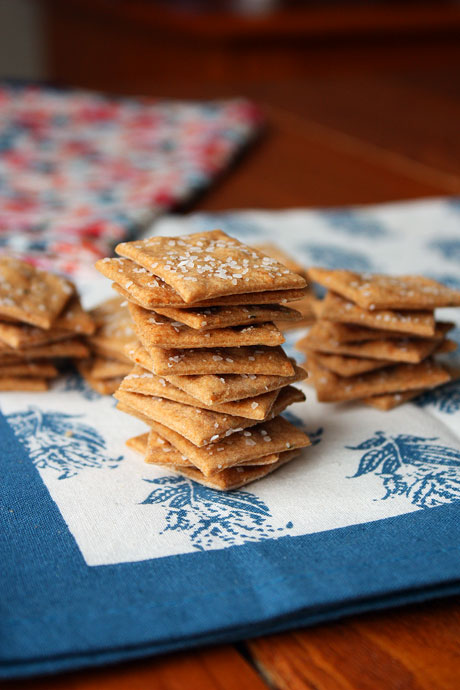
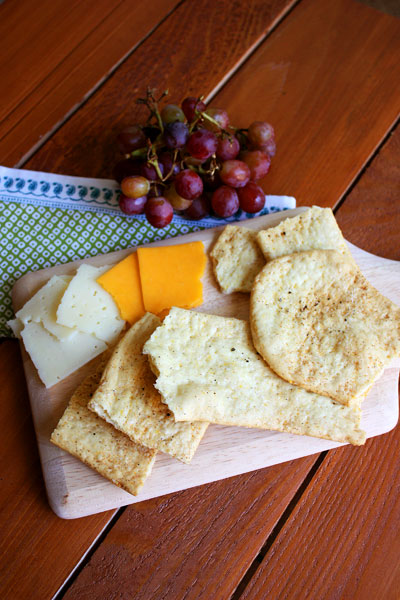
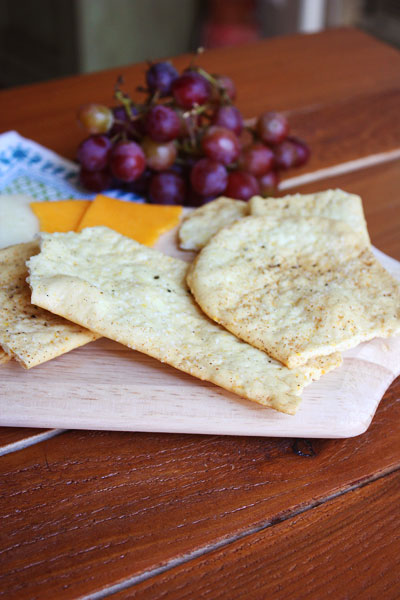
I love making crackers because they're shockingly easy and extremely adaptable. I was in a rosemary mood, so I took Deb's recipe and added in some of that flavor. And since everything is better with cheese, I decided to add in some Parmesan, too. And it totally worked. You should ignore the amount of kosher salt I have on top of my crackers though. I love salty things, but this was a bit too much. I highly recommend you have a lighter hand with the salt shaker.

If you want a plain wheat cracker, you can leave out the rosemary and Parmesan with great results. Or you can substitute other herbs. Either way, these are bound to be a hit. Plus, you know exactly what's going in them!

Rosemary Parmesan Wheat Thins Recipe
Makes about 3 dozen
Print this recipe

1 1/4 cups whole wheat flour
1 1/2 tablespoons sugar
1/2 teaspoon table salt
1/4 teaspoon paprika
4 tablespoons cold butter
1/4 cup grated Parmesan cheese
1/2-1 teaspoon rosemary, minced
1/4 cup cold water
Kosher salt for sprinkling

In a food processor, pulse together the flour, sugar, salt, paprika, cheese, and up to 1 teaspoon rosemary (depending on how much you like rosemary) until combined. Cut the butter into small cubes and add it into the processor. Pulse until it is evenly combined into the flour mixture.  With the machine running, slowly add in the cold water until it forms into a ball. You may need to add another 1-2 tablespoons of water to get the dough to come together but it should not be a sticky dough. Once it's formed into a ball, remove it from the food processor and place on a well floured counter.

Preheat your oven to 400 degrees.

Divide the dough into two pieces and roll it out very thin. The thinner you can roll them, the better they are. Be sure that your dough isn't sticking on your counter, and add more flour if needed. Use a pastry wheel to cut the dough into 1 1/2 inch squares (it doesn't have to be perfect). I use a pastry wheel and a ruler, but I'm pretty OCD. Poke each cracker with a toothpick several times so they don't puff up when they bake. Sprinkle with kosher salt.

Transfer the crackers to a cookie sheet and leave a little bit of space between each one. Bake until crisp and brown about 5-7 minutes. Keep an eye on them because the time to bake correlates directly with how thick or thin they are. Cool before eating.

Adapted from Smitten Kitchen
Picture
You may also like:
Loading...

Pizza Bites

1/31/2013

 
Picture
One last Superbowl snack before Sunday...pizza bites! When I saw this come up on one of my favorite blogs years ago, I had to make it that same week. And we're still eating them. Pizza bites are incredible...for lunch, a snack, or dinner. I make mine a little bigger than the original recipe indicates and place 3-4 pieces of pepperoni in each roll with a big hunk of mozzarella. The original recipe calls for 20-24 balls, and I can only try to get 12 out of mine.

Pizza dough isn't hard to make, and it rises pretty quick. This is my favorite and I actually make it all by hand now. I find it's much easier than using my big mixer. But feel free to grab some from the store or your local pizza place. I highly recommend you make these as soon as possible!

Pizza Bites
Print this recipe

For the dough:
6 ounces (about 1 cup) semolina flour
16 ounces (about 3 1/4 cups) bread flour
1 1/2 tablespoons sugar
1 teaspoon yeast
1/4-1/2 teaspoon garlic powder (optional)
2 teaspoons salt
14 ounces (1 3/4 cups) warm water
3 tablespoons extra virgin olive oil

For the bites:
About 40 pieces of pepperoni
3 pieces of string cheese
Olive oil
Italian seasoning
Grated Parmesan cheese

Combine the yeast, sugar, garlic, and water in a bowl and allow yeast to dissolve. Add flours and stir with a large spoon. Let the dough rest for a few minutes to give the yeast time to work. Add the oil and salt and stir. Place the dough on a floured counter and knead by hand until it's soft and elastic. Place in a lightly oiled bowl and cover. Let it rise about an hour or until it’s doubled in size. I like to cover my rising bread with shower caps that my friends pick up at hotels. They're easy to slip on and they're reusable.

Split into two pieces and shape or place in freezer bags to freeze and use late (you only need one ball of dough for this recipe).

Preheat your oven to 400 degrees.

Divide one ball of dough into 12 pieces. Stretch the piece into a circle about the size of your palm. Place the pepperoni and cheese in the middle of the circle and stretch the dough around it and pinch to close. Place the balls seam side down in a greased 9-inch pie plate.

Brush olive oil on top of the balls and sprinkle the Italian seasonings and parmesan cheese on top. Bake for 20 minutes or until the tops are golden brown. Serve warm.

Source: Annie's Eats
Picture
You may also like:
Loading...

Onion Dip

1/27/2013

 
Picture
Are you ready for the most addicting dip ever? Seriously, ever. I could eat an entire bowl of this stuff. I first had this dip when my aunt and cousin served it, and it's possible that I consumed nearly the entire bowl. But I've learned my lesson and now I only make it when I know there will be people to help me eat it. Lots of people.

The beauty of this? Only four ingredients. If you're going for super easy and tear free, use a bag of frozen diced onions. I've done this, and it's just as good as a freshly diced onion. When cream cheese and Parmesan cheese are main ingredients, it's really hard to go wrong. Gooey cheese + tangy onion = amazing appetizer.

I've made this with both Miracle Whip and regular mayo, and they both work great. Low fat cream cheese is a great substitution also. The recipe below is actually a half batch because I find that's more than enough, but if you're feeding a lot of people, feel free to double the recipe below. Happy snacking!

Onion Dip
Print this recipe

1/2 white onion, diced
1 1/2 bricks of cream cheese (12 ounces)
1/4 cup mayo
1 cup shredded Parmesan cheese

Preheat your oven to 350 degrees.

In a large bowl combine all of the ingredients. Spray a quart cooking dish with cooking spray and spread the dip in it. Bake for 30 minutes or until hot and bubbling. Serve with chips.

Recipe from my cousin Caitlyn
Picture
You may also like:
Loading...

Homemade Soft Pretzels

1/23/2013

 
Picture
Is it just me or do you have to get a soft pretzel every time you walk into a mall? Every time. I have always loved soft pretzels, and I remember going to Broncos games when I was little and getting fresh soft pretzels every. single. game. About 10 years ago when they moved into a new stadium, the fresh pretzels were gone and they substituted it with the frozen Pretzel Time ones. So sad...but I still get one now and then. In fact, I got one at the playoff game a few weeks ago and then I dropped half of it. Fail. Especially because they're $3 a pop.

These pretzels, however, are awesome, and they're pretty easy. True pretzel recipes involve a boiling stage. This one does not, but I still think they taste just as good. Instead of boiling them, you mix hot water and baking soda together and then dunk the shaped pretzel in that before you put it on the baking sheet. It's not exactly the same effect but you still get that crispy crust and chewy inside. Pretty delicious in my opinion. This is an Auntie Anne copycat recipe, so you know it's gotta be good. Plus, you should have all of the ingredients on hand unlike others I've seen and tried.

I don't make pretzels from scratch very often because they're really best on the day they're baked. After that the salt gets soft and liquidy and they lose something. I highly recommend you make them the day you want them and then eat all of them. Every single one. You could make the dough the day before and let it rise in your fridge covered the night before and then shape, dunk, and bake the day of. That would be my recommendation if you don't want to do everything in one day. If you need to reheat though, do it in the oven or a toaster oven. Please don't eat day two pretzels at room temperature or microwaved. It's truly not the same.

One more thing about pretzels. You want the rope to be long...at least 2 feet. The longer it is, the less likely it is to bake into itself and make more of a pretzel mound than an actual pretzel with the spaces. They taste good either way, but if you're looking for that mall pretzel, make sure your dough is at least 2 feet long.

Oh....I highly recommend you serve them with queso! Because everything is always better with queso.

Homemade Soft Pretzels Recipe
Makes 8 pretzels
Print this recipe

1 1/2 cup warm water
1 1/8 teaspoon active dry yeast
2 tablespoons brown sugar
1 cup bread flour
3 cups all purpose flour
1 1/8 teaspoon salt

For the bath:
2 cups hot water
2 tablespoons baking soda

Topping:
1 egg mixed with 1 tablespoon water (optional)
2-4 tablespoons melted butter (optional)
Coarse pretzel salt

In the bowl of your mixer, combine the warm water, yeast, and sugar and let sit for five minutes or until foamy. Add in the flours and mix with the paddle on low speed until everything is incorporated. Let sit for five minutes, add the salt, and mix. Switch to the dough hook and mix on low until the dough is smooth and tacky. Place in a clean greased bowl, cover, and let rise for about 30 minutes to an hour or until doubled.

Preheat the oven to 450 degrees. Prepare two sheet pans with parchment paper sprayed generously with cooking spray or silicone baking mats.

Prepare the baking soda water bath by mixing the two in a large container. Divide the dough into 8 equal pieces and roll/stretch each piece into a rope that is 1/2 inch thick or less and at least 24 inches long. Shape into a pretzel shape by creating a U with the rope, bringing the ends down into an X (that meet up with the bottom of the U, and then crossing the ends so they twist in the middle of the pretzel. Lightly press anywhere the dough touches itself. Dip into the bath and place on the prepared cookie sheet. Let rise for about 15 minutes, brush with the egg wash and sprinkle with salt. Alternately, bake without the egg wash and salt, dunk in butter after they're baked and sprinkle with the salt. Bake for 10 minutes until golden brown. Serve immediately or at room temperature the same day they're baked (don't put in a bag).

To store any leftover pretzels (highly discouraged), you can keep them in a bag and then reheat in the oven at 350 degrees for about 5 minutes until crispy on the outside.

Recipe from Copycat Recipes Cookbook
Picture
You may also like:
Loading...

Pesto Puffs

1/13/2013

 
Picture
What's in a name? Really these should be called pesto tomato mozzarella puff pastry bites, but that seemed just a bit too long. Pesto caprese puffs? Awesome appetizer? I dunno, but I do know they're pretty lovely. It's really hard to go wrong with puff pastry and pesto in my humble opinion. By the way, I love that spell check is freaking out over caprese but not dunno. Really? Ok spell check. Whatevs. Oops...there you go again.

I served these at my husband's 30th birthday party last summer, and I think they're great for a party because they don't have to be served hot. Sadly, the day of football playoff parties is over here in Denver. Ask me how fun it was standing through double overtime in single degree temperatures (with a windchill of negative 6) to have my team lose. My toes still are screaming at me. Anyway....if you're lucky enough to be attending or throwing a playoff party, I highly recommend these guys. They'll make you happy, even if your team is losing. Or loses in the last second. And for that big game in a couple of weeks that could have been ours, well I think I'll whip up a batch of these to console me. 
Picture
Pesto Puffs Recipe
Print this recipe

One sheet puff pastry, thawed
1/4 cup pesto
1 tomato, sliced
Mozzarella slices cut into 1-inch squares

Preheat your oven to 400 degrees.

Unfold the puff pastry on your counter and spread the pesto on top (you may need more or less depending on your love for pesto). Cut into 3-inch squares and place 1-inch apart on a baking sheet covered with parchment paper or a silicone baking mat.

Cut the tomato slices into quarters and place a quarter on each square. Bake for 10-12 minutes or until the bottoms and edges are lightly browned. If you want warm, melty cheese, place the cheese on top of the tomatoes immediately. If you want to serve the puffs at room temperature, plate the puffs and then add the cheese after they've cooled. Refrigerate any leftovers.
Picture
You may also like:
Loading...

Caramel Popcorn

12/5/2012

 
Picture
While I absolutely love popcorn, I'm not a huge fan of caramel popcorn. Until now. I have never made my own because I was worried that when I poured the caramel sauce on top of the popcorn, the popcorn would get soggy and squished. Well, that didn't happen, and I was excited.

I had a hard time with this though...I had a hard time not eating all of the popcorn before I poured the caramel on top of it. I had a hard time not eating all of the caramel popcorn before I put it in the oven, and I had a hard time not eating all of it before I could take a picture. When I saw the recipe, I wondered what the baking step did...it dries out the popcorn so it's extra crisp, which makes it taste like typical caramel popcorn. I'm going to play around with this recipe and add melted chocolate or peanuts next time. Now that I've tried this, I'm not going back!

My dad and I go to the Denver Broncos football games together, and we always get a snack in the third quarter. Last week, our snack was this popcorn, and it was quickly devoured between touchdowns. This is a great snack for the holidays and for football. Cheers to that! 

Caramel Popcorn Recipe
Print this recipe

1 bag popped popcorn (about 12 cups)
1/4 cup butter
1/2 cup packed brown sugar
2 tablespoons milk
1/8 teaspoon baking soda
1/2 tablespoon light corn syrup

Preheat your oven to 250 degrees and line a cookie sheet with foil (and spray with cooking spray) or a silicone baking mat.

In a medium saucepan, melt the butter over medium heat. Add in the brown sugar and bring to a boil while stirring. Stir in the milk, baking soda, and corn syrup and bring to a boil again. Remove from heat and cool for 15 minutes. Place the popcorn in a large heat-proof bowl. After the brown sugar mixture has cooled, pour it over the popcorn in the bowl and toss to coat.

Spread the popcorn in a single layer on the cookie sheet. Bake for 45 minutes, stirring every 15 minutes. Remove from the oven and let cool.

Adapted from Pennies on a Platter 
Picture

Homemade Queso

10/11/2012

 
Picture
Queso is my kryptonite. I will go off a diet so fast if queso is put in front of me. And I'm not super picky about my queso, either. Velveeta and rotel? Sure. I can eat the crap out of that stuff. But I wanted to be a good food blogger and create my own. I tried another homemade queso recipe about a year ago, but I wasn't overly thrilled with it. While it was good, it was missing something. So I decided to experiment with it. Thankfully it only took one try so my hips didn't get too big! This makes a good size batch, but if you're having it at a party, I'd double or triple it. It reheats nicely thanks to the no roux part, and it freezes well. That's how I kept myself from devouring it. I hid it in the depths of my freezer. Next week, I'll show you an amazing meal to make with this stuff: quesochangas!

Homemade Queso Recipe
Print this recipe

*Note: Please do not use individually wrapped American cheese slices. Go to the deli and ask for a chunk of American cheese. If it's a chunk, you can grate it. If it's already sliced, you can tear it into pieces so it will melt faster. If you like spicier food, leave some of the seeds in the jalapeno.

1 tablespoon butter
Half of a white onion, chopped
1 jalapeno, chopped and seeds removed
1 garlic clove, minced
1 large Roma tomato, chopped
About 10 ounces yellow American cheese, shredded*
1 cup Monterey jack, shredded
1/2-3/4 cup milk

In a medium saucepan over medium heat, melt the butter and cook the onion, jalapeno, and garlic until soft, about 5-10 minutes.

Add in one quarter of the American cheese and 1/4 cup milk. Stir until the cheese has melted. Add in half of the Monterey jack and stir until melted. Keep adding the cheese and milk until incorporated and melted. Use as much milk as desired for consistency. If you want your queso thick, you'll need about 1/2 cup of milk. If you like it thinner, you'll want about 3/4 cup of milk. Add in the chopped tomato and salt to taste. Serve immediately, and reheat on the stove or in the microwave.

Source: A She Makes and Bakes creation
Picture
You may also like:
Loading...

Polenta Crackers

9/13/2012

 
Picture
Have you checked out my new What We're Eating page? I've been pretty terrible lately about meal planning, so I figured I would be more motivated to do it if I posted it online. And then you guys get to share in the love with us. Maybe you'll get some good dinner ideas, too! I hate playing the what's for dinner game so check it out if you're curious or looking for ideas.

I first tried these polenta crackers last fall when I took a bread class, and I loved them. The polenta in them gives great flavor and texture, and you can sprinkle whatever seasonings you want on top of them. The original recipe calls for fennel, salt, and pepper. I'm not a fan of fennel so I use garlic powder, fresh cracked pepper, and lots of kosher salt.

There is yeast in these crackers but it's really for the flavor. So if you're one of those people who are scared of yeast, don't worry. It's not meant to work as a leavener. The dough does rise but again, that's to develop the flavor. When I was taught to make these crackers, we rolled them using a pasta roller, which made it super easy. My pasta roller has settings 1-7. I started rolling it at 7 and went down to 3. You want to roll it thin but not too thin. If you don't have a pasta roller, I think you could hand roll it out just fine...it might just require a little more elbow grease. You also don't have to cut the crackers into the typical square shape, either. I roll the dough out with my pasta roller and leave it in that long thin shape. I just make sure that it fits on a pan. Once they're baked, I break them into large pieces. 

These crackers taste great with cheese but one of my favorite things is to make tuna salad and put that on top of them...instead of using bread in a sandwich. I love them plain, too. You can think about what you want to use them for and then adjust which seasonings you want on top of it. These are fun for a dinner party because you can place these large crackers on the table and let people break off how much they want. Rustic is a good thing!
 
Polenta Crackers Recipe
Print this recipe

1 tablespoon active dry yeast
1/4 cup olive oil
1 tablespoon honey
1 1/4 cups warm water
4 1/4 cups (20 ounces) bread flour
1/3 cup uncooked polenta
2 teaspoons salt
Cracked pepper
Kosher salt
Garlic powder or other spices

Mix honey, olive oil, water, and yeast in a mixing bowl and let sit for 5 minutes or until foamy. Add the bread flour, polenta, and salt and mix with the dough hook until thoroughly combined. It's a tough dough, but you'll know that it's well kneaded when you taste a pinch of dough and it doesn't taste really salty. Put the dough into an oiled bowl, cover, and let double in size.

Preheat your oven to 375 degrees. 

Divide the dough into smaller pieces and roll it out using a pasta roller or rolling pin. You'll want it to be fairly thin. Place the dough in large pieces on ungreased sheet pans. Brush with olive oil and sprinkle kosher salt, cracked pepper, and garlic powder (or other seasonings) liberally on top of the dough.

Bake for 15-20 minutes until the crackers are browned on top.

Source: Cook Street Cooking School
Picture

Baked Caprese

9/4/2012

 
Picture
In the last year, I have come to absolutely love all things caprese. Even though I'm not a big fan of raw tomatoes, when you pair them with fresh basil, I could eat them all day long. When I saw this recipe in the Easy Summer Food cookbook, I wanted to try it asap. You score tomatoes, stuff mozzarella in them, and then bake them until they're warm and soft and the cheese is melted. Then you top it off with basil, olive oil, and balsamic vinegar. I love these. Baking the tomatoes tones down the fresh tomato flavor just a touch, and of course you can't go wrong with the caprese combination. I truly believe that fresh basil makes almost anything taste better. I highly recommend you make these before your basil plant dies and tomato season is over. Your mouth will thank you.

Baked Caprese Recipe
Print this recipe

Note: This recipe makes 10 tomatoes, but you can easily make it using as many tomatoes as you want. I made it with four tomatoes and scaled everything way day. It's not so much of a measuring recipe as it is a guide.

10 ripe tomatoes (I used vine-ripened tomatoes)
4 ounces mozzarella cheese, cut into 10 pieces
1/4 cup olive oil
2 tablespoons balsamic vinegar
Bunch of fresh basil leaves, torn
Salt and pepper

Preheat your oven to 325 degrees and spray a baking tray with cooking spray.

In each tomato, cut a deep X about halfway through the tomato. Push a piece of mozzarella into each X. Place the tomatoes on the tray and sprinkle with salt and pepper.

Bake in the oven for 25 minutes until the tomatoes start to soften and open. Remove from the oven, drizzle the olive oil and balsamic vinegar on top and serve.

Source: Easy Summer Food Cookbook
Picture

Everyday Salsa

8/1/2012

 
Picture
I absolutely love salsa, but I have a hard time finding a good brand at the grocery store. I'm not really a fan of beans or peaches or corn or other "strange" ingredients in my salsa. I want some straight up basic but good salsa. The only store brand I've found that's great was at Harris Teeter. If you live near a Harris Teeter, check out their salsa in jars. Pretty dang good...in fact, we brought some home to Colorado with us. Just not enough of it.

Anyway, since I can't find a good salsa, I usually make my own. It's super simple, hardly takes any time, and you can make as much or as little as you need. I make a lot because even as just two people, we go through a lot of it. This is year-round salsa that uses canned tomatoes. My tomatoes still are green, so I haven't had the chance to make this with ours yet this year. It's very easy to substitute fresh tomatoes in the summer. Just know that instead of your salsa being red, it'll be pink. I usually don't measure the ingredients for this--I just add and taste and adjust. So go that route if you're comfortable with it or use my measurements below.

Everyday Salsa Recipe
Yields approximately 3 cups
Print this recipe

Note: If you want to use fresh tomatoes instead of canned, peel approximately 4-6 large tomatoes or up to 10 Roma tomatoes. Cut them into chunks and add them to your food processor or blender. Also, I briefly cook my onion to get rid of the raw onion taste. If you don't have the time or the taste buds, just chop your onion into chunks and throw it into the food processor/blender.

1/2 small white onion
1 tablespoon butter
28 ounce can of diced peeled tomatoes
3 garlic cloves
1 jalapeno, seeded
1/4-1/2 cup cilantro
2 tablespoons lime juice
Salt, to taste

Dice the onion. In a small skillet, melt the butter over medium heat. Add the onion and cook until soft, about 3-5 minutes. Remove from heat. 

Add the tomatoes, garlic, jalapeno, cilantro, cooked onion, and lime juice to the bowl of a food processor or a blender. Pulse until smooth. If you like chunky salsa, don't process it as long. 

Taste the salsa with a chip and add salt as needed. Store in the refrigerator. 

A She Makes and Bakes recipe.   
Picture
<<Previous

     Welcome!

    Cooking is fun and easy at high altitude, but baking can be frustrating. About 90% of my recipes work everywhere, but some are adjusted so us mountain dwellers can enjoy baked goods from scratch. I hope you find great recipes on here for your family, and I'll let you know if any are adjusted for high altitude. 

    Stay Updated!

    Add to your Reader:

    Get new posts delivered to your inbox:

    Enter your email address:

    Delivered by FeedBurner

    Categories

    All
    Appetizers
    Bars
    Beef
    Bread
    Breakfast
    Brownies
    Cake
    Cheese
    Chicken
    Chocolate
    Cinnamon
    Cookies
    Crackers
    Cupcakes
    Dessert
    Do It Yourself
    Drinks
    Fruit
    Ground Beef
    High Altitude
    How To
    Ice Cream
    Italian
    Main Courses
    Mexican
    Muffins
    Oatmeal
    Pasta
    Pastry
    Pie
    Pizza
    Pork
    Project Pastry Queen
    Pumpkin
    Salad
    Sauces
    Side Dishes
    Snacks
    Soup
    Sourdough
    Steak
    Vegetables

    My featured recipes on NoshOnIt

    Some Good Reads!

    Annie's Eats
    Bake at 350
    Climbing Grier Mountain
    Confections of a Foodie Bride
    How Sweet It Is
    I Am Baker
    Macaroni and Chesecake
    Pinch of Yum
    Pink Parsley
    Smells Like Home
    Smitten Kitchen
    Sunny Side Up
    The Curvy Carrot
    The Marvelous Misadventures of a Foodie
    The Pioneer Woman Cooks
All content copyright 2012-2013 She Makes and Bakes.