She Makes and Bakes
  • Home
  • About
  • Ramblings
  • Recipe Index
  • What We're Eating
  • High-Altitude Baking

Pesto Puffs

1/13/2013

 
Picture
What's in a name? Really these should be called pesto tomato mozzarella puff pastry bites, but that seemed just a bit too long. Pesto caprese puffs? Awesome appetizer? I dunno, but I do know they're pretty lovely. It's really hard to go wrong with puff pastry and pesto in my humble opinion. By the way, I love that spell check is freaking out over caprese but not dunno. Really? Ok spell check. Whatevs. Oops...there you go again.

I served these at my husband's 30th birthday party last summer, and I think they're great for a party because they don't have to be served hot. Sadly, the day of football playoff parties is over here in Denver. Ask me how fun it was standing through double overtime in single degree temperatures (with a windchill of negative 6) to have my team lose. My toes still are screaming at me. Anyway....if you're lucky enough to be attending or throwing a playoff party, I highly recommend these guys. They'll make you happy, even if your team is losing. Or loses in the last second. And for that big game in a couple of weeks that could have been ours, well I think I'll whip up a batch of these to console me. 
Picture
Pesto Puffs Recipe
Print this recipe

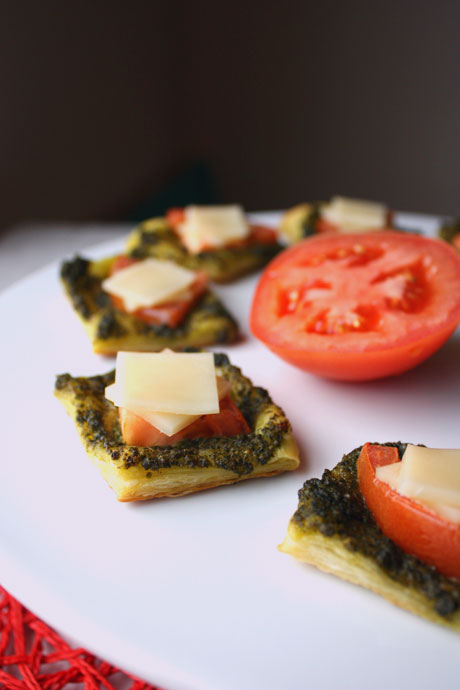
One sheet puff pastry, thawed
1/4 cup pesto
1 tomato, sliced
Mozzarella slices cut into 1-inch squares

Preheat your oven to 400 degrees.

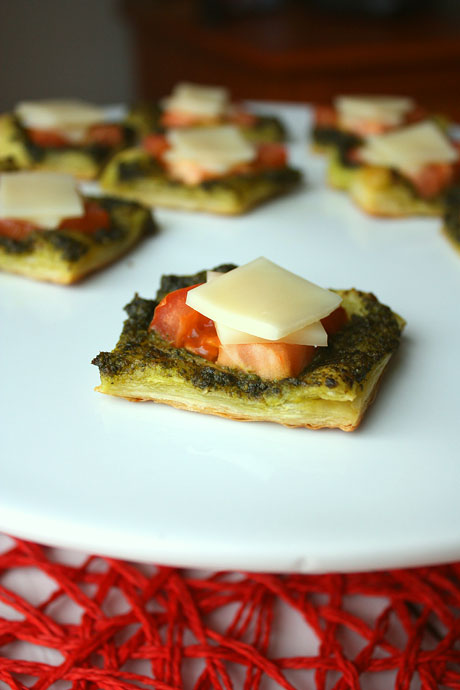
Unfold the puff pastry on your counter and spread the pesto on top (you may need more or less depending on your love for pesto). Cut into 3-inch squares and place 1-inch apart on a baking sheet covered with parchment paper or a silicone baking mat.

Cut the tomato slices into quarters and place a quarter on each square. Bake for 10-12 minutes or until the bottoms and edges are lightly browned. If you want warm, melty cheese, place the cheese on top of the tomatoes immediately. If you want to serve the puffs at room temperature, plate the puffs and then add the cheese after they've cooled. Refrigerate any leftovers.
Picture
You may also like:
Loading...

Cinnamon Sugar Palmiers

1/8/2013

 
Picture
The first time I was fortunate enough to try palmiers was when I took a pastry class. Oh. my. goodness. Hello buttery flaky pastry with cinnamon sugar. I love all things cinnamon sugar. A lot. And then you mix that with oodles of butter? I am so in. Big time.
Picture
My apologies to those of you who are on diets. Save this for when you are off of it. Please.

When I made these in my pastry class, we used homemade puff pastry. While I love the homemade kind, it takes some time to make it. Eventually I'll get to that and share it on here because it's not hard, just a touch time consuming.

Funny thing is that when I watch cooking shows, they pull out the store-bough puff pastry sheets, so it can't be that bad (although the homemade definitely tastes better).

Anyway, this recipe is just three ingredients. That's it. These French beauties will have you swooning. They're fancy enough for the best dinner party or brunch but they're perfect for a football game or a lazy Sunday in your PJs. So go, buy some puff pastry. You will thank me.
Picture
Cinnamon Sugar Palmiers Recipe
Print this recipe

1 sheet of puff pastry, thawed
1/2 cup sugar
1/2 teaspoon cinnamon

Preheat your oven to 400 degrees. Prepare a baking sheet with a silicone baking mat or parchment paper.

Mix together the cinnamon and sugar. Sprinkle about half of it on a clean counter. Unfold the puff pastry sheet on top of it. Sprinkle more cinnamon sugar on top of the pastry sheet and rub it in. Flip it over and make sure that the cinnamon sugar is rubbed into the whole pastry. Sprinkle any additional cinnamon sugar on the top.

Roll the left and right sides (long sides) in toward the middle, jelly roll style, until they meet (should look like the picture above but unbaked). Slice the rolled pastry into 1/2 inch slices and lay flat on the pan, leaving about 2 inches between the pieces.

Bake for 8-10 minutes until the edges are browned and middles are cooked. Let cool slightly before serving.
Picture
You may also like:
Loading...

Homemade Cinnamon Butter Braid

4/2/2012

 
Picture
Have you ever had a butter braid? I'm pretty sure you only can get them through school fundraisers, and they are good! They have a lot of different filling options, but my favorite is the cinnamon one. The problem is that I can only order them once a year (or less if I don't know anyone who has kids selling them), and then you have to store them in the freezer, which is prime real estate in my house. I don't think I've had one for a couple of years, and since I love making things homemade, I decided to try making them myself.

I searched and searched for a recipe for the thick, gooey cinnamon filling. I learned it's sometimes called bakers cinnamon filling, but I could not find a recipe. You can buy a mix from King Arthur's Flour, but that kind of goes against the making it homemade thing. Plus, I didn't want to wait for it in the mail. Therefore, I started experimenting. The first time I made these, I melted the butter, added the other ingredients, and patted it into the pastry. And then when I baked it, the filling ran out, it was really grainy, thin, and just not very good. I mean, it still was edible, but not something I wanted to share. So, back to the drawing board. Did I mention that I made two pastries with that filling, which I didn't want to throw away? Off for a run. The next time, I cooked the filling and this one was on the money. It's thick and gooey, and it stayed in the braid. Definite success.

I like to make my own puff pastry, but I figured most of you would be buying the sheets, so I went that route. Plus, let's be real--I was lazy. I bought the Pillsbury sheets in the freezer section. They come two to a box, and they're folded in thirds, which makes it very easy when you're spreading the filling and cutting the strips. I made this all in the morning, and it took about 30 minutes plus baking. I think you could assemble it at night, cover it with plastic wrap, and leave in the fridge overnight. Then in the morning, take it out while you preheat your oven, brush it with the egg wash, and then bake. If you do that, let me know how it turns out.
 
Here's some pictures to explain the cutting/folding process. It's already folded in thirds, so unfold it, and cut 1/2 inch strips diagonally on the sides. Also cut little slits in the fold creases at the top.
Picture
Pour your filling onto the middle section and fold the top and bottom over the filling.
Picture
With your first full strip, start folding over the middle, alternating between left and right. Fold tightly and be sure there are gaps. Gaps=places where the awesome filling can escape. Bad news.  
Picture
When you're finished folding, it should look like this:
Picture
Next you'll want to trim the wings off and seal (pinch) the edges. Try to press together any pastry pieces, especially at the top and bottom. Then it's ready for the egg wash and the oven.  
Picture
Cinnamon Butter Braid
Makes 2 braids
Print this recipe

1 package puff pastry sheets, thawed
3 tablespoons milk
For the filling:
1/2 cup butter
1 cup brown sugar, packed
2-3 tablespoons cream
1/8 teaspoon baking soda
1 tablespoon cinnamon
1 egg + 1 tablespoon water (egg wash)

For the icing:
1 cup powdered sugar
2 tablespoons milk
Dash cinnamon

Preheat oven to 400 degrees.

In a saucepan over medium high heat, melt the butter. Add in the brown sugar and whisk, bringing it up to a boil. Let it boil for about one minute, remove from heat, and whisk in the cream. Add the baking soda and cinnamon and whisk until combined.

Spread out your puff pastry sheets on parchment-paper-lined sheet trays. Brush with a few tablespoons of milk (this is supposed to help act as a glue to keep the filling in). On the outside sections, cut diagonal strips that are about 1/2 inch wide. Cut small slits on the creases at the top and bottom of the pastry. Spread half of the filling in the center of each pastry sheet, leaving room on the ends. Fold the top and bottom of the pastry over the filling, and start folding the strips over the filling, alternating between the left and right side. Make sure there are no gaps. Cut the wings off the corners and pinch to seal. Press any seams together to minimize filling leakage. 

Mix together egg and water and brush onto the top of the puff pastry. You could use the rest of the wash for scrambled eggs. Place the sheet tray in the oven, and bake for about 20 minutes until the top is browned.  

To make the icing, stir together the powdered sugar, milk, and cinnamon until smooth. Drizzle over baked pastry and serve.

A She Makes and Bakes original
Picture

     Welcome!

    Cooking is fun and easy at high altitude, but baking can be frustrating. About 90% of my recipes work everywhere, but some are adjusted so us mountain dwellers can enjoy baked goods from scratch. I hope you find great recipes on here for your family, and I'll let you know if any are adjusted for high altitude. 

    Stay Updated!

    Add to your Reader:

    Get new posts delivered to your inbox:

    Enter your email address:

    Delivered by FeedBurner

    Categories

    All
    Appetizers
    Bars
    Beef
    Bread
    Breakfast
    Brownies
    Cake
    Cheese
    Chicken
    Chocolate
    Cinnamon
    Cookies
    Crackers
    Cupcakes
    Dessert
    Do It Yourself
    Drinks
    Fruit
    Ground Beef
    High Altitude
    How To
    Ice Cream
    Italian
    Main Courses
    Mexican
    Muffins
    Oatmeal
    Pasta
    Pastry
    Pie
    Pizza
    Pork
    Project Pastry Queen
    Pumpkin
    Salad
    Sauces
    Side Dishes
    Snacks
    Soup
    Sourdough
    Steak
    Vegetables

    My featured recipes on NoshOnIt

    Some Good Reads!

    Annie's Eats
    Bake at 350
    Climbing Grier Mountain
    Confections of a Foodie Bride
    How Sweet It Is
    I Am Baker
    Macaroni and Chesecake
    Pinch of Yum
    Pink Parsley
    Smells Like Home
    Smitten Kitchen
    Sunny Side Up
    The Curvy Carrot
    The Marvelous Misadventures of a Foodie
    The Pioneer Woman Cooks
All content copyright 2012-2013 She Makes and Bakes.