She Makes and Bakes
  • Home
  • About
  • Ramblings
  • Recipe Index
  • What We're Eating
  • High-Altitude Baking

Buckeye Bars

2/26/2013

 
Picture
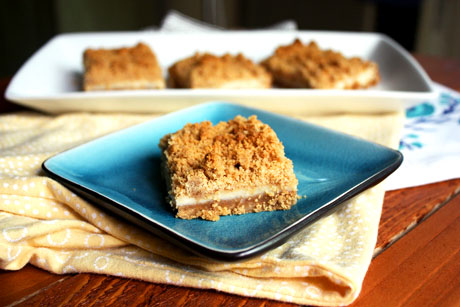
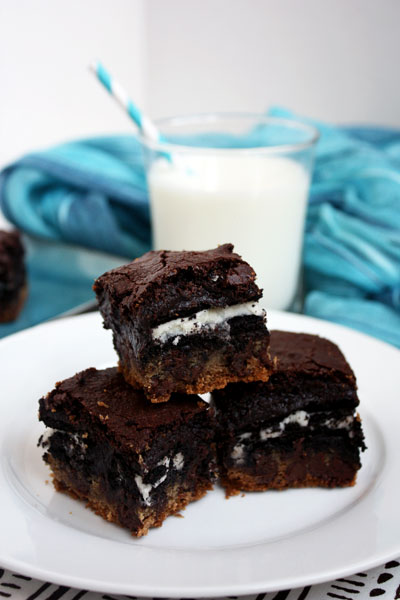
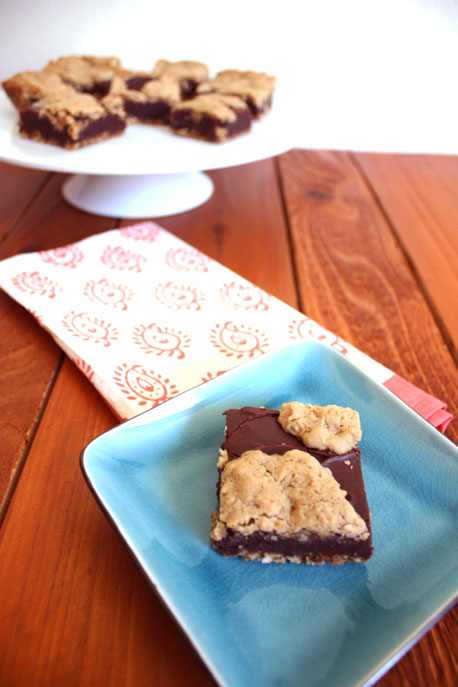
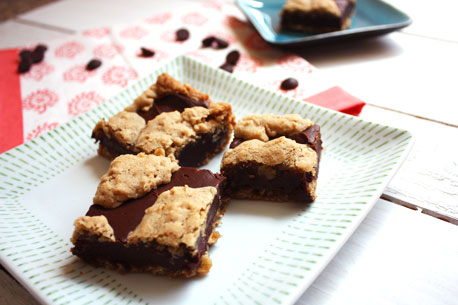
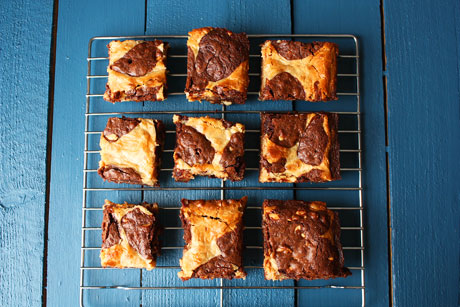
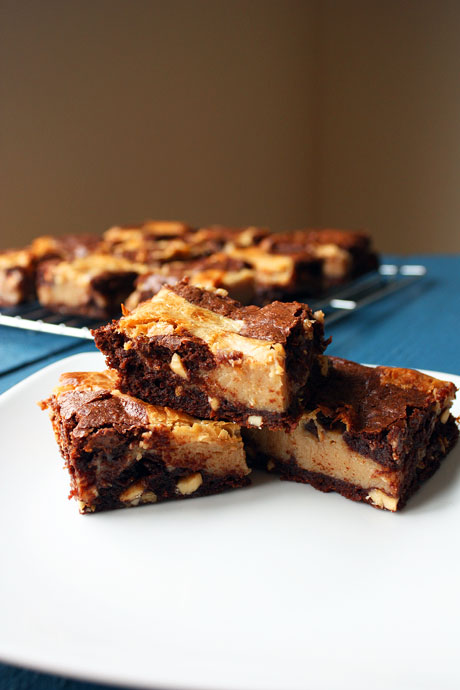
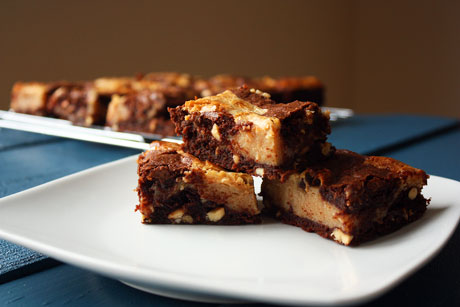
Chocolate and peanut butter. Is there any better combination? I don't think so...although I guess brownies and peanut butter is even better, right? I've had these in my back pocket for some time, and they're pretty stellar.

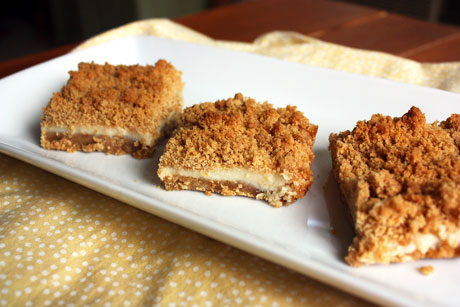
I had never heard of an edible Buckeye until I started dating my husband, who is an Ohio State Buckeye. An edible buckeye is a candy that has a soft peanut butter filling and is surrounded by chocolate (an inedible buckeye is a poisonous nut). It's awesome (the candy one of course). The only problem is that they can be a pain to roll and then dunk in the chocolate. So turning them into a bar is pure genius. I adore these buckeyes...and my buckeye.
Picture
Buckeye Bars Recipe
Makes a 9x9 pan
Print this recipe

1/2 cup butter
6 ounces bittersweet chocolate chips or coarsely chopped
3/4 cups sugar
2 eggs
1/2 tablespoon vanilla
1/2 cup + 2 tablespoons all-purpose flour
1/4 teaspoon salt
1/2 cup chopped peanuts (optional)

For the filling:
1/2 cup peanut butter
14 ounce can sweetened condensed milk

Preheat your oven to 350 degrees. Line a 9x9 pan with aluminum foil, leaving a few inches hanging over the sides (this foil will turn into handles to lift the brownies out of the pan later). Spray the foil generously with nonstick spray, paying special attention to the corners and sides.

In a large microwave-safe bowl, add the chocolate and butter. Microwave for 30-second intervals until melted and smooth, stirring in between. Add the sugar and vanilla into the bowl with the chocolate and whisk until incorporated. Add in the eggs and whisk until thick and glossy (about a minute). Stir in the flour and salt until just combined. Fold in the chopped peanuts if using.

Pour half of the batter into the prepared pan. Whisk together the peanut butter and sweetened condensed milk until smooth and spread over the brownie batter in the pan. Drop the remaining brownie batter on top of the peanut butter by spoonfuls. Bake for 35-40 minutes or until a toothpick comes out clean and the center is set. Let cool before serving.

Adapted from Better Homes and Gardens
Picture
You may also like:
Loading...

Strawberry Crumb Bars

2/10/2013

 
Picture
I don't know about you all, but I'm ready to start growing food in my garden. I've seen that some of you are lucky enough to do this, but in Colorado we can't plant anything outside until Mother's Day...three months away. Sigh. So until I can do that, I'm pretty excited about frozen fruit. I think it still has great flavor, and it's perfect in baked bars like these.

In fact, these bars are pretty perfect themselves. See that pan in the background? I took these to a Superbowl party last week. Nine adults devoured these during the game, and they were complaining about how they couldn't stay away from them. I don't make these very often because they are insanely addictive. The lovely crumb combined with the sweet but not-too-sweet strawberries along with a bit of almond extract in them just pushes them over the edge. I highly recommend you make these for your sweetie on Thursday. He or she will love you even more...and if you're worried about having a giant pan of these in the house tempting you, the recipe splits nicely in half and you can bake it in a 9x9 pan instead. I pretty much always have to do that modification because these go just a little too quickly at my house!
Picture
Strawberry Crumb Bars Recipe
Makes a 9x13 pan
Print this recipe

3 cups all purpose flour
1 1/2 cups sugar, divided
1 teaspoon baking powder
1/4 teaspoon salt
1/4 teaspoon cinnamon
1 cup shortening
2 eggs
1 teaspoon almond extract
1 tablespoon cornstarch
4 cups strawberries (fresh or frozen), cut in half

Preheat your oven to 375 degrees and grease a 9x13 baking dish.

In a large bowl, stir together the flour, 1 cup of the sugar, baking powder, salt, and cinnamon. Add in the shortening and mix with a pastry cutter, fork, or two knives until the mixture resembles coarse crumbs. Add the eggs and almond extract. Press 2/3 of the mixture into a greased 9x13 pan.

Note: If you're using frozen berries, don't thaw first.

In another bowl, combine the remaining 1/2 cup sugar and the cornstarch. Stir together. Add in the strawberries and gently stir until coated. Spoon these over the crust. Sprinkle the remaining crumbs over the strawberries. 

Bake for 40-50 minutes or until bubbly and golden brown. Remove from oven and let cool completely before serving.

Barely adapted from Taste of Home
Picture
You may also like:
Loading...

Lemon Graham Cracker Bars

9/23/2012

 
Picture
Whew! What a weekend. In two weeks, I'll be flying across the Atlantic Ocean for the second time this year to spend two weeks in France. I cannot wait to go to the Mecca of the food world (as far as I'm concerned), but I have a lot of things to do until then. Including getting a lot of blog posts done so you guys have something to read while I'm there. Anyway...

This is a perfect dessert when you're super busy but you want something really tasty. Think lemon pie with graham cracker crust in bar form that you can make in less than 15 minutes. I don't even like lemon and I really liked these bars. Plus, I think you could substitute key lime juice for the lemon juice and have key lime graham cracker bars. That sounds amazing...I'm off to try the variation!  

Lemon Graham Cracker Bars Recipe
Makes a 9x9 pan
Print this recipe

14 ounces sweetened condensed milk
1/2 cup lemon juice
1 1/2 cups graham cracker crumbs
3/4 cup all purpose flour
1/3 cup packed brown sugar
1/2 teaspoon baking powder
Pinch of salt
1/2 cup butter melted

Preheat your oven to 375 degrees.

In a small bowl, mix together the milk and lemon juice.

In a large bowl, combine together the graham cracker crumbs, flour, brown sugar, baking powder, and salt. Add the melted butter and stir until the mixture is wet and crumbly.

Press half of the graham cracker mixture into a greased 9x9 pan. Pour the lemon mixture over the crust, and scatter the remaining crumbs on top. Bake for 20-25 minutes until lightly browned. Cool before slicing. Store in fridge.  

Source: Taste of Home Fall Baking Cookbook
Picture

Apple Cinnamon Treats

9/12/2012

 
Picture
Even though I'm not excited about summer being over, I am excited about fall baking. Cinnamon is one of my favorite spices, and I love pumpkin and apples. So to start off the fall baking season, I decided to make something simple and classic...with a fall twist. I love rice krispies treats, so I decided to take the concept and spin it around a bit. I used apple cinnamon cheerios instead of rice krispies and added some more apples and cinnamon to beef up the flavors. I also did something new to the apples...I shredded them with my cheese grater and then squeezed the juice out of them. I wanted to apple flavor without all the moisture. Success. When I was cooking the treats, the hubs said it smelled like apple jacks. It tempted him so much that he had a treat after dinner...pretty unusual for him! These are such a great and quick dessert or snack to celebrate the start of fall...or mourn the end of summer if you're like me.

Apple Cinnamon Treats Recipe
Makes one 9x9 pan
Print this recipe

1 apple, peeled and cored
1 (10 ounce) bag of marshmallows
1/2 cup butter
1/2 teaspoon cinnamon
8 cups Apple Cinnamon Cheerios

Spray a 9x9 pan with cooking spray.

Shred your peeled and cored apple using the large holes on a cheese grater. Gather up your shredded apple and squeeze the juice out of it.

In a large saucepan over medium heat, combine the shredded apples, marshmallows, butter, and cinnamon. Stir until the marshmallows have completely melted. Add in the cereal in batches until incorporated. Spoon into the greased pan and use wet hands to push the cereal into place. Let cool completely before cutting into squares.
Picture

Slutty Brownies

7/17/2012

 
Picture
I'm not really sure why these are named slutty brownies...what I do know is that they. are. amazing. Are you ready for this? First it's a chocolate chip cookie followed by an Oreo topped by a fudgy brownie. Everything melds together, the Oreo becomes soft, and it's three distinct layers of deliciousness. Plus, they're cool to look at. I know these can't be good for you, so I'm sorry. But also, you're welcome because you'll love them. Just try to resist. 

I made a ginormous batch of these and took them to my company's picnic, and people seemed to really like them. They weren't all devoured because there was a lot of other food and desserts there, but they were gone within two days. Unless you're feeding a very big group of hungry dessert/chocolate lovers, I would stick with a normal batch (what's listed below). The 9x13 pan (which would be double the recipe) makes a lot, and they're really tall. It's slightly overwhelming. Either way, you should make these as soon as possible. Even if you just sit on your couch, watch some trashy tv, and eat a couple.

Slutty Brownies Recipe
Makes a 9x9 pan
Print this recipe

For the bottom cookie layer:
1/2 cup butter-flavored shortening
1/4 cup + 2 tablespoons sugar
1/4 cup + 2 tablespoons brown sugar
1 egg
1/2 tablespoon vanilla
1/2 teaspoon baking soda
1/2 teaspoon salt
1 cup all purpose flour
1 cup chocolate chips

For the top brownie layer:
10 tablespoons butter
1 1/4 cups sugar
3/4 cup cocoa powder (Dutch process gives it a fudgier flavor)
1/2 teaspoon salt
1 teaspoon vanilla
2 eggs
1/2 cup all purpose flour

16 Oreo cookies

Preheat your oven to 350 degrees, line a 9x9 pan with tin foil, and generously grease it (this will help when you want to pull the brownies out of the pan to cut into them).

To make the bottom cookie layer: In a mixer (or with a mixer), cream together your butter-flavored shortening and sugars until fluffy. Add the egg and mix until incorporated. Add the vanilla, baking soda, and salt and mix until combined. Add in the flour and stir until everything has come together. Fold in your chocolate chips. Press into the bottom of the greased pan.

Place the Oreo cookies on top of the cookie dough--no need to press them down or overlap.

To make the brownies: melt the butter in the microwave or on the stove. Once melted, whisk in the cocoa powder until combined. Add in the salt and vanilla and stir until combined. Add in the eggs and quickly whisk together. Stir in the flour until everything is incorporated. Pour the brownie batter on top of the Oreos, making sure it covers everything.

Bake in your preheated oven for 30-35 minutes or until a knife or toothpick comes out clean of brownie batter.

Let cool for a couple of hours before slicing.

Idea is from What's Gabby Cooking
Cookie recipe is from my boss
Brownie recipe is barely adapted from Mel's Kitchen Cafe
Picture
You may also like:
Loading...

PPQ: Blueberry Pie Bars

7/15/2012

 
Picture
This week's Project Pastry Queen was picked by Amanda of Homekeeping Adventures: Blackberry Pie Bars. I'm not a huge fan of blackberries so I was thinking about what kind of berries to put in them when I went into Sam's Club and saw two pounds of blueberries for $5. Sold! In true form of The Pastry Queen, these bars were delicious. Soft, buttery, and a little tangy from the sour cream. You could adapt these in a variety of ways...different berries, nuts, chocolate. I love the buttery crust on top and bottom, and I know that I'll be making these again since they are easy to make (much easier than pie). I think these would be great on a road trip or picnic when you want something sweet and portable. Be sure to check out the Project Pastry Queen website to see everyone's take on the recipe and check out Amanda's page for the recipe.
Picture

S'more Treats

7/5/2012

 
Picture
While I tend to be a purist, I've been wanting to make a variation on rice krispie treats for awhile. I remember being a kid and making rice krispie treats with my mom using a very simple recipe: 1 stick of butter, a bag of big marshmallows, and enough cereal to soak up the marshmallow goo. I was the stirrer, which became less fun the longer I had to stand there and stir. It was, however, a small penance to pay for those treats. I still love rice krispie treats, especially on car trips or when camping. I have a tendency to eat little pieces out of the pan until there are none left...they are one of my many weaknesses.

To make my variation, I decided to use Golden Grahams instead of the Rice Krispies, and then I debated for awhile about adding chocolate. I added it, and I'm so happy I did. These, my friends, taste like s'mores. And if you live somewhere like Colorado where there is a ban on all fires, fireworks, flames, and fun, these will get you the s'more fix without the open flame. (Not really a ban on fun, but it was a strange 4th of July with no fireworks booming.) These will take you about 15 minutes to make, you don't have to turn on your oven, and you can consume them just as quickly. As my friend said, they're rice krispie treats on steroids. Good luck not devouring them as soon as they cool (or even while they're still warm).

Speaking of Colorado and fire, there have been a lot of devastating, destructive wildfires in Colorado this year, and hundreds of homes have been lost. Erin of Dinner, Dishes, and Desserts is hosting a bake sale with the proceeds going to Colorado Disaster Relief. I'm contributing my snickerdoodle bars, and there are a lot of other items up for sale. It starts this Sunday, so head over to Dinners, Dishes, and Desserts to bid on the many items.

S'more Treats Recipe
Makes a 9x9 pan
Print this recipe

1/2 cup butter
1 (10 ounce) bag marshmallows
8 cups Golden Grahams cereal
1 cup chocolate chips

Grease a 9x9 square pan and set aside.

In a large saucepan, melt the butter and marshmallows over medium heat, stirring frequently, until smooth. Once melted and smooth, remove from heat and add half the cereal. Mix until combined, add the remaining cereal, and stir together. (If you like your bars to be more gooey, add less cereal. If you like them to be pretty dry/firm, add more cereal.) Add in the chocolate chips, quickly stir until incorporated, and dump into your greased pan. Using wet hands, press firmly into the pan and let cool before cutting into bars.
 
A She Makes and Bakes Recipe
Picture

Oatmeal Fudge Bars

6/25/2012

 
Picture
What's better than an oatmeal cookie and chocolate fudge together? Um, nothing. My friend, Adria, sent me this recipe over a year ago. In fact, it was closer to two years ago, and now I'm kicking myself that I haven't been enjoying these beauties that long. The funny thing is that what stopped me was that the instructions said to cook the fudge on the stovetop, and I was too lazy to do that. When I finally made them, I put all the fudge ingredients into a microwave-safe bowl, and melted them until smooth. Problem solved for this lazy bones. I still can't believe that's what stopped me. The girl who cooked and stirred 15 pounds of fudge last year during the holidays.  

These take a little bit of time because you have to make the cookie mixture and the fudge, but everything bakes at once, so it's not too bad. I also halved the recipe, which was a great idea for me (since on the day I made these, I also made salted caramel brownies and chocolate chip cookie dough ice cream sandwiches). If you're going to a BBQ this summer, bring these. Your friends will be thrilled.

Oatmeal Fudge Bars Recipe
Makes a 9x13 pan
Print this recipe

For the cookie bars:
1 cup butter
1 1/2 cup brown sugar
1/2 cup sugar
2 eggs
2 teaspoons vanilla
2 1/2 cups oats
2 1/4 cups all purpose flour
1 teaspoon baking soda
1 teaspoon salt
1/2 teaspoon cinnamon (optional)

For the fudge filling:
2 cups semisweet chocolate chips
14 ounces sweetened condensed milk
1 tablespoon butter
1/2 teaspoon salt
1 teaspoon vanilla

Preheat the oven to 325 degrees and grease a 9x13 pan.

In a stand mixer or using an electric mixer, cream together the butter and sugars. Add the eggs and vanilla and mix. Stir in the baking soda, salt, and cinnamon until combined. Mix in the flour until combined and the oats until combined. Press a little more than half of the mixture into the bottom of the pan.

In a saucepan, cook the chocolate chips, sweetened condensed milk, butter, salt, and vanilla over medium low heat until creamy (you also could do this in the microwave in 30-second intervals, stirring in between). Pour this mixture over the dough in the pan, but avoid pouring it near the edges. Flatten pieces of the remaining dough and put on top of the fudge. You'll want to leave windows for the fudge to peek through.

Bake for 25-30 minutes or until topping is light brown and fudge is set. Cool for 30 minutes and store at room temperature.
Picture

Strawberry Rhubarb Crumb Bars

6/6/2012

 
Picture
I breathed a large sigh of relief when I finished off the "on their way to being bad" strawberries by baking them into a cake. Whew. I'm done baking for a bit, I thought. The next day, my husband walked in with a pound of rhubarb from a friend. Naturally, I went out and bought more strawberries because I always think about strawberries when I see rhubarb. I think that rhubarb is pretty tart/sour, so the sweetness of strawberries pairs nicely with it.  

This is my favorite crumb bars recipe, and it's easily adaptable with whatever type of fruit you have on hand (Is rhubarb a fruit? I'm thinking it's a veggie.). Anyway, instead of using all strawberries in these bars like I usually do, I replaced half the amount with rhubarb. The almond in the dough really adds that extra punch that these need, and the bonus is you can have these in the oven in a few minutes. People will think you slaved all day in your kitchen. Usually I halve this recipe and make it in a 9x9 dish, but I had a lot of rhubarb to get through, and I still have more to use in the freezer. I'm thinking muffins next. 

Strawberry Rhubarb Crumb Bars Recipe
Makes a 9x13 pan
Print this recipe

3 cups all purpose flour
1 1/2 cups sugar, divided
1 teaspoon baking powder
1/4 teaspoon salt
1/4 teaspoon cinnamon
1 cup shortening
2 eggs
1 teaspoon almond extract
1 tablespoon cornstarch
2 cups strawberries, cut into pieces
2 cups rhubarb, cut into pieces

Preheat your oven to 375 degrees and grease a 9x13 baking dish.

In a large bowl, stir together the flour, 1 cup of the sugar, baking powder, salt, and cinnamon. Add in the shortening and mix with a pastry cutter, fork, or two knives until the mixture resembles coarse crumbs. Add the eggs and almond extract. Press 2/3 of the mixture into a greased 9x13 pan.

In another bowl, combine the remaining 1/2 cup sugar and the cornstarch. Stir together. Add in the strawberries and rhubarb and gently stir until coated. Spoon these over the crust. Sprinkle the remaining crumbs over the strawberries/rhubarb. 

Bake for 40-50 minutes or until bubbly and golden brown. Remove from oven and let cool completely before serving. 

Note: You can use frozen strawberries and/or rhubarb for this recipe, but do not thaw before using. 

Source: Barely adapted from Taste of Home 
Picture

Snickerdoodle Bars

4/12/2012

 
Picture
It's rare that I see a new recipe and make it the same day, but I had to try this as soon as I could get into the kitchen. This recipe came through my email in the morning, and when I saw it, I knew. Sure enough, I made it that night, and it lived up to every expectation I had. If you love snickerdoodles, cinnamon, or soft and chewy cookies, you will be in love with these bars. I know that I say that everything is good, but these really truly are. I could have eaten the whole pan and still wanted to bake and eat another batch.

I think I had three bars the night I made them, three the next day, and then I had to get them out of the house. I could not stop eating them. Everyone who tried them also had at least two each. They are that good. I would say that the bars would still be excellent without the icing, so if you know you have zero self control, you might want to skip the icing. I don't think it adds that much to the bars. I know one tablespoon of cinnamon seems like a lot, but I wouldn't skimp. It's perfect as is. These are an amazing weekend treat if you're having a get together or if you want to practice your self control...or lack thereof. Have I convinced you? Get to the kitchen and start baking! PS, these are really easy to make, too!

Snickerdoodle Bars
Print this recipe
Makes a 9x13 pan
2 1/3 cup all-purpose flour
1 1/4 teaspoon baking powder
1/2 teaspoon salt
3/4 cup butter, softened
1 1/4 cup sugar
1/2 cup brown sugar, packed
3 eggs
1 teaspoon vanilla

For the Cinnamon Filling
1 tablespoon sugar
1 tablespoon cinnamon

For the Icing (optional)
1 cup powdered sugar
1-2 tablespoons milk
1/4 teaspoon vanilla

Preheat oven to 350 degrees and spray the bottom of a 9x13 pan with cooking spray.

In a bowl, combine the flour, baking powder, and salt. Set aside. Using an electric mixer, cream together the butter and sugars. Beat in eggs one at a time until combined and add vanilla. Slowly add in dry ingredients and mix until incorporated.

Spoon half of the mixture in the pan and spread evenly. Sprinkle the cinnamon sugar over the dough. Drop teaspoon size amounts of remaining dough on top of the cinnamon sugar. Bake for 20-25 minutes until golden brown and a toothpick inserted in the center comes out clean. Cool completely, about 1 hour.

To make the icing, stir the ingredients together until combined. Drizzle on top of the bars.

Source: Betty Crocker

     Welcome!

    Cooking is fun and easy at high altitude, but baking can be frustrating. About 90% of my recipes work everywhere, but some are adjusted so us mountain dwellers can enjoy baked goods from scratch. I hope you find great recipes on here for your family, and I'll let you know if any are adjusted for high altitude. 

    Stay Updated!

    Add to your Reader:

    Get new posts delivered to your inbox:

    Enter your email address:

    Delivered by FeedBurner

    Categories

    All
    Appetizers
    Bars
    Beef
    Bread
    Breakfast
    Brownies
    Cake
    Cheese
    Chicken
    Chocolate
    Cinnamon
    Cookies
    Crackers
    Cupcakes
    Dessert
    Do It Yourself
    Drinks
    Fruit
    Ground Beef
    High Altitude
    How To
    Ice Cream
    Italian
    Main Courses
    Mexican
    Muffins
    Oatmeal
    Pasta
    Pastry
    Pie
    Pizza
    Pork
    Project Pastry Queen
    Pumpkin
    Salad
    Sauces
    Side Dishes
    Snacks
    Soup
    Sourdough
    Steak
    Vegetables

    My featured recipes on NoshOnIt

    Some Good Reads!

    Annie's Eats
    Bake at 350
    Climbing Grier Mountain
    Confections of a Foodie Bride
    How Sweet It Is
    I Am Baker
    Macaroni and Chesecake
    Pinch of Yum
    Pink Parsley
    Smells Like Home
    Smitten Kitchen
    Sunny Side Up
    The Curvy Carrot
    The Marvelous Misadventures of a Foodie
    The Pioneer Woman Cooks
All content copyright 2012-2013 She Makes and Bakes.