She Makes and Bakes
  • Home
  • About
  • Ramblings
  • Recipe Index
  • What We're Eating
  • High-Altitude Baking

Hummingbird Cupcakes

3/17/2013

 
Picture
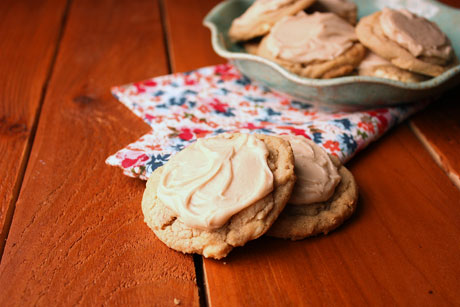
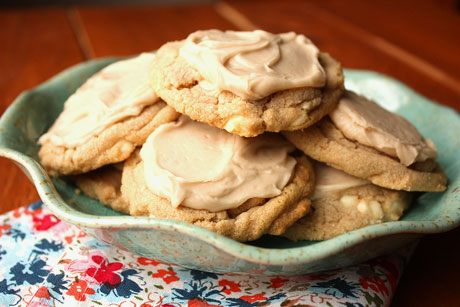
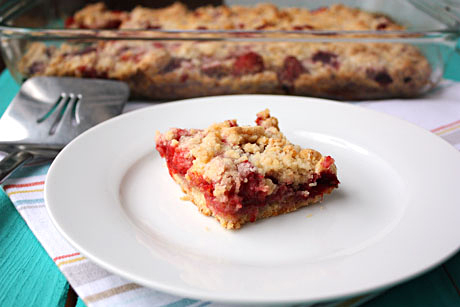
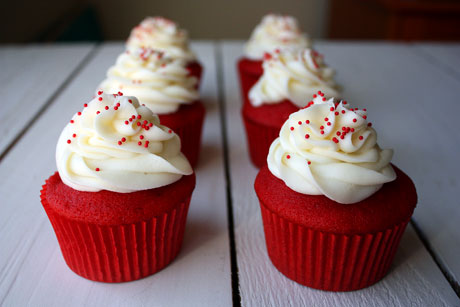
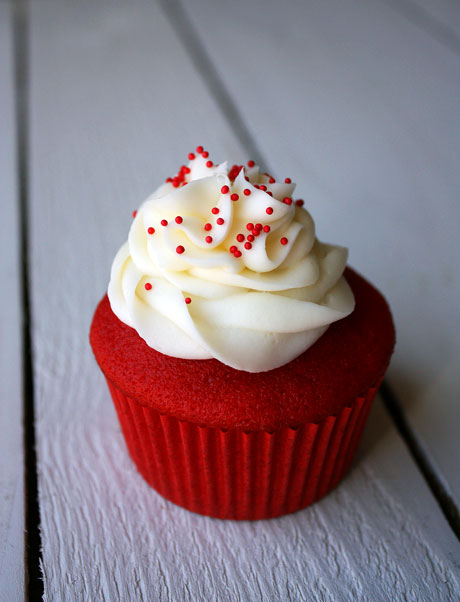
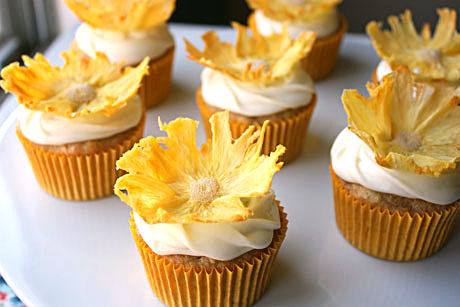
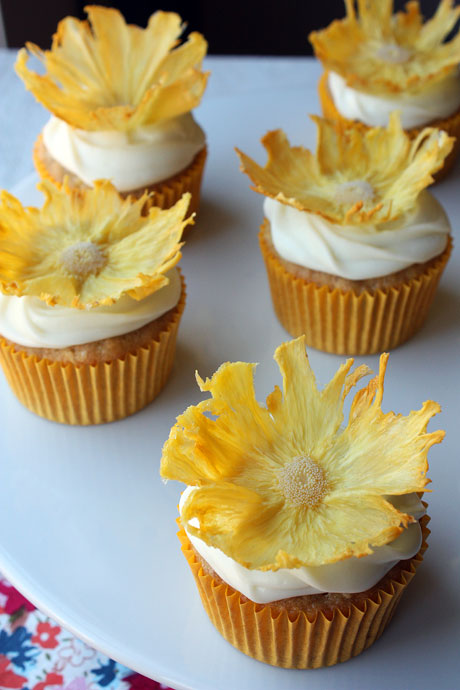
I had never heard of hummingbird cake until I saw a post on Annie's Eats a couple of years ago, and I was mainly intrigued by the beautiful pineapple flowers. Apparently, hummingbird cake is a very southern thing, which explains why I had never heard of it or tried it. Think banana nut bread meets coconut and pineapple. Sold yet? Surprisingly, I am. I am not a fan of either coconut or pineapple, but these are pretty dang good. I've made them a few times now, and everyone loves them. They have a great crumb, moisture factor, and texture. 

I like to pair these with a marshmallow cream cheese (amazing!) and when you top them with the pineapple flower, you can't go wrong. They're pretty and tasty. And, you can make them without a mixer. In one bowl. I love recipes like that. The other bonus is that this recipe works perfectly for me at high altitude. No adjustments needed!

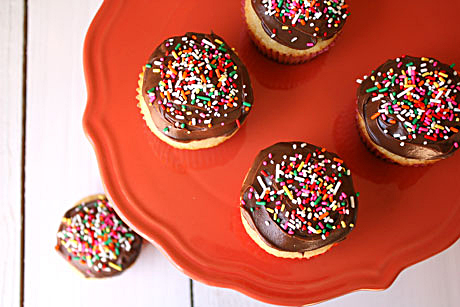
Wondering about those pineapple flowers? The tutorial is coming this week! If you don't have the time or desire to make the flowers, these cupcakes are fantastic without them.

Hummingbird Cupcakes Recipe
Makes 24 cupcakes
Print this recipe

For the cupcakes:
12 tablespoons butter, melted and cooled
1 1/3 cups sugar
2 teaspoons vanilla
2 eggs
1 1/3 cups mashed ripe bananas
1/2 teaspoon baking soda
3/4 teaspoon salt
1/2 teaspoon cinnamon
2 cups all purpose flour
2/3 cup crushed pineapple, drained
2/3 cup walnuts, chopped (optional)
2/3 cup shredded coconut

For the frosting:
8 ounces cream cheese, softened
1/2 cup butter, softened
1 cup melted marshmallows or marshmallow cream
1 pound powdered sugar

Preheat your oven to 350 degrees and place cupcake liners in your muffin tins.

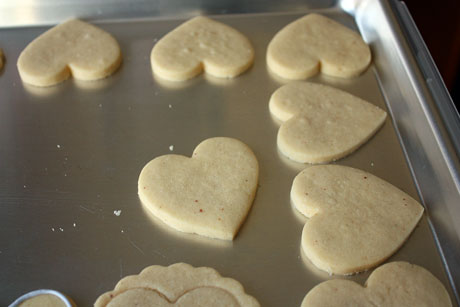
To make the cupcakes, in a large bowl combine the butter, sugar and vanilla and whisk until combined. Whisk in the eggs. Once incorporated, add in the mashed bananas and whisk in. Mix in the baking soda, salt, and cinnamon until combined. Whisk in the flour. With a rubber spatula, fold in the crushed pineapple, nuts (if using), and coconut. Once combined, fill the cupcake liners about 3/4 full (or about 1/4 cup of batter).

Bake for 20-22 minutes or until a toothpick comes out clean. Let them cool in the pans for 5-10 minutes and then remove to a wire rack to cool completely.

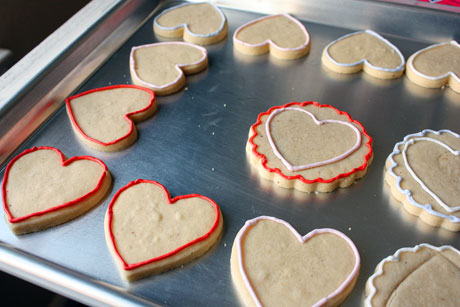
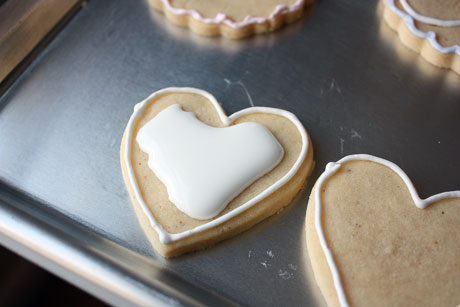
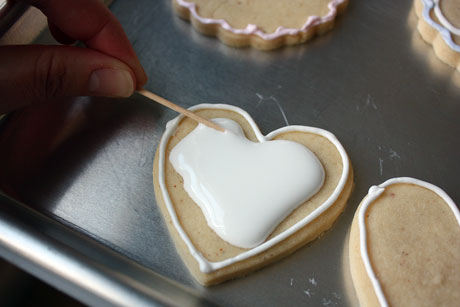
While the cupcakes are cooling, make the frosting. In a mixing bowl, cream together the cream cheese and butter. Add in the melted marshmallows or marshmallow cream until combined. Mix in the powdered sugar and mix until smooth and creamy. Pipe on top of the cupcakes. Add a pineapple flower on top (if using).

Cupcakes barely adapted from Annie's Eats, originally from Martha Stewart's Cupcakes
Frosting fromPaula Deen
Picture
You may also like:
Loading...

Guinness Brownies

3/10/2013

 
Picture
Last June, my husband and I were lucky enough to visit Ireland. Let me just say that if you ever have the opportunity to go, I highly recommend it. Not only is it a beautiful country, but the Irish are some of the nicest people I've ever met. Ever. For example, a taxi driver let us borrow his GPS for a week. The first week when we were in Dublin, he took my husband back and forth from our hotel to various golf courses. So he kind of knew us, but not that well. Certainly not well enough to offer us a fairly expensive electronic. Everyone was so nice and kind and helpful. I plan to go back, and one of the main reasons is because of the people.

The food, unfortunately, is not all that incredible. Irish breakfasts leave a lot of be desired. Every hotel we stayed at had the same breakfast, and by the end of our two weeks we just couldn't choke it down anymore (blood sausage anyone?). I had brought some homemade granola bars and crackers, and we would snack on those instead. Also, I learned that the land of potatoes equals the land of french fries. We got fries with everything. One day I was eating lunch by myself near the prison in Dublin (a tourist attraction by the way), and I ordered a piece of pizza at an Italian restaurant. When they brought it to my table, I was shocked to see it was half of an 8-inch pizza with a side salad and french fries. Mmmkay. I also learned that I am in no way a fan of Irish soda bread. You definitely won't see that recipe on here.

When we were in Dublin, we made our way to the Guinness factory (of course). We both were excited to do the tour, but my husband was about 1000 times more excited that I was. I'm not a big Guinness fan, but he loves it (even more so now). Since we went to the tour during my lunch break, I made sure to have some of their food, too. And one of the things I ordered was a Guinness brownie. Holy crap. I could not even eat the entire brownie because it was so rich. This.never.happens. I love rich brownies. This brownie was incredible. I can't say that my version is like theirs because I sadly don't remember fully. However, my version is pretty dang good. It is rich, it's extremely fudgy, and it has a faint taste of Guinness. You can taste it, but it's not overwhelming. And it's great, even if you aren't Guinness obsessed. So, make these brownies and celebrate your inner Irish until you can get over there!    
Picture
Guinness Brownies Recipe
Makes a 9x9 pan
Print this recipe

6 ounces dark chocolate, chopped
1/2 cup butter
1/2 teaspoon instant espresso powder
3/4 cup sugar
1/4 cup brown sugar, packed
6 tablespoons Guinness
1 egg
1 teaspoon vanilla
1/2 teaspoon salt
1/2 cup plus 2 tablespoons flour

Preheat the oven to 350 degrees. Line a 9x9 pan with aluminum foil and grease it really well with cooking spray.

Combine the chocolate, butter, and espresso powder in a large microwave-safe bowl and melt in 30 second intervals, stirring in between. When it is melted, whisk in the sugars. Then whisk in the Guinness. Stir in the egg and vanilla until just incorporated. Whisk in the salt. Use a rubber spatula to fold in the flour until just combined. Pour the batter into your prepared pan and smooth the top.

Bake for 20-25 minutes until a toothpick inserted in the center comes out with a few crumbs sticking to it. Let cool completely in the pan before serving.

Adapted from Baked
You may also like:
Loading...

Basket of Berries Cake

3/5/2013

 
Picture
I heard an extremely exciting piece of information on the news this morning...it's daylight savings on Sunday! I'm pretty sure this is the one day a year that I look forward to the most. Is that strange? And it wasn't just when I became a food blogger and needed more daylight. I've always been really excited about this day in March (or April, like when I was a kid). I've just always hated the dark I suppose. I'm sure we could psychoanalyze that one, but let's move on. 

The other amazing thing about daylight savings is that it means spring is here. Well, to me, at least. Spring is my second favorite season because things start to grow and turn green and it's pretty and warm and just lovely. Can you guess what my least favorite season is then? (brown=death=yuck.) Anyway, we made this cake for Valentine's day, but I love it for this time of year. It's fun, cheerful, and bright. It's spring in a cake.

Normally I do this cake as chocolate with chocolate frosting and regular Kit Kats. However, the client wanted it to be white and pink. So we found these cookies and cream Kit Kat bars at Cost Plus and made it a vanilla cake with pink buttercream. You can do whatever you want--I've even made this cake in a heart pan. Pictured is an 8-inch cake, but I highly recommend you do a 9-inch, two-layer cake instead. The cake layers were too tall for the Kit Kats, so we had to pipe a row of pearls on the bottom to fill in the space. It's pretty, but if you're looking to avoid any piping details, go with the niner. (Did I hear a niner in there? Were you calling from a walkie talkie?)

I love baking from scratch, but use your favorite cake recipe (or box cake mix). Here are my favorite vanilla and chocolate cake recipes, adapted for high altitude. Here are my favorite vanilla buttercream and chocolate frosting recipes, too. 

Basket of Berries Cake Recipe
Print this recipe

Two 9-inch round cake layers
Frosting
12 Kit Kat candy bars (1.5 ounces each)
2 pounds fresh strawberries, halved
1 pint fresh raspberries
1 pint fresh blackberries or blueberries
2 tablespoons apricot preserves

Place your first baked and cooled cake down on the plate or cake board. If it is domed, slice off the dome part so it's flat (do this on both cakes). Spread frosting over the first layer. Place the second layer on top of the frosting and press down lightly. Spread frosting over the cake, making sure the sides and top are completely covered. You don't have to worry about it looking perfect because the candy bars and fruit will cover it up.

Unwrap the candy bars and use a knife to separate the bars from each other (instead of snapping them). Place the candy bars side by side around the cake. It will look more like a basket if you stick the side with the writing to the cake, but we didn't do that because we wanted the white side to show.

Arrange the fruit on top of the cake and pile it on. Warm the apricot preserves and brush it on top of the fruit to give it a shine. If desired, wrap a ribbon around the cake. Store in the fridge, but bring it up to room temperature before serving.

Idea from Taste of Home
You may also like:
Loading...

Buckeye Bars

2/26/2013

 
Picture
Chocolate and peanut butter. Is there any better combination? I don't think so...although I guess brownies and peanut butter is even better, right? I've had these in my back pocket for some time, and they're pretty stellar.

I had never heard of an edible Buckeye until I started dating my husband, who is an Ohio State Buckeye. An edible buckeye is a candy that has a soft peanut butter filling and is surrounded by chocolate (an inedible buckeye is a poisonous nut). It's awesome (the candy one of course). The only problem is that they can be a pain to roll and then dunk in the chocolate. So turning them into a bar is pure genius. I adore these buckeyes...and my buckeye.
Picture
Buckeye Bars Recipe
Makes a 9x9 pan
Print this recipe

1/2 cup butter
6 ounces bittersweet chocolate chips or coarsely chopped
3/4 cups sugar
2 eggs
1/2 tablespoon vanilla
1/2 cup + 2 tablespoons all-purpose flour
1/4 teaspoon salt
1/2 cup chopped peanuts (optional)

For the filling:
1/2 cup peanut butter
14 ounce can sweetened condensed milk

Preheat your oven to 350 degrees. Line a 9x9 pan with aluminum foil, leaving a few inches hanging over the sides (this foil will turn into handles to lift the brownies out of the pan later). Spray the foil generously with nonstick spray, paying special attention to the corners and sides.

In a large microwave-safe bowl, add the chocolate and butter. Microwave for 30-second intervals until melted and smooth, stirring in between. Add the sugar and vanilla into the bowl with the chocolate and whisk until incorporated. Add in the eggs and whisk until thick and glossy (about a minute). Stir in the flour and salt until just combined. Fold in the chopped peanuts if using.

Pour half of the batter into the prepared pan. Whisk together the peanut butter and sweetened condensed milk until smooth and spread over the brownie batter in the pan. Drop the remaining brownie batter on top of the peanut butter by spoonfuls. Bake for 35-40 minutes or until a toothpick comes out clean and the center is set. Let cool before serving.

Adapted from Better Homes and Gardens
Picture
You may also like:
Loading...

The Best Chocolate Frosting

2/24/2013

 
Picture
For years I have been searching for the best chocolate frosting recipe. Essentially I wanted something that looked like the chocolate frosting you can get in the can but it needed to taste better (although I loved that frosting when I was a kid). I wanted it to be dark in color and super chocolatey. I wanted it to not taste like sour cream (like many of them do). I wanted it to taste like canned chocolate frosting...but not.

And then I finally found it. Well actually I found it months and months ago but I never tried it until a few weeks ago. And then I kicked myself for not trying it sooner. I do this a lot unfortunately. The secret ingredient is Ovaltine. I realize this is pretty unorthodox, but it totally works.

I could happily eat this frosting with a spoon. If you're looking for the perfect chocolate frosting, look no further. You've found it.

By the way, a year ago I started this little blog on a day when I had nothing to do at my office. Here I am a year later, laid off from that job, but happily running a bakery and living my dream. I love all of you guys. It's so much fun to do this; read your comments; feel your love on Facebook, Twitter, Instagram, and Pinterest; and stalk my stats on Google Analytics to see how many people are reading and what you guys are checking out! I'm addicted, and I love it! Thanks for everything! You are the best!  
Picture
The Best Chocolate Frosting Recipe
Makes enough for one 8-inch or 9-inch cake or 24 cupcakes
Print this recipe

Note: You can make this in a stand mixer, food processor, or with a hand mixer.

12 tablespoons butter, room temperature
1/2 cup unsweetened cocoa (use Dutch Process if you have it)
1/2 teaspoon salt
2 1/2-3 cups powdered sugar
2 tablespoons milk
2 teaspoons vanilla
Scant 1/2 cup heavy cream
1/3 cup rich chocolate Ovaltine powder

In a mixer or food processor, cream together the butter, cocoa, and salt until well combined. Scrape down the sides of the bowl and add in 2 1/2 cups of the powdered sugar, milk, and vanilla and mix until smooth.

In a separate bowl, whisk the Ovaltine into the cream and then add that into the mixing bowl while it's running on low. Blend until well combined and smooth. If it's grainy, mix longer or put in the fridge and let it firm up a bit and then remix. Add up to another 1/2 cup powdered sugar if needed.

From Confections of a Foodie Bride who adapted it from the Joy the Baker cookbook
Picture
You may also like:
Loading...

Vanilla Maple Cookies

2/17/2013

 
Picture
While I realize that late February doesn't exactly scream maple to most people, I just needed to share these cookies. They are a dream. Can I share a secret with you all real quick? I used to hate maple. I'm not really sure why, but I loved it as a kid and then I stopped loving it. I though that it smelled disgusting and the thought of putting it on anything made me queasy. And I wasn't even pregnant.

However, one day I was watching an awful reality show on VH1 with models as the contestants. The funny thing about it was that if they answered the trivia questions wrong, they had to eat something that they'd never dream of eating. Ever. One of the "punishment" foods was pancakes with maple syrup. The model about had a heart attack at the prospect of having to eat all those carbs and sugar and butter, oh my! That was the first time in years where I could stomach the thought of maple syrup. I have no idea how that awful show brought me back to the maple love, but I'm thankful I was watching it that morning!

These cookies have just a hint of maple in the cookie and the frosting, which plays well with the vanilla flavor, especially from the white vanilla chips. These cookies are a bit on the sweet side with that frosting, but they're definitely worth it! Soft, chewy, and a great little dessert. Although I'm sure models would say otherwise!

Vanilla Maple Cookies Recipe
Print this recipe

For the cookies:
1 cup shortening
1/2 cup butter, softened
2 cups brown sugar, packed
2 eggs
1 teaspoon vanilla
1 teaspoon maple flavoring/extract
3 cups all purpose flour
2 teaspoons baking soda
2 cups white baking chips

For the frosting:
1/4 cup butter, softened
4 cups powdered sugar
1 teaspoons maple flavoring/extract
4-6 tablespoons milk

Preheat your oven to 350 degrees.

In the bowl of your mixer, cream together the shortening, butter, and brown sugar until light and fluffy. Add in the eggs one at a time, scraping down the side of the bowl as needed. Mix in the vanilla, maple flavoring, and baking soda. Once incorporated, add in the flour until just combined. Fold in the baking chips.

Roll into one-inch balls and place on an ungreased cookie sheet 2 inches apart from each other. Bake for 8-10 minutes or until they just start to turn brown and remove from the oven. Let them sit on the baking sheet for two minutes and then remove to a flat surface to cool.

While the cookies are cooling, make the frosting. Cream together the butter and powdered sugar. Add in the maple flavoring and then the milk a little bit at a time until it's a good consistency for spreading. Be careful you don't add too much or it won't harden. Mix until smooth and spread on top of the cooled cookies. Let dry for a few hours to harden the frosting before packaging in an air-tight container or plastic bag with wax paper in between the layers of cookies.

Source: Barely adapted from Taste of Home
Picture
You may also like:
Loading...

Heart Sugar Cookies

2/12/2013

 
Picture
Happy Valentine's Day (almost)! Are you ready? If not, may I suggest these adorable sugar cookies? I've never really decorated sugar cookies up until a couple of years ago, and I've definitely gotten better with practice. Lots and lots of practice! I even think they're pretty fun now, which completely surprises me.

These are great for teachers, kids, and the people you love...or like...or even just tolerate. Even better is that they taste good! Let's look at how to do this.
Picture
You'll need a batch of royal icing, split into the colors you want. You'll want to keep some of it in bags and flood the rest and place it in squeeze bottles. See how to do that here. I prefer to use a number 3 tip to outline the cookies and a number 2 tip to draw any details on after they dry.
Picture
You'll also need cookies. I did hearts and then scalloped circles. When the scalloped circles came out of the oven, I lightly pressed the heart cutter into the circles so I could outline it easier (instead of drawing it by hand).
Picture
Outline the cookies using the icing from the bags and let them rest for about 20 minutes or so.
Picture
Next you want to flood the cookie with icing from the squeeze bottle.
Picture
Then move it to the sides using a toothpick. Once the cookie is flooded, you can add details to it right away using the flooded icing (like polka dots or hearts) or let it sit for several hours and pipe details on top later.
Picture
To make the polka dots, right after you flood the cookie drop small amounts of another color icing on top using the squeeze bottles. It would have been helpful if I had darker colors...
Picture
To make hearts, place a toothpick at the top (or side of) of each polka dot and drag it through the dot and subsequent dots without picking up the toothpick. It will make a heart. Let these cookies dry overnight before packaging. 
Picture
To pipe details on top of the cookies, wait until they dry for at least a few hours and then pipe details on top. Let them dry overnight before packaging.

Sugar Cookie Recipe
Makes about 40 cookies
Print this recipe

1 cup butter
1 cup powdered sugar
1 egg
2 teaspoons vanilla
3/4 teaspoon salt
1/2 teaspoon nutmeg
2 1/2 cups all purpose flour

In the bowl of an electric mixer, cream together the butter and powdered sugar until combined. Add in the egg and mix, scraping down the sides of the bowl. Add the vanilla, salt, and nutmeg and mix until incorporated. Add in the flour and mix until combined. Place the dough in plastic wrap and chill until firm.

Preheat your oven to 375 degrees.

Roll the dough out to 1/4 inch thickness on a floured counter. Cut with cookie cutters and place on a greased cookie sheet. It is helpful to freeze the cookies for 8-10 minutes before baking as they will hold their shape better. Bake for 8-10 minutes; the cookies will not brown. Remove from the pan and let cool completely before decorating.

Royal Icing Recipe

4 tablespoons meringue powder
Scant 1/2 cup water
1 pound powdered sugar, sifted
1/2-1 tablespoon corn syrup
Few drops of clear extract (I use clear vanilla)

Place the meringue powder and water in the bowl of your stand mixer. Use the paddle attachment to beat it until it's combined and foamy. Add in the sifted powdered sugar and beat on low until combined. Add in the corn syrup and extract and beat on high until the icing is thick and glossy. It should have stiff peaks. Divide the icing into bowls to tint, and make sure to keep it covered.

Cookies adapted from Annie's Eats
Icing recipe from Bake at 350
Picture
You may also like:
Loading...

Chocolate Chip Cookie Dough Truffles

2/11/2013

 
Picture
Have you experienced these beauties yet? If you are a lover of chocolate chip cookie dough, then you will adore these. Eggless chocolate chip cookie dough is covered in chocolate, making the most amazing treat. I love to make a big batch of these and keep them in my freezer. On a day when I need a pick-me-up (read everyday), I just let it thaw for a few minutes and then take a wonderful bite. It's pure bliss.

I have a feeling I'm going to need one or two of these tomorrow. The hubs is sick and has an injured back, which means that he's snoring at night. Which means that I'm not sleeping. Normally I'd push him and tell him to roll over, but with his back, he can't. And if I do, then I feel like a big jerk. A huge jerk. So I sigh and try to sleep but wake up feeling exhausted. Here's hoping that everything gets better quickly, but if not, it's nice knowing I can pop a truffle in my mouth when I need that burst of energy at 3 in the afternoon. Yes, I know that it's not exactly good for you, but it's saved me the last few days!

Chocolate Chip Cookie Dough Truffles Recipe
Print this recipe

8 tablespoons butter, softened
3/4 cup brown sugar, packed
2 1/4 cups all purpose flour
14 ounce can sweetened condensed milk
1 teaspoon vanilla
1/2 cup mini chocolate chips
1 1/2 pound semisweet or bittersweet chocolate, chopped
Mini chocolate chips for garnish

In the bowl of a mixer, cream the butter and sugar until light and fluffy. Mix in the flour, sweetened condensed milk, and vanilla until fully incorporated. Add in the mini chocolate chips until combined, cover with plastic wrap, and chill in the fridge until firm enough to form balls.

Once chilled, form the dough into one-inch balls. Place on a piece of wax paper on a cookie sheet and chill in the freezer for 1-2 hours (or longer if needed).

When you're ready to dip the balls, melt the chocolate in the microwave in 30 second intervals, stirring in between. Once melted, use a fork to dip the ball into the chocolate. Tap gently against the side of the bowl and then flip the ball over so that the side touching the fork is on top. Add a little more chocolate if needed on the top to smooth it. Drop some mini chocolate chips on top if using for garnish. Store in the fridge or freezer.

Tips: If the chocolate cools too much, it won't cover the truffles as smoothly. If that happens, you can warm up the chocolate again.

To avoid fingerprints on these, use rubber gloves when handling.

Source: Annie's Eats
Picture
You may also like:
Loading...

Strawberry Crumb Bars

2/10/2013

 
Picture
I don't know about you all, but I'm ready to start growing food in my garden. I've seen that some of you are lucky enough to do this, but in Colorado we can't plant anything outside until Mother's Day...three months away. Sigh. So until I can do that, I'm pretty excited about frozen fruit. I think it still has great flavor, and it's perfect in baked bars like these.

In fact, these bars are pretty perfect themselves. See that pan in the background? I took these to a Superbowl party last week. Nine adults devoured these during the game, and they were complaining about how they couldn't stay away from them. I don't make these very often because they are insanely addictive. The lovely crumb combined with the sweet but not-too-sweet strawberries along with a bit of almond extract in them just pushes them over the edge. I highly recommend you make these for your sweetie on Thursday. He or she will love you even more...and if you're worried about having a giant pan of these in the house tempting you, the recipe splits nicely in half and you can bake it in a 9x9 pan instead. I pretty much always have to do that modification because these go just a little too quickly at my house!
Picture
Strawberry Crumb Bars Recipe
Makes a 9x13 pan
Print this recipe

3 cups all purpose flour
1 1/2 cups sugar, divided
1 teaspoon baking powder
1/4 teaspoon salt
1/4 teaspoon cinnamon
1 cup shortening
2 eggs
1 teaspoon almond extract
1 tablespoon cornstarch
4 cups strawberries (fresh or frozen), cut in half

Preheat your oven to 375 degrees and grease a 9x13 baking dish.

In a large bowl, stir together the flour, 1 cup of the sugar, baking powder, salt, and cinnamon. Add in the shortening and mix with a pastry cutter, fork, or two knives until the mixture resembles coarse crumbs. Add the eggs and almond extract. Press 2/3 of the mixture into a greased 9x13 pan.

Note: If you're using frozen berries, don't thaw first.

In another bowl, combine the remaining 1/2 cup sugar and the cornstarch. Stir together. Add in the strawberries and gently stir until coated. Spoon these over the crust. Sprinkle the remaining crumbs over the strawberries. 

Bake for 40-50 minutes or until bubbly and golden brown. Remove from oven and let cool completely before serving.

Barely adapted from Taste of Home
Picture
You may also like:
Loading...

Red Velvet Cupcakes

2/7/2013

 
Picture
It's the time of year for every food blogger to post something red velvet, so I figured I had better jump on the wagon. The L-O-V-E holiday is coming up in less than a week, and if you haven't made one of these, it's about time! What's the deal with red velvet you ask? Well, it's a buttermilk cake with a hint of cocoa in it. It definitely doesn't taste like chocolate. It's a bit tangy, and when paired with cream cheese frosting, it's pretty incredible. Plus, it's pretty. And we all love that, right?

I have tried several red velvet cake recipes, and this is my favorite by far. They have great flavor, they're not dry, and they are bright red. Last year I made mini green velvet cupcakes for St. Patrick's Day, so know that you can substitute out the food coloring if you want to go with something different. It was a fun change! I almost always use gel food color, but with these you'll need the liquid. Do yourself a favor and buy the separate bottle of red food color that is one ounce. Perhaps if you don't have to measure anything, maybe you can do a better job of avoiding getting red dye everywhere. Including on your hands and under your nails. Or maybe that's just me who does that every.single.time!

Red Velvet Cupcakes Recipe
Makes about 20
Print this recipe

*If you're baking at high altitude, please follow the * adjustments!

For the cupcakes:
1 cup shortening
1 3/4 cup sugar
2 1/4 cup cake flour
1 1/4 teaspoon salt
2 eggs (*3 eggs*)
1 cup (*plus 2 tablespoons*) buttermilk
1 teaspoon vanilla
1 teaspoon (*3/4 teaspoon*) baking soda
1 1/2 teaspoon white vinegar
1 ounce red food color
1 1/2 teaspoons cocoa powder 

For the cream cheese frosting:
1 1/2 packages cream cheese (12 ounces)
3/4 cup butter
1 1/2 pounds powdered sugar
1/4 teaspoon salt
2 teaspoons vanilla

Preheat your oven to 350 degrees (*375 degrees for high altitude*).

In your mixing bowl fitted with the paddle attachment, cream together the shortening and sugar. In a large liquid measuring cup, combine the eggs, buttermilk, vanilla, baking soda, vinegar, and salt. Add the flour into the mixing bowl in three additions, alternating with the wet ingredients. Start and end with the flour. Once combined, stir together the red food color and cocoa powder in a small bowl. Add into the batter and mix just until incorporated.

Divide the batter into muffin tins with liners, filling each with about 1/4 cup of batter. Bake for 15-17 minutes (*12-15 minutes*) or until a toothpick comes out clean. Cool in the pan for a few minutes and then remove from the pan to cool completely.

While the cupcakes are cooling, make the cream cheese frosting. In your mixing bowl fitted with the paddle, cream together the butter and cream cheese until smooth. Add the vanilla and salt and mix until incorporated. Add the powdered sugar in three additions and mix until smooth. Pipe onto cooled cupcakes.

Source: The Pioneer Woman Cooks cookbook
Picture
You may also like:
Loading...
<<Previous

     Welcome!

    Cooking is fun and easy at high altitude, but baking can be frustrating. About 90% of my recipes work everywhere, but some are adjusted so us mountain dwellers can enjoy baked goods from scratch. I hope you find great recipes on here for your family, and I'll let you know if any are adjusted for high altitude. 

    Stay Updated!

    Add to your Reader:

    Get new posts delivered to your inbox:

    Enter your email address:

    Delivered by FeedBurner

    Categories

    All
    Appetizers
    Bars
    Beef
    Bread
    Breakfast
    Brownies
    Cake
    Cheese
    Chicken
    Chocolate
    Cinnamon
    Cookies
    Crackers
    Cupcakes
    Dessert
    Do It Yourself
    Drinks
    Fruit
    Ground Beef
    High Altitude
    How To
    Ice Cream
    Italian
    Main Courses
    Mexican
    Muffins
    Oatmeal
    Pasta
    Pastry
    Pie
    Pizza
    Pork
    Project Pastry Queen
    Pumpkin
    Salad
    Sauces
    Side Dishes
    Snacks
    Soup
    Sourdough
    Steak
    Vegetables

    My featured recipes on NoshOnIt

    Some Good Reads!

    Annie's Eats
    Bake at 350
    Climbing Grier Mountain
    Confections of a Foodie Bride
    How Sweet It Is
    I Am Baker
    Macaroni and Chesecake
    Pinch of Yum
    Pink Parsley
    Smells Like Home
    Smitten Kitchen
    Sunny Side Up
    The Curvy Carrot
    The Marvelous Misadventures of a Foodie
    The Pioneer Woman Cooks
All content copyright 2012-2013 She Makes and Bakes.