She Makes and Bakes
  • Home
  • About
  • Ramblings
  • Recipe Index
  • What We're Eating
  • High-Altitude Baking

Basket of Berries Cake

3/5/2013

 
Picture
I heard an extremely exciting piece of information on the news this morning...it's daylight savings on Sunday! I'm pretty sure this is the one day a year that I look forward to the most. Is that strange? And it wasn't just when I became a food blogger and needed more daylight. I've always been really excited about this day in March (or April, like when I was a kid). I've just always hated the dark I suppose. I'm sure we could psychoanalyze that one, but let's move on. 

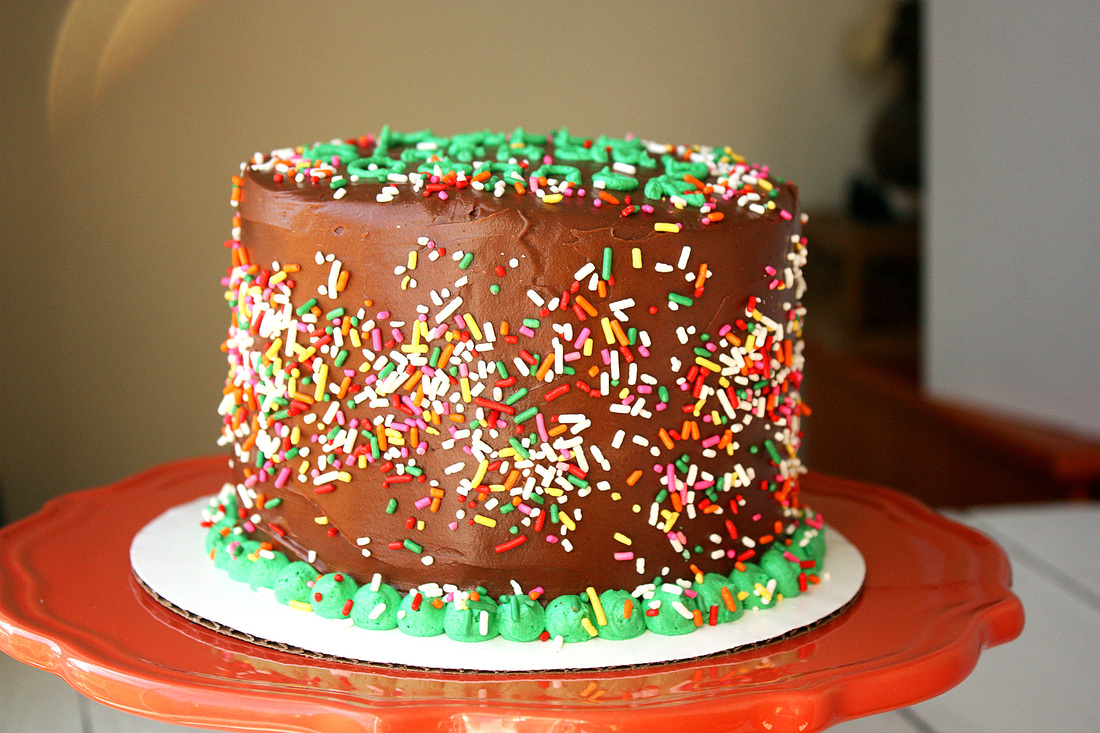
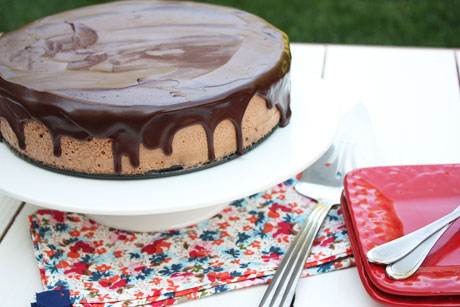
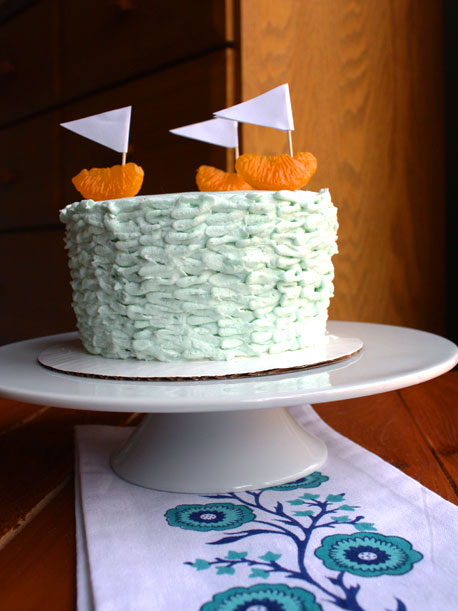
The other amazing thing about daylight savings is that it means spring is here. Well, to me, at least. Spring is my second favorite season because things start to grow and turn green and it's pretty and warm and just lovely. Can you guess what my least favorite season is then? (brown=death=yuck.) Anyway, we made this cake for Valentine's day, but I love it for this time of year. It's fun, cheerful, and bright. It's spring in a cake.

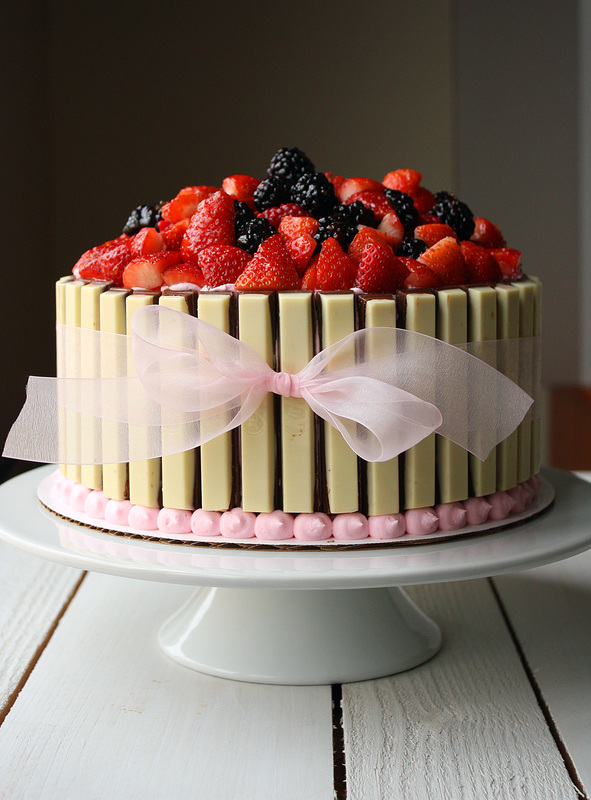
Normally I do this cake as chocolate with chocolate frosting and regular Kit Kats. However, the client wanted it to be white and pink. So we found these cookies and cream Kit Kat bars at Cost Plus and made it a vanilla cake with pink buttercream. You can do whatever you want--I've even made this cake in a heart pan. Pictured is an 8-inch cake, but I highly recommend you do a 9-inch, two-layer cake instead. The cake layers were too tall for the Kit Kats, so we had to pipe a row of pearls on the bottom to fill in the space. It's pretty, but if you're looking to avoid any piping details, go with the niner. (Did I hear a niner in there? Were you calling from a walkie talkie?)

I love baking from scratch, but use your favorite cake recipe (or box cake mix). Here are my favorite vanilla and chocolate cake recipes, adapted for high altitude. Here are my favorite vanilla buttercream and chocolate frosting recipes, too. 

Basket of Berries Cake Recipe
Print this recipe

Two 9-inch round cake layers
Frosting
12 Kit Kat candy bars (1.5 ounces each)
2 pounds fresh strawberries, halved
1 pint fresh raspberries
1 pint fresh blackberries or blueberries
2 tablespoons apricot preserves

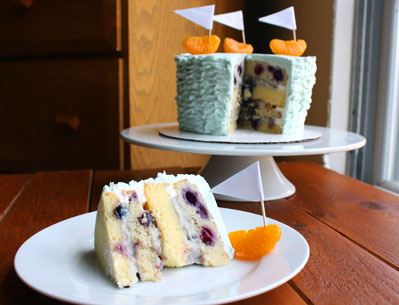
Place your first baked and cooled cake down on the plate or cake board. If it is domed, slice off the dome part so it's flat (do this on both cakes). Spread frosting over the first layer. Place the second layer on top of the frosting and press down lightly. Spread frosting over the cake, making sure the sides and top are completely covered. You don't have to worry about it looking perfect because the candy bars and fruit will cover it up.

Unwrap the candy bars and use a knife to separate the bars from each other (instead of snapping them). Place the candy bars side by side around the cake. It will look more like a basket if you stick the side with the writing to the cake, but we didn't do that because we wanted the white side to show.

Arrange the fruit on top of the cake and pile it on. Warm the apricot preserves and brush it on top of the fruit to give it a shine. If desired, wrap a ribbon around the cake. Store in the fridge, but bring it up to room temperature before serving.

Idea from Taste of Home
You may also like:
Loading...

The Best Chocolate Frosting

2/24/2013

 
Picture
For years I have been searching for the best chocolate frosting recipe. Essentially I wanted something that looked like the chocolate frosting you can get in the can but it needed to taste better (although I loved that frosting when I was a kid). I wanted it to be dark in color and super chocolatey. I wanted it to not taste like sour cream (like many of them do). I wanted it to taste like canned chocolate frosting...but not.

And then I finally found it. Well actually I found it months and months ago but I never tried it until a few weeks ago. And then I kicked myself for not trying it sooner. I do this a lot unfortunately. The secret ingredient is Ovaltine. I realize this is pretty unorthodox, but it totally works.

I could happily eat this frosting with a spoon. If you're looking for the perfect chocolate frosting, look no further. You've found it.

By the way, a year ago I started this little blog on a day when I had nothing to do at my office. Here I am a year later, laid off from that job, but happily running a bakery and living my dream. I love all of you guys. It's so much fun to do this; read your comments; feel your love on Facebook, Twitter, Instagram, and Pinterest; and stalk my stats on Google Analytics to see how many people are reading and what you guys are checking out! I'm addicted, and I love it! Thanks for everything! You are the best!  
Picture
The Best Chocolate Frosting Recipe
Makes enough for one 8-inch or 9-inch cake or 24 cupcakes
Print this recipe

Note: You can make this in a stand mixer, food processor, or with a hand mixer.

12 tablespoons butter, room temperature
1/2 cup unsweetened cocoa (use Dutch Process if you have it)
1/2 teaspoon salt
2 1/2-3 cups powdered sugar
2 tablespoons milk
2 teaspoons vanilla
Scant 1/2 cup heavy cream
1/3 cup rich chocolate Ovaltine powder

In a mixer or food processor, cream together the butter, cocoa, and salt until well combined. Scrape down the sides of the bowl and add in 2 1/2 cups of the powdered sugar, milk, and vanilla and mix until smooth.

In a separate bowl, whisk the Ovaltine into the cream and then add that into the mixing bowl while it's running on low. Blend until well combined and smooth. If it's grainy, mix longer or put in the fridge and let it firm up a bit and then remix. Add up to another 1/2 cup powdered sugar if needed.

From Confections of a Foodie Bride who adapted it from the Joy the Baker cookbook
Picture
You may also like:
Loading...

King Cake

2/5/2013

 
Picture
I'm not going to lie, I've never been to a mardi gras party. Ever. However, last April I went to New Orleans for a neurology meeting, and I fell in love. I've learned that New Orleans is a place you either love or hate. Either you will think it's dirty and smelly and gross or you will be captivated with the people and liveliness of the city. I am in the latter category. I love the random live music throughout the city, the art, the food, the architecture. I love it all, and I can't wait to go back as soon as possible.

So did you know that Fat Tuesday is next week on the 12th? I'm going to have myself a little King Cake and celebrate at home by playing some fun jazz music and having a drink or two. Maybe I'll get some beads from my husband!

If you've never had a King Cake, watch out. Did you know it's basically a giant cinnamon roll? With frosting and sprinkles and gooey cinnamon filling? It's so good! And it's really easy to make, which is another bonus. Be careful when you roll the dough out because if it's too thin, it could blow out one of the sides. If that happens, just cut the "blown out" part off after baking (it makes a great snack!). The glaze and sugar will hide it. I highly recommend to the full filling recipe (I only did half as you can see in the picture below and wished I did more) but know that it may leak out because it's a lot (but so good!). If you're worried about that happening, you can halve the filling recipe. Be sure to hide a plastic baby (after baking) or a bean (before baking) in the cake; whoever gets that piece will have good luck in the upcoming year. Just make sure to warn people that it's in there so someone doesn't choke! Choking=bad luck. For reelz.

King Cake Recipe
Makes one cake (about 18 servings)
Print this recipe

Note: If you like a lot of gooey cinnamon filling, leave the filling recipe as is. If you want less of the goo, it works great to halve the filling recipe, too.

For the dough:
8 ounces sour cream
3 tablespoons sugar
2 tablespoons butter
1/2 teaspoon salt
2 1/4 teaspoons active dry yeast
1/4 cup warm water
1 1/2 teaspoons sugar
1 egg
3-3 1/4 cups bread flour 

For the filling:
1/2 cup butter
1 cup brown sugar, packed
2 tablespoons cream
1/8 teaspoon baking soda
1 tablespoon cinnamon

For the glaze:
1 1/2 cups powdered sugar
2 tablespoons melted butter
1/4 teaspoon butter
2-4 tablespoons milk

Gold (or yellow), purple, and green sugars

In a small saucepan over medium-low heat, combine the first four ingredients (sour cream, sugar, butter, and salt) and stir until the butter has melted. Set aside and cool the mixture to 100-110 degrees.

In the bowl of your mixer, stir together the yeast, warm water, and 1 1/2 teaspoons of sugar. Let sit for about 5 minutes until foamy. When the sour cream mixture has cooled, add it into the mixing bowl with the egg and mix using the paddle attachment until incorporated. Slowly start adding in the flour while mixing on low until a soft dough forms. Switch to the dough hook and mix on low until smooth and tacky.

Spray a large bowl with cooking spray and place the dough in it. Cover and let rise for about one hour or until doubled.

While the dough is rising, make the filling by melting the butter in a saucepan over medium high heat. Add in the brown sugar and whisk, bringing it up to a boil. Let it boil for about one minute, remove from heat, and whisk in the cream. Add the baking soda and cinnamon and whisk until combined. Set aside.

When the dough has risen, place it on a well-floured counter. Roll it out into a 22x12 inch rectangle and spread the filling on it, leaving about a one-inch border. Roll it up from the long side, jelly-roll style, and pinch the seam together. Place it seam side down on a greased cookie sheet and bring the ends of the roll together to form a ring. Secure the ends together by pinching them and moistening them with water. Cover and let rise for about 30 minutes.

While it's rising again, preheat your oven to 375 degrees.

Bake for 20-25 minutes until browned on top and baked through. While the cake is baking, make the glaze by stirring together the powdered sugar, melted butter and vanilla. Add the milk one tablespoon at a time until it's just thin enough to spread.

When the cake is finished baking, let it cool for 10 minutes and then brush the glaze on top. Sprinkle with the colored sugars, alternating the colors, in bands. Let cool completely. Cut out a small piece of the bottom and hide a plastic baby in it.

Adapted from myrecipes.com.  
Picture
You may also like:
Loading...

Homemade Cake Release

2/3/2013

 
Picture
I had a hard time naming this post because I wasn't sure what this was called. You know the baking spray that has the flour in it? That's what this is...except you don't spray it. You brush it on. So whether you call it Baker's Joy, Pam with flour, cake release, or baking spray, this is the home version of it.

I have some *pretty* exciting news today. Many of you know that I had my own bakery and since I got laid off in December I've been working hard at it. Well, another baker in my neighborhood and I created a new bakery called Whipped Bakery, and we're working together! It's amazing, especially because I'm not a fan of decorating cakes and she loves that part. It's the perfect marriage. So, I'd love for you to check it out! Let me know what you think. You can find us on the interwebs here or on Facebook here. If you check us out on Facebook, be sure to like us...and tell any Colorado people about it (please and thank you!).

So in that regard, I will be baking a lot of cakes in the near future. And guess what, that non-stick spray with flour is super expensive. I'm trying to save money, so any little bit helps. Since I make my own cake flour, I figured I better find something to take the place of this expensive spray. I definitely will be using this a lot since it's only three ingredients and can be stored in the pantry. This is a huge win. When I'm baking large cakes (like this football cake), I'm still going to line the pan with parchment paper because I don't want to tempt fate, but I'm extremely happy to not spend $3-$4 on spray when a batch of the homemade stuff probably costs less than $2. As Charlie Sheen says, winning! 
Picture
Homemade Baking Spray

1 cup shortening (6.7 ounces)
1 cup all purpose flour
1 cup vegetable oil

In a medium sized bowl, combine the three ingredients. Whisk until smooth. Store in a resealable container and liberally brush on pans before you add the cake batter (line big pans with parchment paper, too).

Source: Rose Bakes
Picture
You may also like:
Loading...

Apple Cake with Browned Butter Rum Sauce

9/16/2012

 
Picture
Oh boy. So this apple cake is pretty awesome, but what really takes the...er...cake is the sauce. But first, we'll talk about the cake. It's a simple cake made with shredded apples and pecans. It's moist and flavorful with a lot of cinnamon and a little almond extract. It's fall in a cake, and it's really easy to make. No mixer required.  

But the sauce...oh the sauce. It's browned butter, which if you've never had, is amazing. It's nutty and awesome. In addition to the browned butter are vanilla and rum extracts. It's a warm, friendly, comforting sauce. I wouldn't mind curling up with a book and this sauce. I realize that sounds super weird, but it's that good. Paired together, it's the perfect easy fall cake. And, since the sauce uses rum extract instead of rum, it's a cake you can serve to everyone.

I halved the recipe and ended up with thinner slices, but it was perfect. If you're serving more people, I would make the full recipe so you have a taller cake.
Picture
Apple Cake with Browned Butter Rum Sauce Recipe
Makes a 9x9 pan
Print this recipe

For the cake:
4 cups shredded apples
2 cups sugar
2 eggs
1/2 cup canola oil
1 teaspoon almond extract
2 cups all purpose flour
2 teaspoons baking powder
1 teaspoon salt
1 teaspoon cinnamon
1/2 cup chopped pecans

For the sauce:
1/2 cup butter
1 cup sugar
2 tablespoons all purpose flour
1/8 teaspoon salt
1 cup water
2 teaspoons vanilla extract
1/2 teaspoon rum extract

Preheat your oven to 350 degrees.

To make the cake, in a large bowl combine the shredded apples and the sugar. (I shredded mine using a cheese grater, but you also could chop them finely.) Let sit for 5-10 minutes. In a small bowl, whisk together the eggs, canola oil, and almond extract. Add to the apple mixture and stir to combine. Combine the flour, baking powder, salt, and cinnamon. Pour into the apple mixture and stir until combined. Add in the pecans and stir.

Spray a 9x9 pan with cooking spray. Pour the batter into the pan and bake for 35-40 minutes or until a toothpick comes out clean.

To make the sauce, in a medium saucepan melt the butter. Stir and watch as it gets foamy and then starts to turn brown. When it turns into a dark honey color and smells nutty, quickly stir in the sugar, flour, and salt. Gradually add the water. Bring to a boil and cook and stir for 2 minutes. Remove from heat and add in the extracts. Serve warm.  

Source: Taste of Home Fall Baking Cookbook
Picture

Chocolate Sheet Cake

9/3/2012

 
Picture
In junior high, I had to take three electives: typing (boring but useful), wood shop (ha! I remember absolutely nothing about that class), and home economics (I remember this cake and sewing a pillow). So while I want to say that this cake was the best thing to come of that year, it probably was typing. Yawn. We'll say it was this cake to be more exciting though. I remember it fondly, and we made it a lot in my house. I remember that the original recipe called for oleo, which shows you how old school the recipe was.

I haven't had this cake for years, so when I made it this weekend, I was pleasantly surprised and impressed about exactly how good it is. It's super moist (sorry for those of you who hate that word) and it's really chocolatey, even though it doesn't call for a ton of chocolate. This is a cake that you can whip up in under an hour, and that includes making the frosting and frosting it. Plus, it doesn't require a hand or electric mixer. Although I'm a big fan of fancy pretty layer cakes, there's something to be said about a from-scratch sheet cake that can be made and eaten in an afternoon. We need more of those in our lives I think.

Chocolate Sheet Cake Recipe
Makes a 9x13 cake
Print this recipe

*Note: If you're making this at a higher altitude, your cake will sink in the middle unless you change the amount of baking soda to 2 1/4 teaspoons. I sprayed my cake pan with regular cooking spray, but I think that if you want to flip this cake out of the pan and decorate it, you probably should use baking spray or grease/flour.

For the cake:
2 cups sugar
2 cups flour
1 cup butter
1/4 cup unsweetened cocoa powder
1 cup water
1/2 cup buttermilk
2 eggs
1 tablespoon baking soda*
1 tablespoon vanilla
1/4 teaspoon salt

For the frosting:
1/2 cup butter
1/4 cup unsweetened cocoa powder
6 tablespoons milk
1 pound powdered sugar (about 4 cups)

Preheat your oven to 400 degrees.

To make the cake, mix flour and sugar together in a large bowl and set aside. In a medium saucepan, combine the butter, cocoa powder, and water. Heat until it comes to a boil and pour it over the flour mixture. Mix together. Add the rest of the cake ingredients and stir until incorporated. Pour it into a greased 9x13 pan.

Bake for 20 minutes or until a toothpick inserted into the cake comes out clean.

Five minutes before the cake is done, heat the butter, cocoa powder, and milk in a medium saucepan until it boils. Don't use a wooden spoon to stir this mixture or it will taste like wood. Remove from heat, add in the powdered sugar, and beat by hand until smooth. Pour over the hot cake. Let cool slightly before serving.

Source: My junior high home economics class.
Picture

PPQ: Death by Chocolate Cake

8/26/2012

 
Picture
This is the last post of Project Pastry Queen, and I've really enjoyed cooking recipes out of The Pastry Queen Cookbook. You definitely should check it out if you haven't already--there are so many great recipes. This chocolate mousse cake was the perfect way to end the project. It starts with a dense, rich, flourless bittersweet chocolate cake. Then it's topped with a milk chocolate mousse that's light and silky, and the whole thing is topped with a bittersweet chocolate ganache. Bonus--if you use gluten free chocolate, you can make this cake gluten free. Sad thing--if you're pregnant or immunocompromised, no dice on this one. It has raw eggs in the mousse.

Rich really would be an understatement. I had three bites, and I was good. But those three bites were incredible. The other great thing about this cake is that you can freeze it. Technically, you're supposed to freeze it before you add the ganache and then add the ganache to the frozen cake before you serve it. However, I froze the entire thing (minus one piece) and will serve it at a party I'm throwing on Tuesday. I think it'll be fantastic. Don't make this for a cookout or BBQ as the cake needs to stay cold or it will melt.

Check out our grand hostess, Shawnda of Confections of a Foodie Bride, for the full recipe. I made the following changes:

1. I used Bailey's in the cake (yes, you can taste it and it's gooood).
2. I made my cake in a 9-inch springform pan, which I thought worked marvelously. Once the cake was cool, I poured the mousse on top and froze the whole thing. When I was ready to add the ganache, I didn't have to invert the cake out of the pan.
3. I had to bake the cake for 50 minutes, and it was still really fudgy. I'm not quite convinced it was fully cooked. You'll want to watch that.
4. The ganache is supposed to fully cover the sides, but I love the look of dripping ganache, so I went that route instead.

If you want to check out my other Project Pastry Queen recipes, check this out. Be sure to check out the Project Pastry Queen website to see everyone else's take on the recipe. Thanks Shawnda, for creating such a great project! What's up next?
Picture

Make Your Own Cake Flour

8/15/2012

 
Picture
Oh boy are we talking about exciting stuff today. Flour, and more specifically, cake flour. Do you know how expensive cake flour is? It's about $4.50 per box. Yikes! And the annoying thing is that you need it. If a recipe calls for cake flour, it's pretty important that you use it instead of a different kind of flour. The thing about flour is that each type (all purpose, bread, cake, etc.) has a different percentage of gluten. That gluten affects the elasticity and texture of your dough. If you used bread flour in cupcakes, you'd have some pretty tough cupcakes. Likewise, using all purpose flour instead of bread flour isn't going to give you the same chew. So, don't be stingy and use all purpose flour instead of cake flour because you won't get the same results. Especially since now you can make your own, and you don't have to spend the exorbitant amount of money on it.
Picture
To make cake flour, you combine two simple and cheap ingredients in a sifter and sift away.
Picture
The only "bad" thing about this recipe is that you have to sift it about four times.
Picture
But taking the ten minutes to sift and sift and sift is worth the money saved in my opinion. Especially since I buy a 25-pound bag of all purpose flour at Sam's Club for about $10. I go through a lot of flour; therefore, paying a lot of money for any type really isn't an option for me. So take the time to sift two ingredients together and make yourself some cheap cake flour!

Make Your Own Cake Flour Recipe
Makes 4 cups
Print this recipe

Note: If you want a small batch of this, for every cup of all purpose flour, remove two tablespoons of the flour and add in two tablespoons of corn starch.

3 1/2 cups all purpose flour
1/2 cup corn starch

Combine the ingredients in a sifter. Sift together four times. (I like to sift it into one bowl, scoop it out, and sift it back into the same bowl.) Store in a 1970s Tupperware container if you're cool like me. Ha! 

PPQ: Lemon Blueberry Cake

6/17/2012

 
Picture
This week's Project Pastry Queen is celebrating the upcoming birth of Emily of Ruf Love's baby boy. Emily from A Gilt Nutmeg is kind enough to host this sailing-themed baby shower, so I decided to bring a lemon blueberry sailing cake. I wish my pictures were a little better for this one, but oh well. It was made with love.

We actually ate this cake last weekend since we were celebrating Father's Day early because today I'm arriving in Ireland! The hubs and I are spending two glorious weeks here. By the way, happy Father's Day to all the dads out there. I know I love mine more than anything so I hope all of you feel very loved today. My parents loved this cake (I'm not a fan of lemon), and they were very happy to take the rest of it home. I made this one with some vanilla bean frosting I had on hand, but I think cream cheese frosting would be best, so that's what I put in the recipe below. Also, this cake is for high altitude, so if you're at a regular altitude, use your favorite lemon cake recipe or box mix and add in blueberries. It's a great combination. By the way, I made a 6-inch cake and cut each cake in half, so that's why mine looks like it does. The recipe below is for a 9-inch cake; if you want to do 6-inch cakes instead, just halve the recipe.

Happy Father's Day and Happy Baby Shower Day, Emily. I hope everyone feels very loved on this special day! I'll have a Guinness for ya!  

Lemon Blueberry Cake Recipe (High Altitude)
Print this recipe

For the cake:
3 cups cake flour
2 1/2 teaspoon baking powder
1/2 teaspoon salt
1 cup butter, salted
1 1/2 cup plus 2 tablespoons sugar
5 eggs + 1 egg white
1 1/2 cups buttermilk
1/2 cup lemon juice
1/2 cup instant vanilla pudding mix
1 teaspoon lemon zest
1 cup fresh or frozen blueberries

For the Cream Cheese Frosting (any altitude):
1 1/2 packages cream cheese (12 ounces)
12 tablespoons butter
1 1/2 pounds powdered sugar
1/4 teaspoon salt
2 teaspoons vanilla

For the Filling:
1 vanilla pudding snack pack (we are going easy here people)
1/2 cup blueberries

Preheat your oven to 375 degrees and spray 2 9-inch cake pans with Baker's Joy.

To make the high-altitude cake, in a stand mixer, cream together the butter and sugar until light and fluffy. Add the eggs one at a time until incorporated. Add in the baking powder, salt, and lemon zest and mix. Combine the buttermilk and lemon juice. In three additions, add the cake flour and vanilla pudding mix, alternating with the buttermilk/lemon juice mixture. Mix until just incorporated. Pour half the mixture into your greased 9 inch pan. Fold the blueberries into the remaining batter and pour into the second pan.

Bake for 20-25 minutes or until a toothpick inserted in the center comes out clean. Cool your cakes completely before frosting.  

To make the cream cheese frosting, in your mixing bowl fitted with the paddle, cream together the butter and cream cheese until smooth. Add the vanilla and salt and mix until incorporated. Add the powdered sugar one cup at a time and mix until smooth. It's best to weigh your powdered sugar because your amount in cups will depend on your humidity. Store leftover frosting in the fridge or freezer.
 
To assemble the cake, if the cakes are rounded on top, slice the tops off. Place the first cake on the plate, bottom side down. Put some frosting in a piping bag or a ziploc bag with the corner cut off and pipe a circle of frosting around the edge of the cake (this will hold the filling in). Spread the vanilla pudding on top of the cake inside the frosting circle and sprinkle the blueberries over it. Place the second cake layer, bottom side up, over the blueberries. Press down slightly. Frost the cake using the remaining frosting. If you want to make the ruffles or waves, tint your frosting blue, place the frosting in a piping bag fitting with a wide flat tip and move the bag back and forth sideways about one inch in width. Start from the bottom and work your way to the top and then move to the next one-inch section. Continue until there are ruffles around the cake. Man, I hope that makes sense!

Souce: Cake adapted from Annie's Eats; frosting from The Pioneer Woman Cookbook.
Picture

Easy Strawberry Cake

6/14/2012

 
Picture
First of all, we leave for Ireland in one day, and we'll be gone for two weeks. Do you guys know how much work has to be done to be ready to leave your house and your country for two weeks? I feel like my brain is on overdrive as I'm constantly thinking about what needs to get done and packed. I'm sure you all feel very bad for me, right? Right? Anyone? I wish I had a piece of this cake. I think it would relax me.

When strawberries finally come into season, I may have a tendency to go a little crazy. I keep buying them and then I finally get a little strawberried out and I have a batch sitting in the fridge about to go bad. Does this happen to anyone else? Because I do this at least once every year. Sometimes I don't learn and it happens a couple times a year. I am very brilliant.

Thankfully I found this strawberry cake recipe last year on Smitten Kitchen, and it's awesome. You can make it really quick and use up your almost questionable strawberries. Those strawberries turn into a quasi jam-like consistency, and the cake is sweet without being too sweet. Plus, it's really pretty with the sunken strawberries, and it looks like it took you all day to make it.   
Picture
Easy Strawberry Cake Recipe
Makes a 9-inch cake
Print this recipe

6 tablespoons butter, softened
1 1/2 cups all purpose flour
1 1/2 teaspoons baking powder
1/2 teaspoon salt
1 cup plus 2 tablespoons sugar, divided
1 egg
1/2 cup milk
1 tablespoon vanilla
1 pound strawberries, hulled and halved

Preheat your oven to 350 degrees.

Cream together the sugar and butter with an electric mixer until light and fluffy. Add the egg, milk, and vanilla and mix until combined. Add in the flour, baking powder, and salt and stir until incorporated.

Pour the batter into a greased 9-inch cake pan. Place the strawberries, cut side down, on top of the batter. Sprinkle the remaining 2 tablespoons sugar on top and bake for 10 minutes. Reduce the temperature to 325 degrees and bake for another 50-60 minutes or until a toothpick inserted near the center comes out clean. Let cool in the pan.

Source: Smitten Kitchen
Picture
By the way, I added some pretzels to the batter, but it really didn't add anything to the recipe other than a weird texture. I wouldn't recommend it. So ignore those pretzels in the photo. I'm not good enough in Photoshop to take them out of the picture.
<<Previous

     Welcome!

    Cooking is fun and easy at high altitude, but baking can be frustrating. About 90% of my recipes work everywhere, but some are adjusted so us mountain dwellers can enjoy baked goods from scratch. I hope you find great recipes on here for your family, and I'll let you know if any are adjusted for high altitude. 

    Stay Updated!

    Add to your Reader:

    Get new posts delivered to your inbox:

    Enter your email address:

    Delivered by FeedBurner

    Categories

    All
    Appetizers
    Bars
    Beef
    Bread
    Breakfast
    Brownies
    Cake
    Cheese
    Chicken
    Chocolate
    Cinnamon
    Cookies
    Crackers
    Cupcakes
    Dessert
    Do It Yourself
    Drinks
    Fruit
    Ground Beef
    High Altitude
    How To
    Ice Cream
    Italian
    Main Courses
    Mexican
    Muffins
    Oatmeal
    Pasta
    Pastry
    Pie
    Pizza
    Pork
    Project Pastry Queen
    Pumpkin
    Salad
    Sauces
    Side Dishes
    Snacks
    Soup
    Sourdough
    Steak
    Vegetables

    My featured recipes on NoshOnIt

    Some Good Reads!

    Annie's Eats
    Bake at 350
    Climbing Grier Mountain
    Confections of a Foodie Bride
    How Sweet It Is
    I Am Baker
    Macaroni and Chesecake
    Pinch of Yum
    Pink Parsley
    Smells Like Home
    Smitten Kitchen
    Sunny Side Up
    The Curvy Carrot
    The Marvelous Misadventures of a Foodie
    The Pioneer Woman Cooks
All content copyright 2012-2013 She Makes and Bakes.