She Makes and Bakes
  • Home
  • About
  • Ramblings
  • Recipe Index
  • What We're Eating
  • High-Altitude Baking

Chicken Parmesan Sandwiches

2/21/2013

 
Picture
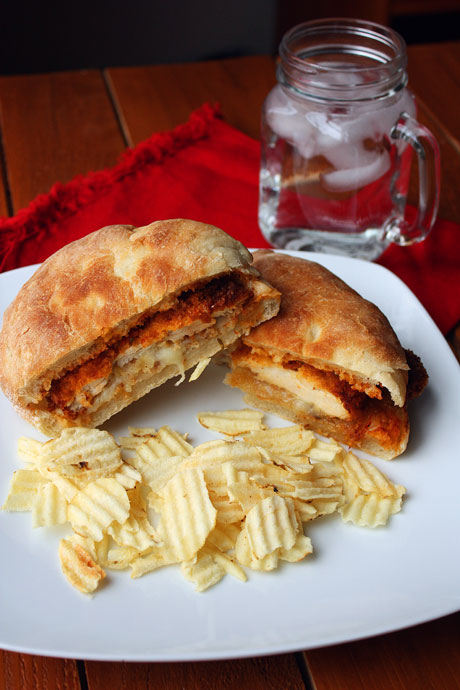
I don't know if you ever read the What We're Eating page, but I had these sandwiches listed on there for about 3 weeks in a row. Not because we loved them that much (although we did) but because I never could get around to making them. So when I finally did, I was so happy. They were amazing! As I've mentioned many times before, my husband hates pasta, so I can never get away with chicken parmesan and spaghetti. So just like I fill my meatball craving with meatball sandwiches, I can now fill my chicken parm craving with these sandwiches. It's a win win (especially because I love bread!).

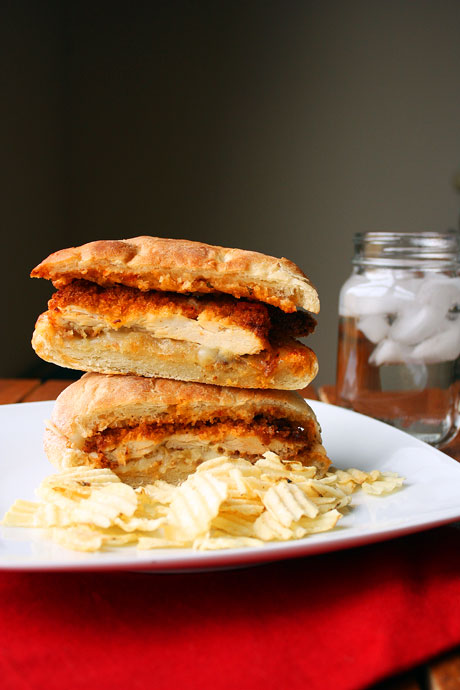
I pan fried these but you could just as easily bake them (and they'd be healthier, too). That's what I'll probably do next time, but I was in the mood to use some hot oil. I pounded a large chicken breast out pretty thin, and that was enough for 2 large sandwiches...and we both only ate half of our sandwich. Next time, I'll just make one sandwich that we can split with a side or salad. I also highly recommend you make these with homemade ciabatta. It really took it over the top! 

Chicken Parmesan Sandwiches Recipe
Makes two sandwiches
Print this recipe

1 large chicken breast
1/4 cup all purpose flour
Salt and pepper
1 egg, beaten
1 cup panko breadcrumbs
1/4 teaspoon garlic powder
1/4 teaspoon onion powder
Vegetable oil

For the sandwiches:
Mozzarella cheese slices
1/2 cup marinara sauce
Sandwich bread or homemade ciabatta
1/4 cup butter, softened
1/4 teaspoon garlic powder

Pound the chicken breast out until it is a uniform thickness, about 1/4 inch thick. Cut the chicken in half so you have two pieces. Mix together the flour, salt, and pepper, and spread it out on a plate. Place the beaten egg in a large wide bowl. Mix together the panko, garlic powder, and onion powder. Place those in a large wide bowl or on a plate. Dredge each chicken breast through the flour so it's coated on both sides, then through the egg, and then through the seasoned panko. Make sure the panko covers the entire breast. Place on a plate.

If you want to fry the chicken: Pour enough oil in the skillet to cover about 1/2 inch. Heat it over medium heat until the oil is almost smoking. If you drop a breadcrumb in the oil to test it, it should sizzle. Once your oil is hot, use tongs to place the chicken breasts in the pan. If they don't fit side by side, do them one at a time. Let them cook for about 3-4 minutes until they're golden brown. Carefully flip the chicken over and cook for another 2-3 minutes until golden brown. The chicken should be 165 degrees on the inside (but check them temperature when it's not in the pan). Take the chicken breast out of the oil and place on a paper towel to drain any grease.
 
If you want to bake the chicken: Preheat your oven to 400 degrees. Place the breaded chicken on a sheet pan and bake for 20 minutes until a thermometer inserted into the chicken reads 165 degrees.

Meanwhile, spread the softened butter on the bread, sprinkle with garlic powder, and place it butter side down on a pan over medium heat until golden brown and toasted, about 1-2 minutes.

Place the cheese on top of the bottom piece of bread, place the chicken on top of it, pour 1/4 cup of hot marinara on top of the chicken, and top it with the second piece of bread. Serve immediately.
Picture
You may also like:
Loading...

Jalapeño Popper Chicken

1/30/2013

 
Picture
Apparently to be a good food blogger, I should be much more interested in the food/party part of the Superbowl than the food. But guess what, I'm not. Yes, I love making dips and snacks and delicious things to eat, but I love football and I love the NFL. A lot. So my favorite part about this upcoming Sunday will be watching the game. If you've been reading my site for any length of time (or know me at all), you know that I love the Broncos. In fact, I was lucky enough to go to the Superbowl in 1999 with my dad when the Broncos beat the Falcons! It was so much fun and is something that I'll remember doing my whole life. Football holds a special place in my life, and it's something that my dad and I have done together for decades.

So this isn't really the perfect Superbowl snack, but it is an awesome meal that would be great this Sunday, next Sunday, or any other day. Jalapeño popper chicken was something that intrigued me when I first saw it. I tucked it away and then I finally tried it and totally fell in love. My first worry was that it would be super spicy from the large amount of jalapeños, but it's not. When you mix it in with the cheeses and then the chicken and breadcrumbs, the spice gets mellowed out. So if you want a lot of heat, I would add a lot of minced jalapeños. Do yourself a favor and make this soon because it's terrific!

Jalapeño Popper Chicken Recipe
Print this recipe

1/2 cup panko crumbs
2 teaspoons canola oil
2 teaspoons taco seasoning
1 egg
2 ounces cream cheese
1/4 cup cheddar cheese, shredded
1-2 jalapeños, seeds and ribs discarded and then minced
2 chicken breasts

In a small pan, combine the panko and canola oil. Cook on medium heat while stirring until the crumbs are golden brown. Remove from heat and mix with the taco seasoning. 

Preheat the oven to 375 degrees and set an ovenproof rack over a rimmed baking sheet. Spray lightly with cooking spray.

In a shallow bowl, mix the egg.

In another bowl, combine the cream cheese, cheddar cheese, and jalapeños. Use a small, sharp knife to cut a slit in the chicken breast horizontally (this is where you will stuff the cheese filling). Stuff with the filling and use toothpicks to secure if needed. Alternately, pound the chicken breast out thin, spread the filling over half of it, and fold the chicken on top of the cheese filling. Secure with toothpicks.

Dredge the stuffed chicken through the egg and then dip in the panko mixture. Make sure the crumbs are covering each part of the surface, and if any cheese is showing, cover that area really well so it doesn't drip out as much.

Place the breaded chicken on top of the rack, and if there is any cheese filling covered with the crumbs, place that side up. Bake for about 25-30 minutes or until the chicken is cooked through.

Source: Elly Says Opa and Sunny Side Up
Picture
You may also like:
Loading...

Chicken Pot Pie with Pepper Chive Biscuits

1/14/2013

 
Picture
Are you ready for one of the most comforting meals ever? Well hello. I love pot pie, and I definitely love it with pie crust (mainly because I adore good pie crust). However, in January a few veggies soaked in cream stuffed inside a buttery flaky pie crust can be a bit much. Calorie wise, that is. This creamless pot pie studded with cream cheese pepper chive biscuits is incredible. You don't have to fuss with a pie crust (which can be annoyingly difficult), and the biscuit topping almost preportions the servings. And have I mentioned yet that the biscuits are the perfect contrast to the filling? A bit of spiciness from the pepper contrasts nicely with the cream cheese and chives. Not to mention they're so tender and wonderful. And yes, I'm aware that I'm trying to make pot pie sound healthy. Just go with it.

This really isn't hard to make, and if you wanted to save yourself some time, you could use a bag of frozen veggies instead of doing the prep and cooking the veggies yourself. I included an onion, carrots, green beans, and celery but you could do zucchini, peas, or any variety of your favorite vegetables (or the ones you know your family will eat). I have to leave the peas out or the hubs won't touch it. If you are going to add peas, use the frozen ones and add them into the sauce at the very end (still frozen).

The broth is a simple roux made with chicken broth instead of milk/cream. I'm not going to lie...it's a little skimpy on the sauce side but it does coat the veggies well and it's not dry. This sauce really allows those veggies to shine, but if you like it saucier (and I don't blame ya), you can double the sauce part. I used a very large chicken breast that I boiled, but if you're really going for easy, cut up a rotisserie chicken! All in all, it's one of our favorite cold-weather meals. And I love that I can have it in my arsenal when I need it. Not to mention that it's not 8 million calories like some of the other ones out there. 
Picture
Chicken Pot Pie with Pepper Chive Biscuits Recipe
Print this recipe

*Note: This filling is not very saucy as it's mainly veggies (because I was trying to be a tad bit healthier). If you like a lot of sauce, double the flour, butter, and chicken broth mixture.

For the biscuits:
1 1/4 cups all purpose flour
1 1/2 teaspoons baking powder
1/8 teaspoon baking soda
1/2 teaspoon salt
1/4 teaspoon garlic powder
1/2 teaspoon sugar
1/2 teaspoon fresh cracked pepper
2 tablespoons fresh chives, chopped
2 tablespoons cold butter cut into cubes
2 ounces cream cheese, cold
1/4 cup + 2 tablespoons buttermilk, cold

For the filling:
1 tablespoon butter
1 1/2 cups carrots, finely diced
1 cup green beans, cut into 1/4 inch pieces
1 small yellow onion, diced
1 cup diced celery
2 garlic cloves, minced
1/4 cup butter*
1/4 cup flour*
2 cups chicken broth*
2 cups cooked, shredded chicken

To make the biscuits, stir together the flour, baking powder, baking soda, salt, garlic powder, sugar, pepper, and chives in a medium size bowl. Add the cold butter and cream cheese and cut them into the dry ingredients using a pastry cutter or a fork until they resemble coarse crumbs. Add in the buttermilk and stir until the dough is in one ball. Place a little flour on your counter and pat the biscuits out until they're about 1/4 inch thick. Use a cookie cutter or a glass and cut 9-12 biscuits (depending on size). Place them on a plate, cover with plastic wrap, and place in the fridge.

Preheat your oven to 400 degrees and spray a 9x9 pan with cooking spray.

To make the filling, in a large skillet over medium heat melt the 1 tablespoon of butter. Add the carrots, green beans, yellow onion, and celery and cook for about 10 minutes, stirring every so often, until the veggies have softened slightly. Add the garlic and cook for about 30-60 seconds or until fragrant. Remove them to a bowl. In the same skillet, melt the 1/4 cup butter over medium heat and sprinkle the flour on top. Whisk together and cook for about 3 minutes until bubbling and slowly add in about 1/4 of the chicken broth while whisking. Keep whisking and slowly add in more of the broth. Once all the broth is incorporated, whisk and cook for a few minutes until any lumps are gone. Season with salt and pepper. Add the veggies and chicken to the broth and stir to incorporate everything.

Pour this mixture into your prepared pan. Place the biscuits on top of the chicken mixture and brush them with buttermilk, heavy cream, or melted butter. Place in the oven and bake for 20-23 minutes until the biscuits are golden brown and the pot pie mixture is bubbling. Let cool slightly before serving.

To reheat, preheat the oven to 300 degrees. Cover with foil and bake until heated through, about 15 minutes.

Adapted from Joy the Baker
Picture

Pesto Tortellini Soup

1/7/2013

 
Picture
When I told my husband what we were having for dinner, he squished up his face and said, "I don't think I'm going to like that." Being the nice wife that I am, I told him he needed to try it anyway. And guess what, he liked it. I think his exact words were, "It's good; I'm just not in a soup mood." I'm taking that as a win. And it also means that I'll be serving it around these parts again. Ain't married life grand?

So here's the deal with this soup. I took one of my favorite pasta dishes and adapted it. There's Italian sausage, chicken, bell peppers, onions, and pesto. Oh, and tortellini...one of the best things about this soup. I adore tortellini. This soup is not overly anything (for those of you who may not love pesto). It's a perfect marriage of flavors and a spectacular alternative to your classic chicken noodle soup. It really doesn't take long to prep, and you could make it in your Crock Pot after you did a little prep work, too. Otherwise it takes about 2 hours or so to get on the table. That's a win in my book.

Another win? Here's the best kitchen tip *ever* if you have a stand mixer. Use the paddle attachment to shred your chicken on low speed. It only takes about a minute and is 100 times easier than using two forks.
Picture
Pesto Tortellini Soup
Print this recipe

1 small yellow onion
1 small green bell pepper
1 small red or orange bell pepper
8 ounces Italian sausage
1 large chicken breast
2 cups chicken broth
4 cups water
2 tablespoons pesto
2 cups fresh refrigerated tortellini

In a large pot, cook the Italian sausage, onion, and peppers over medium heat until the veggies are softened and the sausage is browned. Add the whole chicken breast, broth, and water. Cook over medium-low heat for about 1 1/2 hours. Remove the chicken breast and shred it. Skim the grease off the top of the soup using a large spoon and return the shredded chicken to the pot. Stir in the pesto and keep on low heat. About 15 minutes before you're ready to eat, increase the heat to medium and wait for it to boil. Add the pasta and cook for 6-8 minutes until tender. Serve hot.

A She Makes and Bakes original
Picture
You may also like:
Loading...

Breaded Chicken Skewers with Grilled Romaine

9/6/2012

 
Picture
I realize that grilling season is "officially" over, but it was still 90 degrees in Colorado today. So let's fire the grill up and go! This is some of the best chicken I've had in quite some time. Instead of doing a typical flour, egg wash, bread crumb breading, you make a simple dressing, toss the chicken in that, and then add the bread crumbs. Then, instead of frying or baking the chicken, you grill it on skewers. Oh man, it was tender, juicy, and had great flavor and crunch from the bread crumbs. 

I realize that grilling romaine may seem a little strange. Even my husband looked at me like you're asking me to grill lettuce? But don't skip this step. It brings out the sweet smokiness of the lettuce and enhances the flavor. Plus, it's something different. I highly recommend you try this meal before it gets cold and dark outside!

Breaded Chicken Skewers with Grilled Romaine Recipe
Print this recipe

1/4 cup extra virgin olive oil, plus more for drizzling
2 tablespoons red wine vinegar, plus more for drizzling
2 tablespoons chopped fresh oregano
1 tablespoon minced shallot or red onion
1 teaspoon minced garlic
1/4 teaspoon red pepper flakes
Kosher salt
1 head Romaine lettuce, quartered lengthwise
1 1/2 pounds boneless, skinless chicken breasts, cut into chunks
1 1/2 cups breadcrumbs
1/4 cup grated parmesan cheese

Preheat a grill to medium high heat and soak 8 wooden skewers in water (so they don't burn on the grill).

In a medium bowl, stir together the oil, vinegar, oregano, shallot, garlic, red pepper flakes, and 1 1/4 teaspoons salt. Drizzle the cut sides of the lettuce with about 1 teaspoon of this mixture.

Add the chicken chunks to the rest of the mixture in the bowl and toss. Add the breadcrumbs and toss until the chicken is coated. Place the chunks on the skewers, leaving space between each piece. 

Grill the skewers until the chicken is cooked through, about 8-10 minutes. Also grill the romaine, turning it once, until marked and slightly wilted, about 1-2 minutes. Put the grilled romaine on plates and drizzle additional olive oil and red wine vinegar on top. Season with salt, add the chicken skewers, and sprinkle the parmesan on top of everything. 

Source: Food Network  
Picture

Buffalo Chicken Dip

7/19/2012

 
Picture
One of my favorite snack foods is chips and dip. Last summer we vacationed with my husband's family in the Outer Banks. Love. His family lives in Ohio, so they all drove and we flew. When we all arrived at our rental house, my mother in-law plugged in a crock pot full of this buffalo chicken dip. It was about 9 pm, but I chowed down on this dip. After a long day of flying and driving, it pairs nicely with a glass of shiraz...or four.

I've made it a few times since then, and I just love it. In fact, I had it for dinner one night. There's chicken....it's perfectly acceptable. I've served it at a few parties, and it's a big hit. I think most people really like chips and dip. I highly recommend you serve it with Fritos or another thick tortilla chip. The flavors meld better and you're not going to break a chip in the dip. Party foul! If you're feeling fancy, sprinkle a little blue cheese on top. Be prepared to share because people are going to dig in!  

For the chicken, you can use a rotisserie chicken or cook one large chicken breast (I boiled mine). By the way, if you have a stand mixer, plop the cooked chicken breast in the bowl, put the paddle attachment on, and mix on low. Your mixer will shred the chicken!!

Buffalo Chicken Dip Recipe
Print this recipe

8 ounces cream cheese, softened
1/2 cup Ranch dressing
1/2 cup buffalo wing sauce
2 cups cooked shredded chicken
1/2 cup shredded mozzarella

Stir all the ingredients together. Pour them in a greased 1 1/2 quart casserole dish and bake at 350 degrees for 20 minutes or until hot and the cheese is melted. You also can pour the mixture into a small Crockpot and cook on low until hot and cheese is melted, stirring occasionally. Serve immediately with Fritos or another thick tortilla chip.

Recipe from my mother in-law.
Picture

Stovetop Chicken Tacos

6/22/2012

 
Picture
I'm in Ireland right now, and if you're interested in reading about our trip/seeing pictures, check out the Ramblings page. It's a great country, and we're having a great time so far. Thanks to everyone for your great comments and well wishes!

Back to the food...We love Mexican food at our house, and while we have tacos frequently, they're usually of the beef persuasion. My hubby loves him some beef. In fact, whenever I ask him what he wants for dinner, he says steak. Every. Time. Anyway, it's nice to have a change of pace, so I love these chicken tacos. They take no longer than the ground beef ones, and they have a different flavor profile that's fresh and spicy...bound to please even those beef lovers.

Instead of the typical cumin and chili powder found in ground beef tacos, these are cooked in an orange juice/adobo/cilantro sauce, with a tiny bit of yellow mustard added at the end. If you don't like spice, you can cut down on the chipotle peppers. These tacos cook up in about 20 minutes, and you're on your way to an easy, wonderful, and fairly healthy dinner. We don't eat these nearly often enough, but I'm planning to put them in the rotation a lot more often.    
Picture
Stovetop Chicken Tacos Recipe
Serves 2-4 (depending on how hungry you are)
Print this recipe

3 tablespoons butter
4 garlic cloves, minced
2 tablespoons minced chipotle in adobo sauce
3/4 cup cilantro
1/2 cup orange juice
1 tablespoon Worcestershire
1 1/2 pounds boneless, skinless chicken breasts (about 2-3)
1 teaspoon yellow mustard
Salt and pepper

In a skillet, melt the butter, add garlic and chipotle and cook for about 30 seconds until fragrant. Stir in 1/2 cup of the cilantro, orange juice, and Worcestershire and bring to a boil. Add the chicken and simmer covered for 10-15 minutes, flipping the chicken halfway through the time. Once the chicken is cooked through, transfer it to a plate and cover with foil.

Increase the heat and cook until the liquid is reduced to about 1/4 cup. Stir in the mustard. Shred the chicken into pieces, add to the skillet with the remaining cilantro and toss until combined. Serve while hot with tortillas, cheese, tomatoes, sour cream, and anything else you love on your tacos.

Source: Cook's Illustrated
Picture

Weeknight Chicken Enchiladas

3/7/2012

 
Picture
When I was a teenager, I wasn’t a big fan of Mexican food. At home, I would eat ground beef tacos and taco salad. If I went to a Mexican restaurant, the only thing I would ever order was a cheese quesadilla (which someone once pointed out was a Mexican grilled cheese sandwich). Thankfully, now I really like Mexican food and have a lot more options at home and when we go out!

We usually eat Mexican food at least once or twice a week at home. We have beef and chicken tacos, fajitas, chimichangas, pork green chili, quesadillas, nachos, taquitos, and these enchiladas. These are a great weeknight meal because they’re quick, easy, and delicious. Granted, these aren’t super healthy, but you could substitute low-fat cheeses and help it along.

I used to use rotisserie chicken for this meal, but I’ve been buying chicken breasts in bulk and freezing them. So now I just boil one or two breasts for about 20-30 minutes and then cut it up into very small pieces (usually quarter inch or so). If you like your Mexican food more spicy, add more chili powder or use hot chilis instead of mild; you could even add a jalapeno. You can change up this recipe to use what you have in your pantry and make it perfect for what your family will like. 
 
Weeknight Chicken Enchiladas
Print this recipe
Makes 6-8 enchiladas

2 cups diced chicken
1/2 teaspoon chili powder
1/4 teaspoon salt
4 ounces cream cheese, softened
2 cups cheddar cheese, shredded
Two 4-ounce cans of diced mild green chilis
Two 10-ounce cans of mild green chili enchilada sauce
6-8 tortillas
Additional 1/2 cup cheddar cheese

To make the filling, combine chicken, chili powder, and salt in a large bowl. Then add cream cheese, cheddar cheese, and green chilis. Stir until well combined. Spread 1/2 cup of filling in the middle of each tortilla and roll up.

In an oiled 9x9 pan, pour 1/2 cup of enchilada sauce on the bottom and spread it around. Place filled tortillas in pan seam side down. Pour the rest of the enchilada sauce over the top. Cover with aluminum foil and bake at 350 degrees for 20 minutes. Uncover, top with 1/2 cup cheddar cheese, and bake uncovered for 10 additional minutes until bubbling.

A She Makes and Bakes recipe
Picture
Pin It

     Welcome!

    Cooking is fun and easy at high altitude, but baking can be frustrating. About 90% of my recipes work everywhere, but some are adjusted so us mountain dwellers can enjoy baked goods from scratch. I hope you find great recipes on here for your family, and I'll let you know if any are adjusted for high altitude. 

    Stay Updated!

    Add to your Reader:

    Get new posts delivered to your inbox:

    Enter your email address:

    Delivered by FeedBurner

    Categories

    All
    Appetizers
    Bars
    Beef
    Bread
    Breakfast
    Brownies
    Cake
    Cheese
    Chicken
    Chocolate
    Cinnamon
    Cookies
    Crackers
    Cupcakes
    Dessert
    Do It Yourself
    Drinks
    Fruit
    Ground Beef
    High Altitude
    How To
    Ice Cream
    Italian
    Main Courses
    Mexican
    Muffins
    Oatmeal
    Pasta
    Pastry
    Pie
    Pizza
    Pork
    Project Pastry Queen
    Pumpkin
    Salad
    Sauces
    Side Dishes
    Snacks
    Soup
    Sourdough
    Steak
    Vegetables

    My featured recipes on NoshOnIt

    Some Good Reads!

    Annie's Eats
    Bake at 350
    Climbing Grier Mountain
    Confections of a Foodie Bride
    How Sweet It Is
    I Am Baker
    Macaroni and Chesecake
    Pinch of Yum
    Pink Parsley
    Smells Like Home
    Smitten Kitchen
    Sunny Side Up
    The Curvy Carrot
    The Marvelous Misadventures of a Foodie
    The Pioneer Woman Cooks
All content copyright 2012-2013 She Makes and Bakes.