She Makes and Bakes
  • Home
  • About
  • Ramblings
  • Recipe Index
  • What We're Eating
  • High-Altitude Baking

Buffalo Chicken Dip

7/19/2012

 
Picture
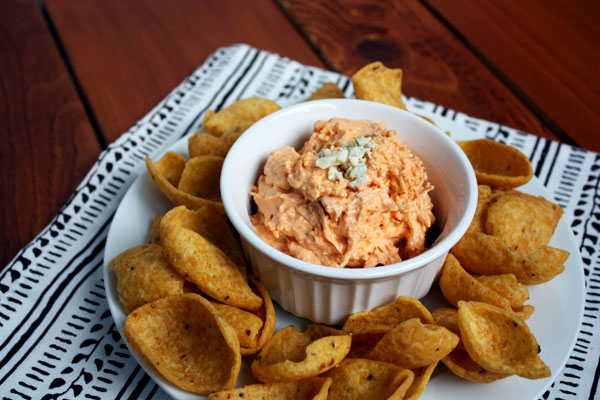
One of my favorite snack foods is chips and dip. Last summer we vacationed with my husband's family in the Outer Banks. Love. His family lives in Ohio, so they all drove and we flew. When we all arrived at our rental house, my mother in-law plugged in a crock pot full of this buffalo chicken dip. It was about 9 pm, but I chowed down on this dip. After a long day of flying and driving, it pairs nicely with a glass of shiraz...or four.

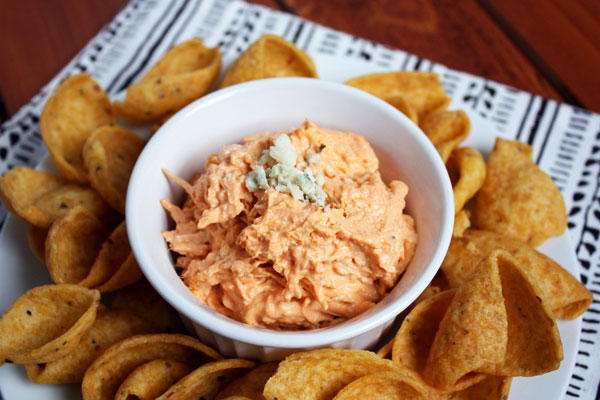
I've made it a few times since then, and I just love it. In fact, I had it for dinner one night. There's chicken....it's perfectly acceptable. I've served it at a few parties, and it's a big hit. I think most people really like chips and dip. I highly recommend you serve it with Fritos or another thick tortilla chip. The flavors meld better and you're not going to break a chip in the dip. Party foul! If you're feeling fancy, sprinkle a little blue cheese on top. Be prepared to share because people are going to dig in!  

For the chicken, you can use a rotisserie chicken or cook one large chicken breast (I boiled mine). By the way, if you have a stand mixer, plop the cooked chicken breast in the bowl, put the paddle attachment on, and mix on low. Your mixer will shred the chicken!!

Buffalo Chicken Dip Recipe
Print this recipe

8 ounces cream cheese, softened
1/2 cup Ranch dressing
1/2 cup buffalo wing sauce
2 cups cooked shredded chicken
1/2 cup shredded mozzarella

Stir all the ingredients together. Pour them in a greased 1 1/2 quart casserole dish and bake at 350 degrees for 20 minutes or until hot and the cheese is melted. You also can pour the mixture into a small Crockpot and cook on low until hot and cheese is melted, stirring occasionally. Serve immediately with Fritos or another thick tortilla chip.

Recipe from my mother in-law.
Picture

Caprese Bruschetta

7/1/2012

 
Picture
I'm home from Ireland, and this was one of the first things I made. Actually, I made biscuits and gravy for my husband first thing because after eating baked beans for breakfast for the past week, we were ready for some American food. But soon after that, I made this because I've been dying for some fresh fruits and veggies. In our experience, the land of potatoes equals the land of french fries. We got fries with everything. In fact, I ordered a slice of pizza for lunch one day, and I got fries with it. Strange, but I wasn't complaining too much. They served salads with most meals, but my lettuce usually seemed to be turning brown. So I was ready for some awesome produce. Don't get me wrong though; I loved Ireland. It's a great country, and I highly recommend visiting!

I never really used to like fresh tomatoes, and I'm still not a huge fan. However, if you mix them with basil and cheese (or cilantro and onions for that matter), I'm all in. I love caprese, and I started thinking about this on the plane. I made it in my jet-lagged state, and I was thinking you could make it for the 4th of July because it's red, white, and blue. Then I realized basil isn't blue and figured I should go back to bed. So instead make these when you're ready for something fresh. These scream summer, and I know I'll be enjoying them for awhile...especially when our tomatoes start growing in the garden.

By the way, the recipe calls for mozzarella fresca, which I found as a ball in the fancy cheese section of my local grocery store. I highly recommend this over shredded mozzarella. It has a lot more moisture than shredded, and it melts in your mouth. I don't think it's much more expensive than shredded.  

Caprese Bruschetta Recipe
Makes 4-5 pieces
Print this recipe

4 roma tomatoes, diced
4 ounces mozzarella fresca, cubed
4-6 large basil leaves, cut or torn into strips
1 large garlic clove, minced
2 tablespoons olive oil, divided
1/2 teaspoon balsamic vinegar
Salt, to taste
Freshly cracked pepper, to taste
4-5 slices of French bread or baguette

Preheat your oven to broil. Brush your bread slices with 1 tablespoon olive oil and broil in the oven until golden brown. Set aside.

In a bowl, stir together your chopped tomatoes, cubed mozzarella, basil, garlic, remaining olive oil, balsamic vinegar, and salt and pepper to taste. Spoon this mixture on top of the bread and serve.

Variations: You could use other types of tomatoes and slice instead of dice them. Instead of cubing the cheese, you could lay a slice of it on top of the bread. You also could place full basil leaves on top. Make this your own! It's easy and adaptable.

Source: A She Makes and Bakes original
Picture

Pico de Gallo

4/16/2012

 
Picture
I live for pico de gallo. If you've never had it, it's a super fresh, very chucky salsa. There's no sauce--just veggies. And it's ah-ma-zing! Last year, the hubs and I went to Mexico and stayed in an all-inclusive "resort." It was a far cry from a resort, and it was a very interesting trip, but one of the best things was the grill/bar by the pool. Every day they had vats of serve-yourself pico de gallo. They also had a steady stream of awesome french fries and other fried food. And every day for lunch and/or an afternoon snack, I would have french fries and pico de gallo with tortilla chips. It's not often that I get to eat pico and french fries every day--it was a glorious week in that respect.

Story time--when we finally got settled after a long day of traveling and having to switch hotels and rooms, we went to dinner in the hotel. I asked what kind of wine they had and the server said red or white. O-kkkkay. Then the hubs asked what kind of beer they had, and the server said beer and walked away. We just sat there stunned and wonder what happened until he brought back a little plastic cup with beer in it. Turns out they only had one kind and they served it sparingly. Gonna need more my friend. Lesson learned. 

Anyway, the secret to pico de gallo is that there are equal amounts of tomatoes, onion, and cilantro. You can adjust everything to your own personal preferences and add in as much jalapeno as you'd like for the heat factor. The pico pictured is extremely mild since I forgot to buy a jalapeno at the store and our garden isn't growing yet. I really didn't want to go back for one so I just omitted it, but it still tasted great.     
Picture
Pico de Gallo
Print this recipe
5 roma tomatoes
1/2 red onion
1-2 jalapenos
Fresh cilantro
Lime juice
Salt

Chop the tomatoes and onion into small pieces. (I've heard that running the chopped onion under cold water will take some of the overpowering raw onion taste out of it, so I do that. Sometimes it works, sometimes it doesn't.) If you want a milder pico, remove the seeds in the jalapeno (I do this). Finely dice the jalapeno(s). Adjust the amount of jalapeno for the temperature you prefer. 

Grab a bunch of cilantro and chop it up. You can leave the leaves attached to the stems, but discard the long stems. The leaves are where the flavors are at. Mix everything together, add a couple tablespoons of lime juice (or about 1/2 of a lime squeezed), and salt. Mix together and try out the concoction with a chip. Adjust seasoning/ingredients until you're happy with it. 

It's best if you eat the pico de gallo within 24 hours. Once you master how much of each ingredient you like, you can always scale it down and make it personal sized for one meal. If I want a little for lunch or a snack, I’ll use one tomato and scale everything else down. This was perfect last summer when we had roma tomatoes and jalapenos growing in the garden!  

Recipe from The Pioneer Woman  

Get in my mouth!
Picture

Nutella Strawberries

4/9/2012

 
Picture
While I'm not a huge Nutella (hazelnut cocoa spread) fan, I do love it with strawberries. I'd never smear it on a piece of toast, but if you put it on some fruit, I'll eat it till the cows come home....or something along those lines. In my opinion, this tastes just as good as chocolate-dipped strawberries, and it's a lot easier. And I think it's healthier too, but don't quote me on that. 

I followed a "recipe" from Kirbie's Cravings, but I figured out some tips out along the way that make it easier. From the top, cut the strawberries in half about three-quarters of the way down. Use a pastry bag with a flat tip (like the basket weave or rose petal tip). This makes it easier to get the Nutella in the strawberry since you're not trying to fit a huge round tip into the middle. I squeezed out about 1/2-1 teaspoon of filling into each berry and moved the bag from left to right so that it would squeeze out through the sides where I cut.

If you don't have pastry bags, you could put some nutella in a sandwich bag, cut off the tip and squirt it in. I think it'll be messier because you won't have the stability/control of the tip, but I'm sure it can be done. You also could add more Nutella, but I loved having just the taste of it inside the berry. 

Nutella Strawberries
Print this recipe

Pint of strawberries, rinsed
1/2 cup Nutella

Pat the strawberries dry and cut off the leaves/stem. This will give the strawberry a flat surface to sit on. From the top, cut the berries in half but only cut about three-quarters of the length down. 

Fill a pastry bag fitted with a flat tip with the Nutella. Gently open the strawberry from the top, place your pastry bag inside it (about half-way down), and fill the strawberry with 1/2-1 teaspoon of Nutella while moving the bag from left to right so the filling comes out of the cuts. You can add more filling if you'd like. Repeat with the remaining strawberries.
 
Source: Kirbie's Cravings 
Picture

PPQ: Biscoff Trail Mix Granola Bars

4/1/2012

 
Picture
I think I might get kicked out of Project Pastry Queen because I adapt everything...but you have to make what you know you and your family will like, right? The original recipe is called Jubilation Granola Chews, and you can find the real, probably healthier recipe here. I wanted to make my granola bars a little more train mix-y since I love that stuff. And then I substituted Biscoff for the peanut butter.

If you're not a food blog reader, you've probably never heard of Biscoff. I never had, and I just bought my first jar yesterday. All I can say is wow. This stuff is the nectar of the gods. It's hard to explain the taste, but it's a sweeter peanut butter and it kind of tastes like a cookie. Apparently Delta used to serve Biscoff cookies on their flights. It's super good, and it's worth the $5/jar in my opinion. Unfortunately, you can't really taste it in these bars, so I don't know if I'd use it again in these. If you don't want to use/buy the Biscoff, you can just use peanut butter. Nutella probably would be good, too.

These bars are pretty easy to make, and they don't take a lot of time. You'll need a candy thermometer for when you cook the sugar mixture. Even though my bars have chocolate and candy in them, I figure they have to be a little healthier than processed granola bars--at least I know all the ingredients. You could add anything you want into these, too. This recipe is easily adjustable. I also halved this recipe because I really didn't need 16 bars.

Biscoff Trail Mix Granola Bars
Print this recipe
1/2 cup packed brown sugar
3/4 cup honey
1/3 cup light corn syrup
1/4 cup water
1/4 cup butter
1/3 cup Biscoff (or peanut butter) 
1/2 teaspoon kosher salt
2 teaspoons vanilla
4 cups old-fashioned oats
1 cup almonds, sliced or slivered
1 cup peanuts
1 cup raisins
1 cup chocolate chips
1 cup peanut butter chips
1 cup M&Ms

Preheat your oven to 350 degrees. Generously grease a 9x13 pan.

Spread the oats, almonds, and peanuts on a large baking sheet and bake for 7-10 minutes until lightly browned. Stir intermittently.

In a large bowl, combine the raisins, chocolate chips, peanut butter chips, and M&Ms. When the oats/nuts are done browning, add them to the bowl.

In a medium saucepan, mix together sugar, honey, corn syrup, and water. Bring to a boil over medium high heat, reduce to medium, and cook until your candy thermometer registers 240 degrees (the soft-ball stage), about 8-10 minutes. Stir in the Biscoff, butter, salt, and vanilla. 

Pour the sugar mixture over the oat/candy mixture and stir to combine everything. Pour into a greased 9x13 pan and press down into the pan with your hands or a piece of plastic wrap if it sticks to your hands. Let cool for 1 hour before slicing into bars (about 4 1/2 by 1 1/2 inches).

Source: Adapted from The Pastry Queen
Picture
Forward>>

     Welcome!

    Cooking is fun and easy at high altitude, but baking can be frustrating. About 90% of my recipes work everywhere, but some are adjusted so us mountain dwellers can enjoy baked goods from scratch. I hope you find great recipes on here for your family, and I'll let you know if any are adjusted for high altitude. 

    Stay Updated!

    Add to your Reader:

    Get new posts delivered to your inbox:

    Enter your email address:

    Delivered by FeedBurner

    Categories

    All
    Appetizers
    Bars
    Beef
    Bread
    Breakfast
    Brownies
    Cake
    Cheese
    Chicken
    Chocolate
    Cinnamon
    Cookies
    Crackers
    Cupcakes
    Dessert
    Do It Yourself
    Drinks
    Fruit
    Ground Beef
    High Altitude
    How To
    Ice Cream
    Italian
    Main Courses
    Mexican
    Muffins
    Oatmeal
    Pasta
    Pastry
    Pie
    Pizza
    Pork
    Project Pastry Queen
    Pumpkin
    Salad
    Sauces
    Side Dishes
    Snacks
    Soup
    Sourdough
    Steak
    Vegetables

    My featured recipes on NoshOnIt

    Some Good Reads!

    Annie's Eats
    Bake at 350
    Climbing Grier Mountain
    Confections of a Foodie Bride
    How Sweet It Is
    I Am Baker
    Macaroni and Chesecake
    Pinch of Yum
    Pink Parsley
    Smells Like Home
    Smitten Kitchen
    Sunny Side Up
    The Curvy Carrot
    The Marvelous Misadventures of a Foodie
    The Pioneer Woman Cooks
All content copyright 2012-2013 She Makes and Bakes.