She Makes and Bakes
  • Home
  • About
  • Ramblings
  • Recipe Index
  • What We're Eating
  • High-Altitude Baking

How to Make Pineapple Flowers

3/19/2013

 
Picture
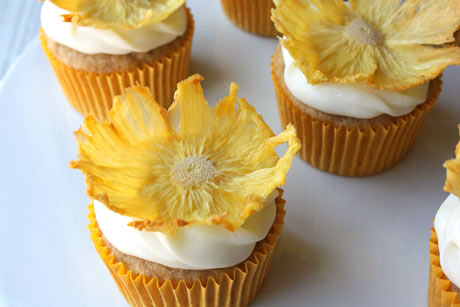
Have you seen anything prettier? These lovely little flowers are  amazing. All of that detail like the dots in the center and the lines around it happens naturally when you dry the flowers. I think they're stunning, and I love to put them on hummingbird cupcakes and carrot cupcakes. Apparently they taste really good, too, although I would never try them because I'm not a fan of pineapple. So picky!

I'm not going to lie and say pineapple flowers are the easiest thing to make. However, they are not the hardest either. They just require a sharp knife and some time. As is true with most things, the more you make them, the easier they get (and the better you get at making them). So here we go.
Picture
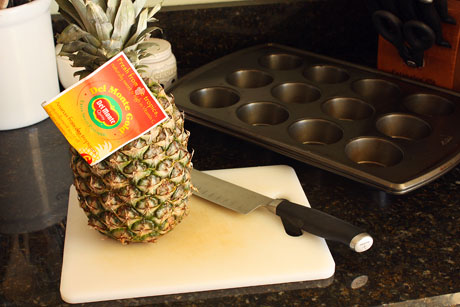
Here's what you need:
  • Pineapple
  • Sharp knife
  • Cutting board
  • Small measuring spoon, paring knife, or veggie peeler
  • Muffin tins
  • Sheet trays lined with a silicone baking mat or parchment paper
Picture
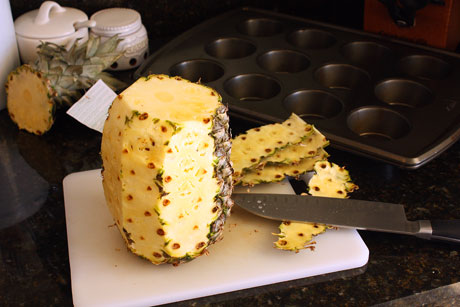
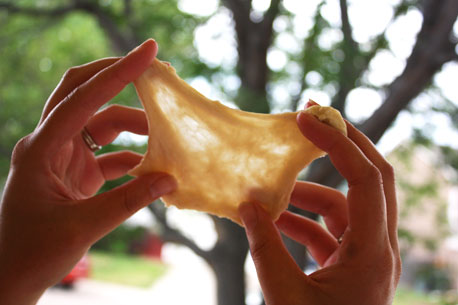
Cut the top off the pineapple and slice the rind off. The first time I did this, I sliced the rind off along with a lot of the pineapple. I highly recommend you don't do this. Instead of cutting straight down, follow the rind or you'll have some tiny flowers. You really don't want tiny flowers.
Picture
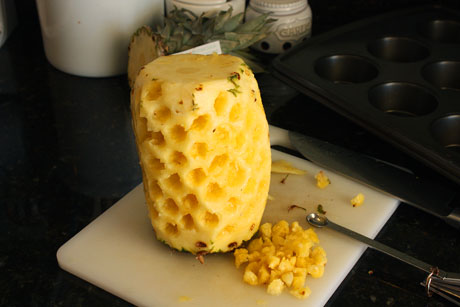
Use a small measuring spoon, small paring knife, or the point of a vegetable peeler to pop out the eyes/seeds on the pineapple.
Picture
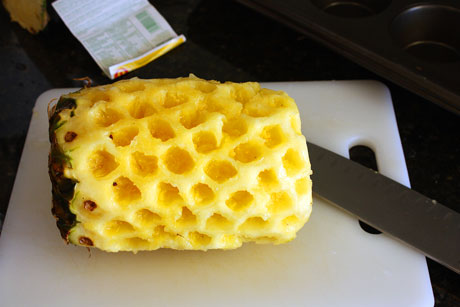
Lay the pineapple on its side, and get ready to cut with your sharp knife.
Picture
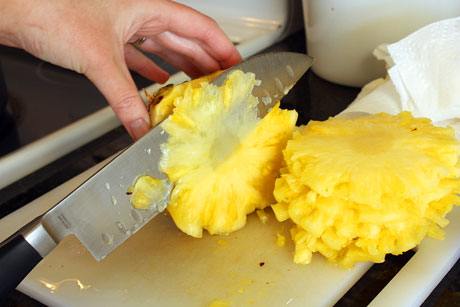
Make extremely thin cuts through the pineapple. You should be able to see your knife through the slice (which is why you want it to be extremely sharp). Don't worry about having mistakes. There are a lot of my slices that were too thick or I only got half a slice. The more you do it, the better you'll get. Even my slices at the beginning were too thick but then better at the end of the pineapple.
Picture
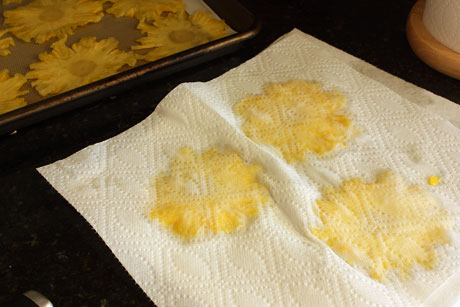
If your pineapple is really ripe and juicy, you'll want to press the slices between towels before you place them on the baking sheets. What we're doing is drying out the pineapple, so any moisture you can get rid of before you dry them in the oven will speed up the process.
Picture
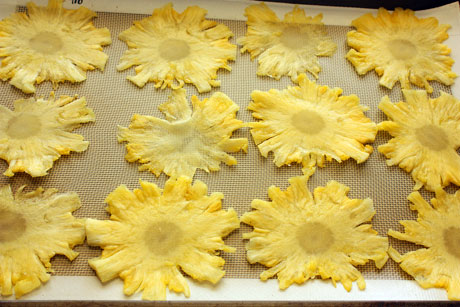
Place the slices on a baking sheet lined with a baking mat or parchment paper.

Bake them at 225 degrees to slowly dry them out. Baking times vary, but you'll want to start with 30 minutes, then flip the slices over, and then bake for another 30 minutes. The slices should shrink and be almost completely dry. The little dots in the middle of the flower happen naturally when they dry.

If they aren't dry after the hour, bake them for 5-10 minute increments and keep a close eye on them so they don't get too brown.
Picture
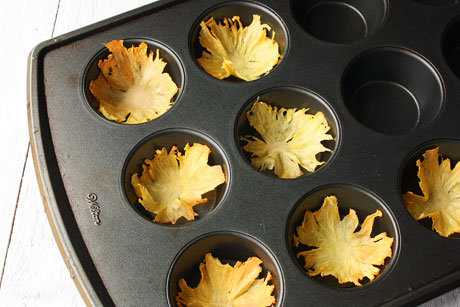
Place the flowers in muffin tins so they curve like a flower and let them dry overnight so they retain their shape.

Print this tutorial

Source: From Annie's Eats/Martha Stewart
You may also like:
Loading...

Heart Sugar Cookies

2/12/2013

 
Picture
Happy Valentine's Day (almost)! Are you ready? If not, may I suggest these adorable sugar cookies? I've never really decorated sugar cookies up until a couple of years ago, and I've definitely gotten better with practice. Lots and lots of practice! I even think they're pretty fun now, which completely surprises me.

These are great for teachers, kids, and the people you love...or like...or even just tolerate. Even better is that they taste good! Let's look at how to do this.
Picture
You'll need a batch of royal icing, split into the colors you want. You'll want to keep some of it in bags and flood the rest and place it in squeeze bottles. See how to do that here. I prefer to use a number 3 tip to outline the cookies and a number 2 tip to draw any details on after they dry.
Picture
You'll also need cookies. I did hearts and then scalloped circles. When the scalloped circles came out of the oven, I lightly pressed the heart cutter into the circles so I could outline it easier (instead of drawing it by hand).
Picture
Outline the cookies using the icing from the bags and let them rest for about 20 minutes or so.
Picture
Next you want to flood the cookie with icing from the squeeze bottle.
Picture
Then move it to the sides using a toothpick. Once the cookie is flooded, you can add details to it right away using the flooded icing (like polka dots or hearts) or let it sit for several hours and pipe details on top later.
Picture
To make the polka dots, right after you flood the cookie drop small amounts of another color icing on top using the squeeze bottles. It would have been helpful if I had darker colors...
Picture
To make hearts, place a toothpick at the top (or side of) of each polka dot and drag it through the dot and subsequent dots without picking up the toothpick. It will make a heart. Let these cookies dry overnight before packaging. 
Picture
To pipe details on top of the cookies, wait until they dry for at least a few hours and then pipe details on top. Let them dry overnight before packaging.

Sugar Cookie Recipe
Makes about 40 cookies
Print this recipe

1 cup butter
1 cup powdered sugar
1 egg
2 teaspoons vanilla
3/4 teaspoon salt
1/2 teaspoon nutmeg
2 1/2 cups all purpose flour

In the bowl of an electric mixer, cream together the butter and powdered sugar until combined. Add in the egg and mix, scraping down the sides of the bowl. Add the vanilla, salt, and nutmeg and mix until incorporated. Add in the flour and mix until combined. Place the dough in plastic wrap and chill until firm.

Preheat your oven to 375 degrees.

Roll the dough out to 1/4 inch thickness on a floured counter. Cut with cookie cutters and place on a greased cookie sheet. It is helpful to freeze the cookies for 8-10 minutes before baking as they will hold their shape better. Bake for 8-10 minutes; the cookies will not brown. Remove from the pan and let cool completely before decorating.

Royal Icing Recipe

4 tablespoons meringue powder
Scant 1/2 cup water
1 pound powdered sugar, sifted
1/2-1 tablespoon corn syrup
Few drops of clear extract (I use clear vanilla)

Place the meringue powder and water in the bowl of your stand mixer. Use the paddle attachment to beat it until it's combined and foamy. Add in the sifted powdered sugar and beat on low until combined. Add in the corn syrup and extract and beat on high until the icing is thick and glossy. It should have stiff peaks. Divide the icing into bowls to tint, and make sure to keep it covered.

Cookies adapted from Annie's Eats
Icing recipe from Bake at 350
Picture
You may also like:
Loading...

Homemade Soft Pretzels

1/23/2013

 
Picture
Is it just me or do you have to get a soft pretzel every time you walk into a mall? Every time. I have always loved soft pretzels, and I remember going to Broncos games when I was little and getting fresh soft pretzels every. single. game. About 10 years ago when they moved into a new stadium, the fresh pretzels were gone and they substituted it with the frozen Pretzel Time ones. So sad...but I still get one now and then. In fact, I got one at the playoff game a few weeks ago and then I dropped half of it. Fail. Especially because they're $3 a pop.

These pretzels, however, are awesome, and they're pretty easy. True pretzel recipes involve a boiling stage. This one does not, but I still think they taste just as good. Instead of boiling them, you mix hot water and baking soda together and then dunk the shaped pretzel in that before you put it on the baking sheet. It's not exactly the same effect but you still get that crispy crust and chewy inside. Pretty delicious in my opinion. This is an Auntie Anne copycat recipe, so you know it's gotta be good. Plus, you should have all of the ingredients on hand unlike others I've seen and tried.

I don't make pretzels from scratch very often because they're really best on the day they're baked. After that the salt gets soft and liquidy and they lose something. I highly recommend you make them the day you want them and then eat all of them. Every single one. You could make the dough the day before and let it rise in your fridge covered the night before and then shape, dunk, and bake the day of. That would be my recommendation if you don't want to do everything in one day. If you need to reheat though, do it in the oven or a toaster oven. Please don't eat day two pretzels at room temperature or microwaved. It's truly not the same.

One more thing about pretzels. You want the rope to be long...at least 2 feet. The longer it is, the less likely it is to bake into itself and make more of a pretzel mound than an actual pretzel with the spaces. They taste good either way, but if you're looking for that mall pretzel, make sure your dough is at least 2 feet long.

Oh....I highly recommend you serve them with queso! Because everything is always better with queso.

Homemade Soft Pretzels Recipe
Makes 8 pretzels
Print this recipe

1 1/2 cup warm water
1 1/8 teaspoon active dry yeast
2 tablespoons brown sugar
1 cup bread flour
3 cups all purpose flour
1 1/8 teaspoon salt

For the bath:
2 cups hot water
2 tablespoons baking soda

Topping:
1 egg mixed with 1 tablespoon water (optional)
2-4 tablespoons melted butter (optional)
Coarse pretzel salt

In the bowl of your mixer, combine the warm water, yeast, and sugar and let sit for five minutes or until foamy. Add in the flours and mix with the paddle on low speed until everything is incorporated. Let sit for five minutes, add the salt, and mix. Switch to the dough hook and mix on low until the dough is smooth and tacky. Place in a clean greased bowl, cover, and let rise for about 30 minutes to an hour or until doubled.

Preheat the oven to 450 degrees. Prepare two sheet pans with parchment paper sprayed generously with cooking spray or silicone baking mats.

Prepare the baking soda water bath by mixing the two in a large container. Divide the dough into 8 equal pieces and roll/stretch each piece into a rope that is 1/2 inch thick or less and at least 24 inches long. Shape into a pretzel shape by creating a U with the rope, bringing the ends down into an X (that meet up with the bottom of the U, and then crossing the ends so they twist in the middle of the pretzel. Lightly press anywhere the dough touches itself. Dip into the bath and place on the prepared cookie sheet. Let rise for about 15 minutes, brush with the egg wash and sprinkle with salt. Alternately, bake without the egg wash and salt, dunk in butter after they're baked and sprinkle with the salt. Bake for 10 minutes until golden brown. Serve immediately or at room temperature the same day they're baked (don't put in a bag).

To store any leftover pretzels (highly discouraged), you can keep them in a bag and then reheat in the oven at 350 degrees for about 5 minutes until crispy on the outside.

Recipe from Copycat Recipes Cookbook
Picture
You may also like:
Loading...

Sugar Cookies and Royal Icing Tutorial

12/6/2012

 
Picture
I'm a fairly firm believer that there are bakers in the world and decorators. Most people prefer one or the other. While I love to bake, I'm not a huge fan of decorating cakes and cookies. I can do it (although I don't have crazy good skills like some people), but I don't really enjoy it as much as when I bake. So I try and keep things fairly simple. These Santa Hat cookies that are decorated with royal icing fit the bill. There's only two colors. There's no extra piping detail, and it's fairly easy decorating because I used sanding sugar to add the extra pop.

It's not difficult to use royal icing, so let me show you the way. One thing before we start is that royal icing will dry out, so you must always keep it closed and covered (I use a wet paper towel).

First of all, this is my go-to sugar cookie recipe now when I want to do cut outs (even if I'm not going to go all out and use royal icing). The one that I used growing up is awesome, but it never held its shape. So I use this one now, and I also love it because it's really soft. The one thing I moved over from my family recipe is the nutmeg. If you've never had nutmeg in your sugar cookies, I insist you try it. It's pretty much the best thing ever. Just saying. People love my sugar cookies.

Here's what you'll need to decorate these cookies:
-Two airtight containers for your icing
-Gel red food coloring
-Two piping bags
-Number 2 or 3 piping tips
-Two squeeze bottles (optional but recommended)
-Toothpicks

First you make your icing using a stand mixer and the paddle attachment. I'm sure that it would work with a hand mixer, but I've never tried it. You have to whip the frosting until it's fluffy.

While the frosting is whipping, place the cookies on a cookie sheet.

Next you divide your frosting between containers and tint it. Place some of it into piping bags--you only need to put as much in as what you'll need for piping.
Picture
I got a little ahead of myself and forgot to put a coupler on one of the bags. Don't be like me. Close up the bags nice and tight so they don't dry out.I wait to cut off the tip of the plastic bag and put the icing tip on until I'm ready to do the outline.
Picture
Then take what's left of the frosting and add a little bit of water (1/2 teaspoon at a time) to thin it out so you can coat the cookie with it. Stir until the water is completely mixed in.
Picture
You'll know that your icing is thin enough when it runs off the back of a spoon and disappears into the bowl in 5-10 seconds. Note that you can always add more water but you can't take it away (although you can add the thicker icing from your piping bag into it if needed to thicken it up). Cover up the thinned icing. 
Picture
Now you can start decorating the cookies. Attach a number 2 or 3 tip to the coupler on your piping bag and pipe the outline of the cookies. Since the red outline for these depends on where the white outline is, I started with the white outline. Pipe the outline on all the cookies in the one color. Then start with the first cookie you did, and pipe on the second outline. I find that by the time I've finished piping all the cookies, the first cookie is dry enough for me to work with again (I was decorating 20 cookies). When you're not working with an open bag of frosting, cover the tip with a wet paper towel.
Picture
Then you'll pipe on the red outline. By the time you've finished all of the cookies, the first cookie should be dry enough for you to start the flooding process. You'll know if it's dry enough if you can lightly touch the outline and it's firm.
Picture
To flood the cookies, you'll first want to gently stir the frosting near the surface to get rid of any air bubbles that developed while it sat. You can transfer the icing into squeeze bottles or you can use a spoon to drop the icing onto the cookie. I use a spoon because my squeeze bottles are in my crawl space and I'm too lazy to get them (but squeeze bottles definitely make it easier). Carefully drop a good amount of the thinned icing in the center of the area and then use a toothpick to move it to the edges (sorry, didn't get a picture of the icing in the center). Do this on all the cookies.
Picture
Once the cookies all are flooded with the white icing, start with the first cookie you flooded and repeat with the thinned red icing. If you see any air bubbles, you can pop them with the toothpick.
Picture
Once you cookies are frosted, you want to let them sit for at least a few hours or overnight (uncovered is fine) to let the icing set. The icing will be hard and have a matte sheen.
Picture
The next day I wet a small paintbrush and lightly and gently brushed it on top of the white icing. Then I sprinkled white sanding sugar on top and shook off the excess. And I forgot to take a picture. Sorry.
Picture
Sugar Cookie Recipe
Makes about 40 cookies, depending on your shape
Print this recipe

1 cup butter
1 cup powdered sugar
1 egg
2 teaspoons vanilla
3/4 teaspoon salt
1/2 teaspoon nutmeg
2 1/2 cups all purpose flour

In the bowl of an electric mixer, cream together the butter and powdered sugar until combined. Add in the egg and mix, scraping down the sides of the bowl. Add the vanilla, salt, and nutmeg and mix until incorporated. Add in the flour and mix until combined. Place the dough in plastic wrap and chill until firm.

Preheat your oven to 375 degrees.

Roll the dough out to 1/4 inch thickness on a floured counter. Cut with cookie cutters and place on a greased cookie sheet. Bake for 8-10 minutes; the cookies will not brown. Remove from the pan and let cool completely before decorating.

Royal Icing Recipe

4 tablespoons meringue powder
Scant 1/2 cup water
1 pound powdered sugar, sifted
1/2-1 tablespoon corn syrup
Few drops of clear extract (I use clear vanilla)

Place the meringue powder and water in the bowl of your stand mixer. Use the paddle attachment to beat it until it's combined and foamy. Add in the sifted powdered sugar and beat on low until combined. Add in the corn syrup and extract and beat on high until the icing is thick and glossy. It should have stiff peaks. Divide the icing into bowls to tint, and make sure to keep it covered.

Cookies adapted from Annie's Eats
Icing recipe from Bake at 350

For a great decorating tutorial, check this out. For some FAQs on royal icing, check this out.  
Picture

How to Peel Tomatoes

8/27/2012

 
Picture
I'm going to be sharing some tomato recipes this week, so I wanted to give a quick tutorial about how to peel tomatoes first. Get out your vegetable peeler. No wait, don't. I was just kidding. Peeling tomatoes is really easy, and no veggie peeler is required.

First, get out a large pot, fill it with water, and heat it on high until boiling. Meanwhile, cut a small, shallow X on the bottom of your tomatoes. Also fill a large bowl with ice water.
Picture
When the water is boiling, place the cut tomatoes into the pot. Let them sit in the water for 30-45 seconds. You should start to see the skin peeling away from the X you cut. Use a slotted spoon to remove the tomatoes and place them into the ice water. Let them sit there for about a minute or two to cool and then you can easily peel the skin off of the tomatoes with your fingers. This method also works for peaches!
Picture

Make Your Own Cake Flour

8/15/2012

 
Picture
Oh boy are we talking about exciting stuff today. Flour, and more specifically, cake flour. Do you know how expensive cake flour is? It's about $4.50 per box. Yikes! And the annoying thing is that you need it. If a recipe calls for cake flour, it's pretty important that you use it instead of a different kind of flour. The thing about flour is that each type (all purpose, bread, cake, etc.) has a different percentage of gluten. That gluten affects the elasticity and texture of your dough. If you used bread flour in cupcakes, you'd have some pretty tough cupcakes. Likewise, using all purpose flour instead of bread flour isn't going to give you the same chew. So, don't be stingy and use all purpose flour instead of cake flour because you won't get the same results. Especially since now you can make your own, and you don't have to spend the exorbitant amount of money on it.
Picture
To make cake flour, you combine two simple and cheap ingredients in a sifter and sift away.
Picture
The only "bad" thing about this recipe is that you have to sift it about four times.
Picture
But taking the ten minutes to sift and sift and sift is worth the money saved in my opinion. Especially since I buy a 25-pound bag of all purpose flour at Sam's Club for about $10. I go through a lot of flour; therefore, paying a lot of money for any type really isn't an option for me. So take the time to sift two ingredients together and make yourself some cheap cake flour!

Make Your Own Cake Flour Recipe
Makes 4 cups
Print this recipe

Note: If you want a small batch of this, for every cup of all purpose flour, remove two tablespoons of the flour and add in two tablespoons of corn starch.

3 1/2 cups all purpose flour
1/2 cup corn starch

Combine the ingredients in a sifter. Sift together four times. (I like to sift it into one bowl, scoop it out, and sift it back into the same bowl.) Store in a 1970s Tupperware container if you're cool like me. Ha! 

Demystifying Bread Making

6/13/2012

 
Picture
It always amazes me when people say they're scared of making bread. Why oh why. Yeast is your friend, and homemade bread is so much better and cheaper than store bought. Let me say that the only kitchen fear I can think of is stacking cakes. Mainly because you do this for weddings, and mainly because brides can be ca-ra-zy! I don't want to "ruin" a wedding. No siree.

Anyway, I have been making bread for years, and the longer you do it, the better you get. For the longest time, I used my bread maker, and it worked great. When I got a Kitchen Aid mixer, I started using that, and it was even easier. I have taken some bread classes, so I'm here to pass my knowledge along to you so that you aren't scared anymore. Please note that these tips are based on my experience and what I've been told. So don't yell at me and tell me I'm wrong. Thanks.

1. I think a lot of people get hung up on what type of yeast to use. I know I have. Here's the thing: it doesn't matter if you use instant (aka bread machine yeast) or active dry yeast if you make your dough the same way. If you always stir your yeast into the liquid, it doesn't matter which type you buy. This is a very general statement, and I know some people will argue with me, but this always works for me.
2. If you're using new yeast (either a new jar or a packet), you'll need to proof your yeast to make sure it's alive. Yes, yeast is alive. Proofing it means pouring it into the warm water or milk, adding some sugar, and letting it sit for about 5-10 minutes. If it's alive, it'll bubble and get foamy (like the picture below). If it doesn't do anything, you have a bad batch or it's old. I make a lot of bread, so I always buy a jar. Once I know it's ok, then I don't have to proof it again. You can use the yeast, water/milk, and sugar measurements from your recipe to proof your yeast. Do not skip this step because nothing is more frustrating than going through the whole bread-making process to have your loaves be dense and not great because your yeast didn't work. Also, if you're using packets, you need to proof each packet. Don't assume that if one packet was ok that the other two will be ok as well.   
Picture
3. When you add the yeast to the liquid, you want the liquid to be warm. You know the trick of seeing if a bottle is too hot for a baby by testing it on the inside of your wrist? That's what you want to do for bread. It should be around 100 degrees, and you'll know if it's too hot or cold by using that neat little trick. If your liquid is too cold, it will take forever to work. If your liquid is too hot, it will kill the yeast. So be like goldilocks and make sure it's just right.
4. Bread making is much easier if you have a machine to do it for you, especially if you're working with a very tough dough. Stand mixers are expensive (but so worth the cost), but bread machines are pretty inexpensive. Also, you can go to Goodwill and get one there for super cheap. All of their appliances are tested to make sure they work before they're put on the sales floor. Heck, if you live in the Denver area and don't have a bread machine, let me know and you can have mine. It's just hanging out in my crawl space.  
5. If you're using a bread machine, use the dough setting because you can shape and bake it yourself. It'll be prettier that way. Put the ingredients into the pan according to the manufacturer's instructions (mine were liquids at the bottom, dry ingredients, and the yeast in a well on top) and hit start.
6. There are two main types of bread: regular (baguettes, French, sourdough, etc.) and enriched. Enriched dough has eggs and/or butter in it. Generally it is stickier than regular dough. I also think that it's probably not called regular dough, but I can't think of a better or more accurate word. Sorry.
 7. The best way to tell if your "regular" dough has been kneaded enough is the window test. Take a small portion of dough and stretch it out. When you hold it up to the light, you should be able to see through it without having it tear. At that point, it's fully kneaded and ready to rise.
Picture
8. Dough rises and loaves (shaped dough) proof. If your dough over-rises, it's not a big deal. You can punch it down and then shape it. If your loaves or rolls over-proof, you will need to punch them down, reshape them, and let them proof again. If you put over-proofed loaves into the oven, they will collapse and you'll have not so good bread. This is super frustrating, so don't do it.  
9. A lot of breads bake best in a moist, steamy oven. If the recipe says to steam the oven, you can easily do that by spraying water in your oven with a squirt bottle. You'll want to do this a couple of times in the first 10 minutes. This keeps the crust of the bread from setting too quickly.  
10. Your first shaped rolls and/or loaves are not going to be beautiful. It's ok because they'll taste great. Just go with it. If you made hundreds of loaves every day like bakeries do, you would have beautiful loaves, too. The more you make, the better they look.
11. Dough loves to rise in warm, humid environments. My bread rises really fast in the summer when my house is 86 degrees (I wish I was exaggerating). My bread rises really slow in the winter when my house is 68 degrees. You can get your bread to rise faster by placing it in the oven and placing a pan of boiling water under it. Make sure the oven and the oven light are off. The steam and warmth will help your bread to rise if you don't want to wait all day.
12. You really can't skip the dough rising step, but you can speed up the loaves proofing step. This is due to the beauty of oven spring. Many recipes say that your loaves should proof until they're doubled in size. I rarely do this. I usually give them about 20-30 minutes and then I place them in the preheated oven. They'll finish rising in the hot oven.
13. Check your oven the first time you bake a loaf of bread or rolls. If the bottom of them gets too brown, place another pan under the one you're baking the bread on. This will keep the bottoms from getting too done. I do this for all my bread.
14. Get yourself some parchment paper, and bake all your bread on parchment. You don't want to have to scrape your bread off of a pan. This will make you angry. 

I hope some of these tips will help you to be more confident about using yeast. It's good stuff, and nothing makes your house smell better than baking bread. Do you have any other questions about baking bread? I'd love to answer them! Conquer your fear!  

Sourdough Loaves and Shaping Tutorial

4/30/2012

 
Picture
Although I had a great trip to New Orleans, both seeing and eating wonderful things, I was very happy to be back in my kitchen yesterday. And the first thing I did was make bread. I love making bread, and I love fresh bread for dinner. Not much else beats fresh bread.   

I know that making bread can be intimidating to some people, but it's pretty easy once you get the hang of it. It's much easier if you have a stand mixer or a bread machine. I have both, and I much prefer the stand mixer. In fact, my bread machine is hanging out with the Christmas decorations and childhood stuffed animals in the crawl space. At least it has good company, right? But, if you don't have a stand mixer, use your bread machine on the dough setting. Let it do the hard work for you, and then you can shape it, let it proof, and bake it yourself. No one will be the wiser that you didn't do all of it yourself since it won't be a strange square-shaped loaf of bread. If you don't have a stand mixer or a bread machine, I hope you have some strong muscles.

In case you were wondering about some terminology (because I know that you care about this stuff), dough rises and loaves proof. Your dough will be fine if you let it rise all day; your loaves will not. If your loaves overrise, they will collapse in the oven, and you will be mad or upset (or both). But, if you know that your loaves have overproofed, you can punch (and by punch, I mean lightly press) them down, reshape them, and let them proof again before baking. I have done this and in fact did this with these in the picture. My plans changed, and the loaves sat on the counter for many hours. Whoops. They tasted great though, and no one knew that I almost had a bread fail. 

One more important thing: when you're baking loaves of bread, you want to steam your oven. I found that the easiest way for me to do this was get a clean spray bottle and fill it water. When you put your proofed loaves in the oven, quickly spray the entire oven and your loaves with at least 10 sprays of water. Then repeat this in 3-5 minutes and again in another 3-5 minutes. This keeps the air in the oven nice and moist, and it will prevent the crust of the bread from baking too fast. Just be very careful to not spray the window on the oven door with water or it could break. Please, please be careful!! I can't afford to buy you guys new ovens!  

Here's the amazing recipe for sourdough loaves, and I'll show you how to shape a loaf below. One amazing variation on this is to throw a bunch of fresh rosemary into the dough when you incorporate all the ingredients. It's so good!
Picture
Sourdough Loaves
Makes two 1-pound loaves
Print this recipe

6 oz (3/4 cup) sourdough starter
1 cup + 2 tablespoons warm water
1/2 tablespoon yeast
1 lb, 2 oz (3 1/4 cups + 2 tablespoons) bread flour
1/2 tablespoon + 3/4 teaspoon salt   

In your mixing bowl, combine starter, water, and yeast. Mix with the paddle until combined. Add in the bread flour and mix on low until flour is hydrated. Turn off the mixer and let it sit for about 10 minutes. This gives the yeast a chance to work before the salt inhibits it. After ten minutes, add the salt, mix on low for about 30 seconds, and switch to the dough hook. Knead on low speed for about 5 minutes until the dough is smooth and satiny. Place into a greased bowl and let rise for an hour or two until doubled in size. 

If you're using a bread machine, place the ingredients in the mixer according to the manufacturer's instructions, set it for the dough setting, and hit start.

Once your dough has risen, follow the instructions below to shape it into two loaves, place them on a silpat or parchment paper-lined sheet pan, cover loosely with plastic wrap, and proof at room temperature for about an hour until doubled in size. If you want them to have a stronger sourdough flavor, place these well-covered loaves in the fridge for 8-12 hours (no more than 24 hours). When you take them out of the fridge, remove the plastic wrap, and allow the dough to come to room temperature. Wait to bake until they're doubled in size. About 5 minutes before baking, quickly slash slits on the top of the bread using a sharp knife.

Bake at 500 degrees with plenty of steam in the first 10 minutes. Bake for about 20-25 minutes until the loaves are golden brown and sound hollow when tapped. Let them cool for about 30 minutes before you slice into them.

Here's how to shape your loaves:

When your dough is done rising, split it into two equal pieces. Working with one at a time, spread it into a rectangle.
Picture
Starting with the small end, start to roll it up tightly. When you complete a roll, press down on it so you know it's tight. You will do this several times, and this will ensure that it will keep its shape.
Picture
When you're finished rolling it up, pinch the seams together.
Picture
The final step is to roll or rock the dough with the seam side down to even it out. At this point, you can stretch it into a longer loaf, too. If you want the ends to be thinner than the middle, just stretch the ends out and taper them. This is what it should look like:
Picture
So pretty. Your next step is to put this on a silpat or parchment paper-lined sheet pan and let it proof. About five minutes before you put it in the oven, you'll want to quickly slash the top of it with a sharp knife. It helps to say slash while you do the motion because then you do it faster. You don't want to drag your knife through the bread--it will ruin the look of the bread and could deflate it. Don't skip the slashing or your bread will crack. Then you bake with steam and enjoy!
 
Source: Cook Street Cooking School

Pizza Dough and Sauce

3/27/2012

 
Picture
If you read any food blogs, you’ll see that almost everyone has their favorite pizza dough recipe. This is mine, and boy do we love it. The mix of semolina flour and bread flour gives it a crispy brown crust with a chewy interior. Pizza is a very easy thing to make from scratch, and it tastes so great. We hardly order pizza anymore. There are so many things you can do with pizza dough. We love to make pizza, calzones, pizza rolls, pepperoni rolls, breadsticks, and garlic knots. The beauty of most pizza dough recipes is that they make enough for two pizza pies or a lot of calzones and even more rolls and breadsticks. You can stick the extra dough in the freezer, and it becomes an easy weeknight meal. All you have to do is pull it out of the freezer in the morning and let it thaw and come to room temperature.

It’s best to weigh the flours so you get exact amounts. If you don’t have a scale or don’t want to buy one, the dough should be slightly sticky/borderline tacky (your finger barely sticks to the dough when you touch it), so keep adding more flour or water to get it there.

The sauce recipe is my favorite because it tastes so fresh and you don’t have to precook it. If you’re a little weirded out by the lemon juice, don’t be. I was skeptical because I am not a lover of lemon, but it adds such a great fresh and bright taste to the sauce. It’s incredible. You’ll love this sauce recipe.

Pizza Dough
Print this recipe
6 ounces (about 1 cup) semolina flour
16 ounces (about 3 1/4 cups) bread flour
1 1/2 tablespoons sugar
1 teaspoon yeast
1/4-1/2 teaspoon garlic powder (optional)
2 teaspoons salt
14 ounces (1 3/4 cups) warm water
3 tablespoons olive oil

You can make this dough in a stand mixer or by hand. I usually start it in the hand mixer and finish it by hand.

Combine the yeast, sugar, garlic, and water in a bowl and allow yeast to dissolve. Add flour and mix to combine. Let the dough rest for a few minutes to give the yeast time to work. Add the oil and salt and mix to combine. Mix using the bread hook until it’s soft and elastic OR knead by hand until the dough is soft and elastic. I've found that the oil keeps you from being able to fully knead the dough, so I usually plop the dough on the counter, add a touch of flour, and knead it for a couple of minutes until it's smooth. Place in a lightly oiled bowl and cover. Let it rise about an hour or until it’s doubled in size. I like to cover my rising bread with shower caps that my friends pick up at hotels. They're easy to slip on and they're reusable.

Split into two pieces and shape or place in freezer bags to use later.

Pizza Sauce
1 (28 ounce) can crushed tomatoes
2 tablespoons tomato paste
1/4 teaspoon black pepper
1 teaspoon dried basil
1 teaspoon dried oregano
1 teaspoon garlic powder
2 tablespoons lemon juice
1 teaspoon salt, to taste

In a medium-sized bowl, combine all ingredients and mix well. Store in a covered container in the fridge for one week or store what you don't use in the freezer.
 
To Make the Pizza
While the dough is rising, move an oven rack to the top rung, place your pizza stone on it (if you have one), and preheat your oven as high as it will go (usually about 550 degrees). This will give you the best tasting pizza. It comes at a price, though, because your house probably will smell like you just cleaned your oven. At least mine did. So now I bake it at 530 degrees. The pizza toppings don't get as crispy and brown, but it’s a nice compromise. You’ll want to let the oven preheat for at least an hour. 

Stretch the dough into a 10-12 inch circle with thicker edges using plenty of flour or cornmeal for dusting. I put my dough onto a floured piece of parchment paper that I can slide on top of my pizza stone. Add sauce, cheese, and any other toppings. Slide the pizza onto the stone or place your baking sheet into the oven and bake for 10-15 minutes until browned and bubbling. Make sure to let it cool first so you don't lose a layer of skin from the roof of your mouth!

Source: Pizza dough barely adapted from Cook Street Cooking School. Sauce recipe barely adapted from Peter Reinhart’s Artisan Breads Every Day
Picture

Sourdough Starter

3/20/2012

 
Picture
Today's post isn't super exciting or pretty, but it will lead to great things. I promise. Do you love sourdough bread but don't want to make your own starter because it's gotta be hard? Well, it's not. It takes some time, but it's inactive time. You only have to stir it twice a day for about a week. King Arthur Flour has a great primer about sourdough (with everything you could ever need to know), and this starter recipe is from them. I'd like to point out two important things I've learned about having a sourdough starter.

1. It should always be the consistency of pancake batter. 
2. You don't have to baby it as much as you think or as often as people/cookbooks tell you. More on this later.

What you should do first is call your local bakery (but not your chain grocery store) and ask if you can buy a cup of their sourdough starter. They may say no, but it's worth a shot. It'll save you some time if you don't have to make your own. You also can buy starter from King Arthur Flour and have it shipped to your house. Theirs is 240 years old. Mine is 13 years old (I got it from a cooking school in Denver when I took a bread class). If you already have a cup of starter, skip down to Building Your Starter. 

Here's an easy way to make your own starter.
Print these directions
Making Your Starter
2 cups warm water
1 tablespoon of sugar or honey (optional)
1 tablespoon or packet active dry yeast
2 cups all-purpose flour
           
Pour the water into a glass bowl, add the sugar/honey and yeast. Stir to dissolve. Add the flour and stir until the flour is fully hydrated. Cover with a dishcloth or towel and set in a warm place (or at room temperature). Let it set for 2-5 days, stirring once or twice a day. It should be bubbling during this time. Once it stops bubbling and smells sour, stir it once more, use it, or cover and refrigerate. I keep my starter in an 8-cup Tupperware container. You can now skip to Using and Maintaining Your Starter.

Building Your Starter
If you bought a starter, measure 1 cup of it into a bowl. You will be doubling the volume every time you feed it so make sure your bowl is big enough. Add in 1/2 cup all-purpose flour and 1/2 cup water. Stir, cover, and let sit at room temperature for one day. After one day, add in 1 1/4 cups flour and 3/4 cup water. Stir, cover, and let sit at room temperature for two days. After two days, add in 2 1/2 cups flour and 1 1/2 cups of water. Stir and let sit at room temperature for 2 days. Now you can use it. This gives you 8 cups of starter. This is the amount of starter I have and use for two people. We always have more than plenty. 

Using and Maintaining Your Starter
When you use your starter, you want to replace what you used with flour and water. Now, you can measure out the flour and water (if you used 2 cups, you'll add about 1 1/4 cup flour and 3/4 cup water) or you can dump in some flour and add some water until it's the consistency of pancake batter again. That's what I do. I try not to over think it. It's just starter, and I have more important things to think about. Make sure you always have at least 2 cups of starter.

Unless you are using your starter every few days, store it in the refrigerator because this will keep it from going bad. If you see liquid on top, this means it's hungry and needs to be fed with water and flour. You'll want to pull your starter out of the fridge a few days before you want to use it, dump out a couple cups of it (into the trash/drain or there are some recipes that use an unfed starter), replace what you dumped out with more flour and water, and let it sit and ferment for a couple of days. Then it's ready for you to use.

A lot of people say you need to use your starter every week or two weeks. I usually go at least a month and it's fine. It's very hungry, and there's a thick layer of nasty water on top of it, but that's ok. I dump out some starter, add some flour and water until it's the consistency of pancake batter, let it sit for a couple of days and then use it. After I use it, I add a little more flour and water to replace what I used, stir it up, and put it back in the fridge.

The moral of the starter story is don't over think it. It doesn't have to be precise. And in the world of baking where precision is everything, isn't it nice to have something that you can dump some water and flour into, stir, and let it do the work? Let me know how your starters are coming along or if you have questions. Tomorrow there will be a great sourdough cheddar roll recipe that will knock your socks off!
Picture
<<Previous

     Welcome!

    Cooking is fun and easy at high altitude, but baking can be frustrating. About 90% of my recipes work everywhere, but some are adjusted so us mountain dwellers can enjoy baked goods from scratch. I hope you find great recipes on here for your family, and I'll let you know if any are adjusted for high altitude. 

    Stay Updated!

    Add to your Reader:

    Get new posts delivered to your inbox:

    Enter your email address:

    Delivered by FeedBurner

    Categories

    All
    Appetizers
    Bars
    Beef
    Bread
    Breakfast
    Brownies
    Cake
    Cheese
    Chicken
    Chocolate
    Cinnamon
    Cookies
    Crackers
    Cupcakes
    Dessert
    Do It Yourself
    Drinks
    Fruit
    Ground Beef
    High Altitude
    How To
    Ice Cream
    Italian
    Main Courses
    Mexican
    Muffins
    Oatmeal
    Pasta
    Pastry
    Pie
    Pizza
    Pork
    Project Pastry Queen
    Pumpkin
    Salad
    Sauces
    Side Dishes
    Snacks
    Soup
    Sourdough
    Steak
    Vegetables

    My featured recipes on NoshOnIt

    Some Good Reads!

    Annie's Eats
    Bake at 350
    Climbing Grier Mountain
    Confections of a Foodie Bride
    How Sweet It Is
    I Am Baker
    Macaroni and Chesecake
    Pinch of Yum
    Pink Parsley
    Smells Like Home
    Smitten Kitchen
    Sunny Side Up
    The Curvy Carrot
    The Marvelous Misadventures of a Foodie
    The Pioneer Woman Cooks
All content copyright 2012-2013 She Makes and Bakes.