She Makes and Bakes
  • Home
  • About
  • Ramblings
  • Recipe Index
  • What We're Eating
  • High-Altitude Baking

How to Make Pineapple Flowers

3/19/2013

 
Picture
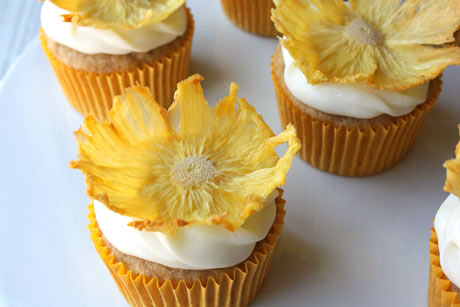
Have you seen anything prettier? These lovely little flowers are  amazing. All of that detail like the dots in the center and the lines around it happens naturally when you dry the flowers. I think they're stunning, and I love to put them on hummingbird cupcakes and carrot cupcakes. Apparently they taste really good, too, although I would never try them because I'm not a fan of pineapple. So picky!

I'm not going to lie and say pineapple flowers are the easiest thing to make. However, they are not the hardest either. They just require a sharp knife and some time. As is true with most things, the more you make them, the easier they get (and the better you get at making them). So here we go.
Picture
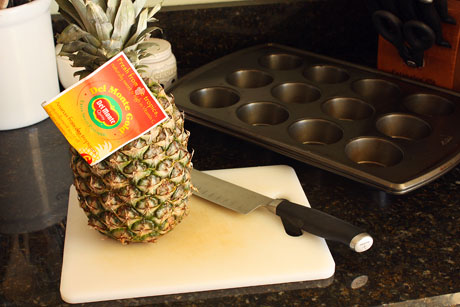
Here's what you need:
  • Pineapple
  • Sharp knife
  • Cutting board
  • Small measuring spoon, paring knife, or veggie peeler
  • Muffin tins
  • Sheet trays lined with a silicone baking mat or parchment paper
Picture
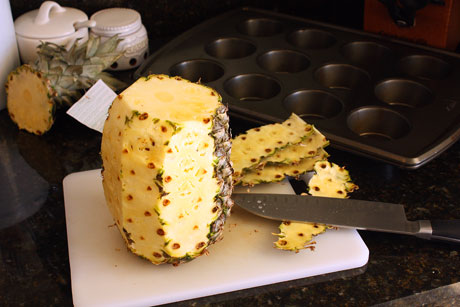
Cut the top off the pineapple and slice the rind off. The first time I did this, I sliced the rind off along with a lot of the pineapple. I highly recommend you don't do this. Instead of cutting straight down, follow the rind or you'll have some tiny flowers. You really don't want tiny flowers.
Picture
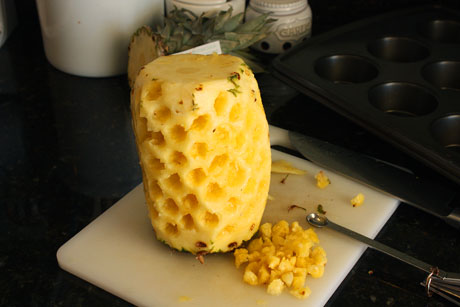
Use a small measuring spoon, small paring knife, or the point of a vegetable peeler to pop out the eyes/seeds on the pineapple.
Picture
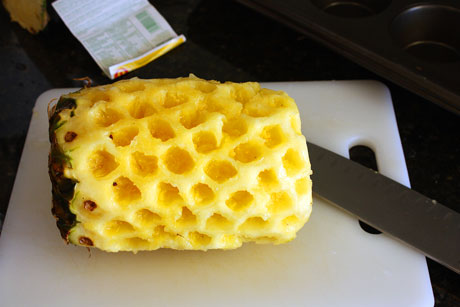
Lay the pineapple on its side, and get ready to cut with your sharp knife.
Picture
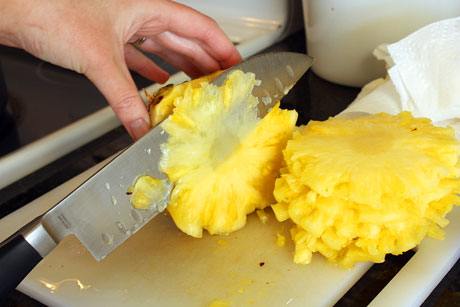
Make extremely thin cuts through the pineapple. You should be able to see your knife through the slice (which is why you want it to be extremely sharp). Don't worry about having mistakes. There are a lot of my slices that were too thick or I only got half a slice. The more you do it, the better you'll get. Even my slices at the beginning were too thick but then better at the end of the pineapple.
Picture
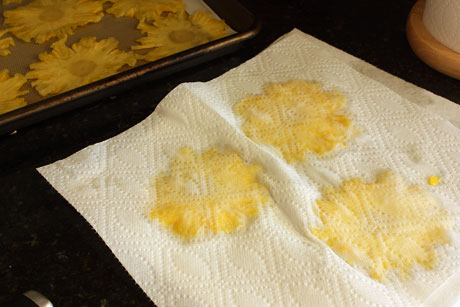
If your pineapple is really ripe and juicy, you'll want to press the slices between towels before you place them on the baking sheets. What we're doing is drying out the pineapple, so any moisture you can get rid of before you dry them in the oven will speed up the process.
Picture
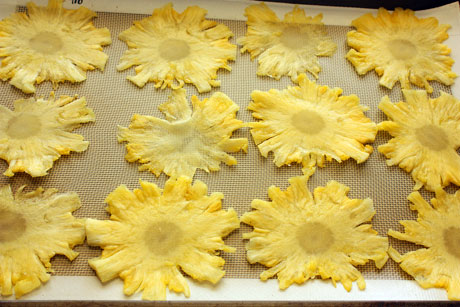
Place the slices on a baking sheet lined with a baking mat or parchment paper.

Bake them at 225 degrees to slowly dry them out. Baking times vary, but you'll want to start with 30 minutes, then flip the slices over, and then bake for another 30 minutes. The slices should shrink and be almost completely dry. The little dots in the middle of the flower happen naturally when they dry.

If they aren't dry after the hour, bake them for 5-10 minute increments and keep a close eye on them so they don't get too brown.
Picture
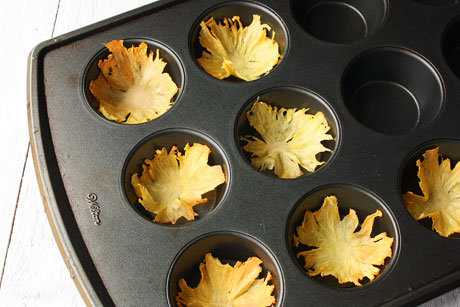
Place the flowers in muffin tins so they curve like a flower and let them dry overnight so they retain their shape.

Print this tutorial

Source: From Annie's Eats/Martha Stewart
You may also like:
Loading...
Hari Chandana link
3/20/2013 12:30:16 am

very creative.. thanks for sharing !!

Gabriela Godoy link
3/20/2013 01:57:25 am

They look beautiful!!

Sharon
3/22/2013 11:06:46 am

Theses flowers are beautiful! I want to do them for my granddaugther's "tropical" engagement party. How far ahead can I make them? [email protected]. Thanks for any help you can give me.

Tiffany, aka Streusel link
3/28/2013 01:49:01 am

Lovely!

Lotti link
4/3/2013 03:54:33 pm

Yum! Thanks for sharing. >o<
I'll definitely be making these!

Sweet Life link
4/4/2013 05:28:04 am

These is very creative, thanks for sharing and I hope to try it as soon as I can!

Rosie @ Blueberry Kitchen link
4/6/2013 02:00:06 am

These look amazing, thanks for the tutorial!

Whitney @ The Newlywed Chefs link
4/7/2013 11:37:48 am

These are darling!! Perfect for a spring garden party!

Ana
4/12/2013 09:11:17 am

Hi, I'm Ana from Fooduel.com. It is a site in which users vote recipes.

There is a ranking of the best recipes and a profile with your voted recipes. Each recipe has a link to the blog which belongs the recipe. This way you will get traffic to your blog.

It's easy, fast and fun. The best Photo recipes will be here.

You are invited to enter, add your blog and upload a recipe with a nice photo.

You are able to see your stats:

-Number of visits to your blog from Fooduel.com.
-Number of votes received every day
-Number of votes received by each category
-Number of votes for each grade (1-10)
-Number of votes for each recipe.

You can watch how its works here http://www.fooduel.com/about.php

We would love that you participate with some recipe. Looks Amazing!

Best regards

http://www.Fooduel.com

Jessica the baker link
4/13/2013 05:10:54 am

Hi Emily,

You've been awarded a blog award! If you're interested check it out here: http://jessicathebaker.wordpress.com/2013/04/13/liebster-award/

carolinaheartstrings link
4/17/2013 10:56:05 am

How creative. Great pictures, wonderful!

Vera Zecevic – Cupcakes Garden link
4/20/2013 06:45:41 am

These flowers are so pretty. Very creative idea!

carolinaheartstrings link
5/6/2013 10:58:38 am

You are so creative. Love this post.

reusable bags link
8/12/2013 04:34:28 pm

The slices should shrink and be almost completely dry. The little dots in the middle of the flower happen naturally when they dry.

onlinecasino-dk.org link
8/12/2013 05:32:27 pm

They just require a sharp knife and some time. As is true with most things, the more you make them, the easier they get (and the better you get at making them). So here we go.

Laura (Blogging Over Thyme) link
8/16/2013 12:17:22 pm

Oh my goodness--this is pure brilliance. Absolutely love it. Pinning immediately!

http://birthdayplanet.net/parties/show/290-lightning-mcqueen-party link
8/27/2013 06:16:00 pm

If your pineapple is really ripe and juicy, you'll want to press the slices between towels before you place them on the baking sheets. What we're doing is drying out the pineapple, so any moisture you can get rid of before you dry them in the oven will speed up the process.

Coco in the Kitchen link
9/8/2013 09:26:44 pm

These are brilliant. Great tutorial, too. Thanks for he step-by-steps, Emily. I have to try my hand @ this soon!

Barbara Johnon
11/11/2013 04:58:37 am

Can you still eat them? and are they still tasty? I am going to make them - already have the pineapple!! Can't wait!!

She Makes and Bakes
11/12/2013 10:49:34 pm

Yep, you can still eat them and they are tasty! Enjoy!

Lisa link
12/21/2013 11:41:04 pm

Wow - those are so pretty!

KgReciPe link
1/10/2014 05:45:16 am

Lovly recipe. I like to eat this.

Chloe link
1/31/2014 12:31:21 am

This is a really good read for me. Must admit that you are one of the best blogger I have ever read. Thanks for posting this informative article. Good to read this whole new thought totally nice thought!

Jackie link
3/11/2014 04:16:01 am

Those look wonderful! You did such a great job on them. May have to take a stab at these but not sure I will get them as perfect as you did.

Sandra link
5/18/2014 11:27:23 pm

These are beautiful and very creative. I have a meat slicer from back in the days when I was catering. Wonder if I could slice pineapple on it?

professional essay writer link
5/21/2014 03:57:55 am

The postings on your site are always excellent. Thanks for the great share and keep up this great work! All the best to you:)

Suki F link
7/22/2014 11:05:34 am

These look amazing! it looks easy enough for me. I might try it.

The Cat Lady Cook link
10/4/2014 03:57:12 pm

This is so beautiful and clever. This would be perfect for party cupcakes or a summer event.

Fabiana link
3/11/2015 10:16:59 am

These look really cute and I'm sure they are delicious. I might tr these during the weekend.


Comments are closed.

     Welcome!

    Cooking is fun and easy at high altitude, but baking can be frustrating. About 90% of my recipes work everywhere, but some are adjusted so us mountain dwellers can enjoy baked goods from scratch. I hope you find great recipes on here for your family, and I'll let you know if any are adjusted for high altitude. 

    Stay Updated!

    Add to your Reader:

    Get new posts delivered to your inbox:

    Enter your email address:

    Delivered by FeedBurner

    Categories

    All
    Appetizers
    Bars
    Beef
    Bread
    Breakfast
    Brownies
    Cake
    Cheese
    Chicken
    Chocolate
    Cinnamon
    Cookies
    Crackers
    Cupcakes
    Dessert
    Do It Yourself
    Drinks
    Fruit
    Ground Beef
    High Altitude
    How To
    Ice Cream
    Italian
    Main Courses
    Mexican
    Muffins
    Oatmeal
    Pasta
    Pastry
    Pie
    Pizza
    Pork
    Project Pastry Queen
    Pumpkin
    Salad
    Sauces
    Side Dishes
    Snacks
    Soup
    Sourdough
    Steak
    Vegetables

    My featured recipes on NoshOnIt

    Some Good Reads!

    Annie's Eats
    Bake at 350
    Climbing Grier Mountain
    Confections of a Foodie Bride
    How Sweet It Is
    I Am Baker
    Macaroni and Chesecake
    Pinch of Yum
    Pink Parsley
    Smells Like Home
    Smitten Kitchen
    Sunny Side Up
    The Curvy Carrot
    The Marvelous Misadventures of a Foodie
    The Pioneer Woman Cooks
All content copyright 2012-2013 She Makes and Bakes.