She Makes and Bakes
  • Home
  • About
  • Ramblings
  • Recipe Index
  • What We're Eating
  • High-Altitude Baking

Biscoff S'more Cookies

6/10/2012

 
Picture
A surprisingly awesome thing happened with these cookies. Apparently when you mix Biscoff and brown sugar together, it tastes like a graham cracker. I definitely was not expecting this, but it's pretty tasty. PS, have you tried Biscoff yet? If not, please go get some. You should be able to find it with the peanut butters.

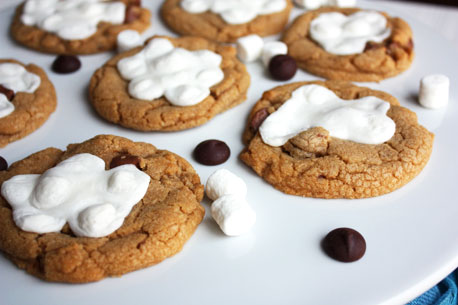
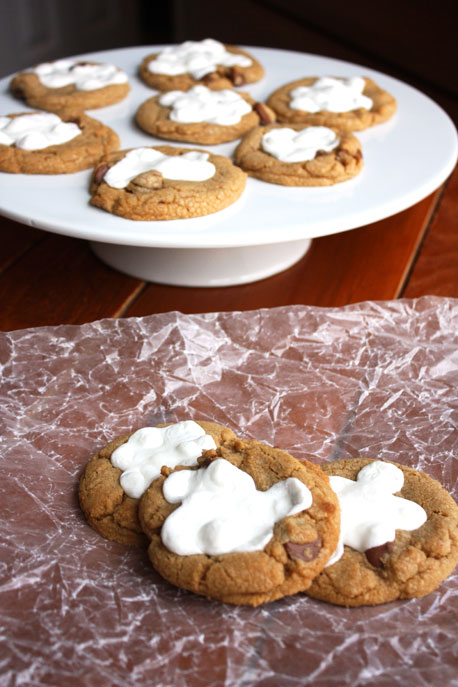
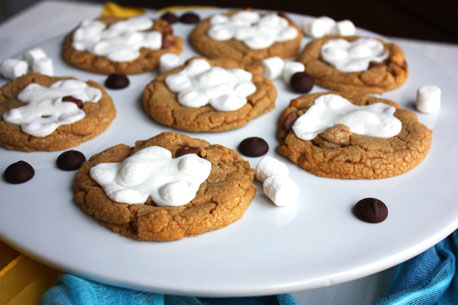
I made these cookies last week on a whim. I was looking in the pantry and saw Biscoff and marshmallows, so I figured I would adapt my favorite peanut butter cookie recipe, add in some chocolate chips, and then top them with marshmallows. I told myself they'd be Biscoff s'more cookies, but when they came out of the oven, I was surprised at how much these tasted like s'mores. This is the perfect cookie if you want s'mores but you don't want to smell like smoke or you don't have access to a campfire. I only had 1/2 cup of milk chocolate in my pantry, and they weren't very chocolatey, so I think doubling the chocolate chips is necessary. I've indicated this in the recipe below. These bad boys will smack you in the face and say what's up summer?    
Picture
Biscoff S'more Cookies Recipe
Makes about 20 cookies
Print this recipe

1/2 cup sugar
1/2 cup brown sugar
1/2 cup Biscoff
1/2 cup butter-flavored shortening
1 egg
1 1/4 cup flour
3/4 teaspoon baking soda
1/2 teaspoon baking powder
1/4 teaspoon salt
1 cup milk chocolate chips
2 cups mini marshmallows

Preheat your oven to 375 degrees.

Cream together the sugars, Biscoff, and shortening until mixed. Add the egg and mix until incorporated. Stir together the baking soda, baking powder, salt, and flour, and add to the mixing bowl. Stir until incorporated. Fold in the chocolate chips.

Drop two tablespoons of rounded dough onto a greased baking sheet and press down on them a bit. Bake for 7 minutes, take out of the oven and drop about 6-7 mini marshmallows on each cookie (you don't have to be too precise about it). Place the sheet back in the oven and let bake for 1-2 more minutes until the marshmallows have puffed. Let cool on the sheet for 4 minutes before removing to your counter or a wire rack.

Adapted from Betty Crocker.
Picture

Orange Creamsicle Cookies

5/16/2012

 
Picture
This is the perfect cookie for summer. I love chocolate, but sometimes you want something different. Something refreshing...and if you're like me, you still want sugar. Enter the orange creamsicle cookie. An incredible orange buttercream filling sandwiched between two vanilla chip cookies. 

My husband actually dreamed up this idea. Well, kind of. I was trying to think of a cupcake flavor to make, and he suggested putting a clementine slice inside a cupcake. I ran with that and decided to make vanilla cookies with a clementine buttercream...and then, like usual, my grocery store didn't have the key ingredient I needed, so I changed it to orange. I think this version is a win, and if you're concerned that it's actually two cookies with frosting, just close your eyes as you eat it. Your taste buds will scream that it's worth it.
Picture
Orange Creamsicle Cookies Recipe
Makes about 20 sandwiches
Print this recipe

For the cookies:
1/2 cup shortening
1/4 cup butter, softened
1 cup packed brown sugar
1 egg
2 teaspoons vanilla
1 1/2 cup all-purpose flour
1 teaspoon baking soda
1 cup white baking chips

For the filling:
1/4 cup butter
1/2 teaspoon orange zest
1/4 cup milk
1/4 teaspoon vanilla
2 cups powdered sugar
Dash salt

Preheat your oven to 350 degrees.

To make the cookies, in a large bowl cream the shortening, butter, and brown sugar until well combined. Add the egg and mix. Add the vanilla and baking soda and mix. Add the flour and mix until everything is incorporated. Fold in the chips.

Drop about one round tablespoon of dough onto an ungreased baking sheet, leaving about 2 inches between each cookie. I do smaller cookies with this since you are eating 2 cookies. Bake for 8-10 minutes (I do 10 minutes) until golden brown. Let rest on the cookie sheet for one minute before removing to a counter to cool.

To make the filling, in a large bowl mix together the butter and orange zest until smooth. I definitely recommend a stand or hand mixer for this. Add the milk, vanilla, and salt and mix until combined. Add the powdered sugar one cup at a time, mixing until smooth. 

To assemble the cookies: Once the cookies are cool, pair up the cookies so they match in size and shape. Place 1-2 tablespoons of filling on the bottom of one cookie. Place the second cookie cookie on the filling (bottom side touching the filling) and squish together until you can see the filling.  

Cookies adapted from A Taste of Home; filling a She Makes and Bakes creation 
Picture
You may also like:
Loading...

Rainbow Sugar Cookies

5/2/2012

 
Picture
It's been one of those insane weeks at work where I basically don't leave my office for eight hours every day. So when I was driving home from work, I decided to forgo my run and bake cookies instead. I like my decision. I was thinking through many cookie options until I remembered a rainbow cookie post that In Katrina's Kitchen did awhile ago. This is a spin on her idea.

These require a little more work than your standard cookie because you have to separate the dough and then color it. But these cookies are a lot of fun, and I think they'd be great for a kid's birthday party. These look like soemthing I would have loved to eat when I was a kid....and I loved eating them tonight. Although something tells me I better not skip that run tomorrow.

This is my family sugar cookie recipe. The dough spreads a bit if it's warm, so I suggest chilling it. In fact, that's what the recipe calls for but I wanted something quick. Since it spread, I used cutters after the cookies were baked to cut them into the stars and Mickey heads. It was a great night of baking therapy.  
Picture
Rainbow Sugar Cookies
Makes about 24 cookies
Print this recipe

1 cup butter
1 cup sugar
2 eggs
1 teaspoon baking powder
2 teaspoons cream of tartar
1/2 teaspoon nutmeg
2 1/4 cups flour

In the bowl of a stand mixer or with a hand mixer, cream together the butter and sugar. Add the eggs and mix until combined. Add the baking powder, cream of tartar, and nutmeg, and stir until incorporated. Add the flour and mix until fully combined.

Divide the dough into 5 bowls and add your food coloring. I used blue, purple, orange, yellow, and green. The gel colors will be more vibrant than liquid colors. In the separate bowls, chill the dough in the refrigerator for an hour or until cold.

Preheat your oven to 350 degrees.

Once cold, take a small piece of each color of dough and combine into one ball. If you want to add sprinkles, press these on the top of the dough ball. Bake for 12-15 minutes. 

Let cool before serving. 

A She Makes and Bakes family recipe.  
Picture

PPQ: Triple-Threat Chocolate Cookies

3/25/2012

 
Picture
This isn't the Project Pastry Queen recipe for the week, but we're celebrating my Mom's birthday today, so I made these instead. I'm going to serve them with homemade vanilla bean ice cream and chocolate sauce. If you want to see this week's true PPQ post, which is a frangelico-hazelnut fruit tart, check this out. I'm sure it's good, but I thought my mom would like these cookies better.

If you like chocolate and nuts, you'll like these cookies. Making these cookies is very different from the normal process of cookie making. You melt the chocolate and butter, let it cool, and then add it to the eggs/sugar and mix until it's thick and glossy. Also, there is not a lot of flour in these--only 1/3 cup. If you don't like/are allergic to nuts, you should probably just skip these cookies. The nuts really help hold the cookie dough together, and I don't think they'd do well without the nuts. All in all, it's a great cookie! 

Triple-Threat Chocolate Chip Cookies
Print this recipe
Makes about 4 dozen

1 cup chopped pecans
1 cup chopped walnuts
6 tablespoons butter
8 ounces bittersweet chocolate, chopped
3 ounces unsweetened chocolate, chopped
3 eggs
1 cup sugar
1 tablespoon vanilla extract
1/3 cup flour
1/4 teaspoon baking powder
1/4 teaspoon salt
1 1/2 cups semisweet or milk chocolate chips

Preheat the oven to 350 degrees and arrange the nuts on a baking sheet in a single layer. Toast the nuts for about 7-9 minutes until golden brown. Cool.

In a saucepan, melt butter and chopped chocolates over low heat, stirring frequently so they don't burn. Remove from heat and let cool.

In a mixing bowl, combine eggs and sugar and beat on medium speed using the paddle attachment until fluffy, about 3 minutes. Add the vanilla and melted chocolate. Beat on medium speed until the dough is thick and glossy. Add in the flour, baking powder, and salt and mix just until incorporated. Stir in the nuts and chocolate chips. Let the dough rest for about 20 minutes so it's easier to scoop. 

Drop about 2-3 tablespoons full of cookie dough on greased baking sheets. Using wet fingers, push down slightly on top of cookies to make them a little flatter (you don't need to squish them, though). Bake for 10-12 minutes until the tops begin to crack and they look glossy. Cool for a few minutes on the sheet before removing them.   
Picture
Forward>>

     Welcome!

    Cooking is fun and easy at high altitude, but baking can be frustrating. About 90% of my recipes work everywhere, but some are adjusted so us mountain dwellers can enjoy baked goods from scratch. I hope you find great recipes on here for your family, and I'll let you know if any are adjusted for high altitude. 

    Stay Updated!

    Add to your Reader:

    Get new posts delivered to your inbox:

    Enter your email address:

    Delivered by FeedBurner

    Categories

    All
    Appetizers
    Bars
    Beef
    Bread
    Breakfast
    Brownies
    Cake
    Cheese
    Chicken
    Chocolate
    Cinnamon
    Cookies
    Crackers
    Cupcakes
    Dessert
    Do It Yourself
    Drinks
    Fruit
    Ground Beef
    High Altitude
    How To
    Ice Cream
    Italian
    Main Courses
    Mexican
    Muffins
    Oatmeal
    Pasta
    Pastry
    Pie
    Pizza
    Pork
    Project Pastry Queen
    Pumpkin
    Salad
    Sauces
    Side Dishes
    Snacks
    Soup
    Sourdough
    Steak
    Vegetables

    My featured recipes on NoshOnIt

    Some Good Reads!

    Annie's Eats
    Bake at 350
    Climbing Grier Mountain
    Confections of a Foodie Bride
    How Sweet It Is
    I Am Baker
    Macaroni and Chesecake
    Pinch of Yum
    Pink Parsley
    Smells Like Home
    Smitten Kitchen
    Sunny Side Up
    The Curvy Carrot
    The Marvelous Misadventures of a Foodie
    The Pioneer Woman Cooks
All content copyright 2012-2013 She Makes and Bakes.