She Makes and Bakes
  • Home
  • About
  • Ramblings
  • Recipe Index
  • What We're Eating
  • High-Altitude Baking

Cheese Biscuits

10/25/2012

 
Picture
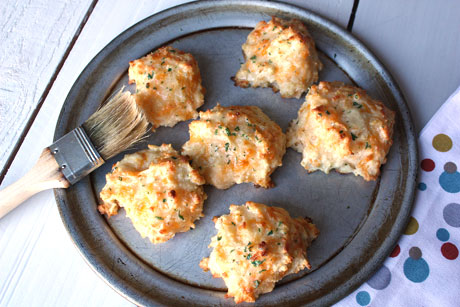
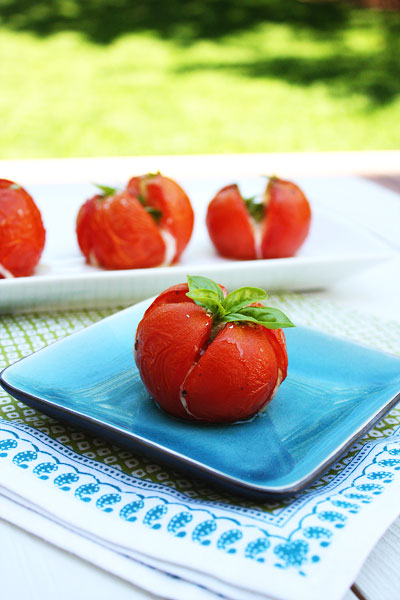
I've never liked fish or seafood. In fact, the only fish I really will eat is tuna in the can...which I don't think even counts. Therefore, I never went to Red Lobster growing up. Thankfully, my parents knew that I would love the cheese biscuits that they served, so they would always bring me home some. And thus began my love affair. Ever since I moved out of my parents house, I've been making my own cheese biscuits (since I couldn't get my fix through them anymore). Until last year, I had been making them with Bisquick, milk, cheese, and some garlic powder. While I have nothing against Bisquick, it started to taste funny to me. So I decided to find my own recipe.

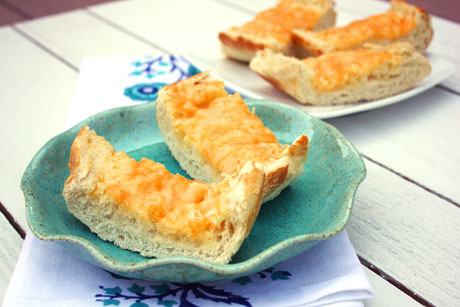
These are one of my husband's favorite breads. Sometimes I can even convince him to eat pasta if I serve these with it...which is pretty huge since he abhors pasta. Weirdo. When it's just the two of us, I make half of this recipe, and we have leftover biscuits. I love the fact that while they don't come out of a yellow box, they're pretty much just as easy to make. And I think they taste better, too.

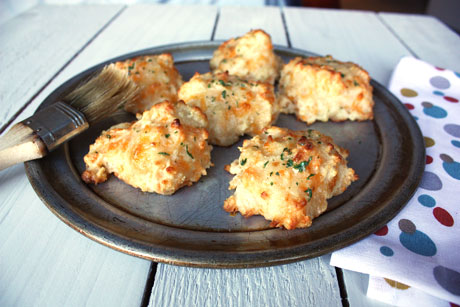
Cheese Biscuits Recipe
Makes about 12 medium size biscuits
Print this recipe

Notes: I use butter-flavored shortening, but use regular if that's all you have. If you don't have buttermilk (I usually don't), pour a scant 1 tablespoon of white vinegar into the 3/4 measuring cup and then fill it up with milk. Let it sit while you get the rest of your ingredients together and then pour it in at the end. The butter topping makes quite a bit, so if you know that you won’t want to slather your biscuits with it, you can cut it down some. My husband likes a lot of butter! 

For the biscuits:
1 2/3 cups all purpose flour
2 teaspoons baking powder
3/4 teaspoon salt
1/4 teaspoon baking soda
1/2 teaspoon garlic powder
1/4 cup shortening
1 1/4 cups sharp cheddar cheese, grated
3/4 cup buttermilk

For the topping:
1/4 cup butter
1/2 teaspoon garlic powder
1/4 teaspoon dried parsley

Preheat your oven to 450 degrees.

In a large bowl, stir together the flour, baking powder, salt, baking soda, and garlic powder. Using a fork, mix in the shortening until it is broken down and resembles coarse crumbs. Stir in the cheese. Add in the milk and then stir until combined. Drop by spoonfuls onto a greased baking sheet, leaving a couple of inches between the biscuits. 

Bake for 12-14 minutes until the tops are brown. 

While the biscuits are baking, melt the butter. Stir in the garlic powder and parsley and then brush over the tops of the hot baked biscuits. Serve immediately. 

Adapted from AllRecipes 
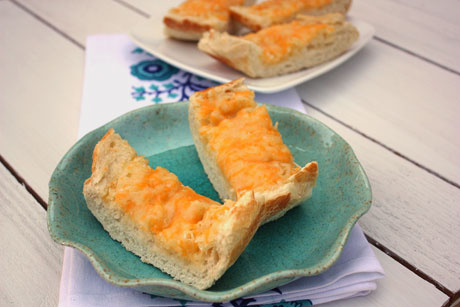
Picture

Shredded Beef Quesochangas

10/18/2012

 
Picture
There's a Mexican restaurant in Colorado called Hacienda, and they make some pretty awesome food in my opinion. The thing that I always want to order (but don't do as often as I'd like) is a quesochanga. It's a chimichanga that has married some queso. There's queso on the inside and the outside, and for a queso-loving girl like myself, it's essentially perfection. I always thought it was really hard to make a chimichanga because there was hot oil involved. As it turns out, you don't have to deep fry these bad boys. You can shallow fry them in a pan, and it takes less than a minute. Easy peasy, and it's not scary. I promise. You just have to be careful.

We're using the shredded beef that I told you about months ago. I love this stuff. I make a huge batch, and then I freeze what we don't eat into individual portions. That way, I can make these or quesadillas or shredded beef tacos. One easy crock pot day and I have a lot of dinner variations! To make this recipe, all you need is that beef, queso, tortillas, and oil. Seriously, it's one of the easiest meals to make, and it's incredibly delicious!

Shredded Beef Quesochangas Recipe
Makes two
Print this recipe

Note: You want the meat and the queso to be hot because it's not in the oil long enough to heat it up. Unless you like eating cold food, I highly recommend it's hot when you place it in the tortilla. The tortilla will be easier to roll if it's warm, too. 
 
2 tortillas
1/2 cup Mexican shredded beef
1/4 cup queso
Vegetable oil

Pour enough vegetable oil to cover the bottom of a large skillet about 1/8-1/4 of an inch. Heat it on medium until it starts smoking.
 
While the oil is heating, divide the meat between the two tortillas. Pour half of the queso on top of the meat in each tortilla. Tuck the sides of the tortilla in, and then roll the tortilla up. It should look like a burrito, and there should be no gaps where the filling could ooze out of it. When the oil is smoking, carefully place the quesochanga into the oil using tongs, seam side down. Let it sit for about one minute or less until golden brown, and use the tongs to carefully flip it. After another minute or less when it's golden brown, remove from the oil and place on a paper towel to drain. Repeat with the remaining quesochanga (or you could do both at the same time if you're up for it).  Serve with additional queso on top and/or on the side.

Source: She Makes and Bakes
Picture

Homemade Queso

10/11/2012

 
Picture
Queso is my kryptonite. I will go off a diet so fast if queso is put in front of me. And I'm not super picky about my queso, either. Velveeta and rotel? Sure. I can eat the crap out of that stuff. But I wanted to be a good food blogger and create my own. I tried another homemade queso recipe about a year ago, but I wasn't overly thrilled with it. While it was good, it was missing something. So I decided to experiment with it. Thankfully it only took one try so my hips didn't get too big! This makes a good size batch, but if you're having it at a party, I'd double or triple it. It reheats nicely thanks to the no roux part, and it freezes well. That's how I kept myself from devouring it. I hid it in the depths of my freezer. Next week, I'll show you an amazing meal to make with this stuff: quesochangas!

Homemade Queso Recipe
Print this recipe

*Note: Please do not use individually wrapped American cheese slices. Go to the deli and ask for a chunk of American cheese. If it's a chunk, you can grate it. If it's already sliced, you can tear it into pieces so it will melt faster. If you like spicier food, leave some of the seeds in the jalapeno.

1 tablespoon butter
Half of a white onion, chopped
1 jalapeno, chopped and seeds removed
1 garlic clove, minced
1 large Roma tomato, chopped
About 10 ounces yellow American cheese, shredded*
1 cup Monterey jack, shredded
1/2-3/4 cup milk

In a medium saucepan over medium heat, melt the butter and cook the onion, jalapeno, and garlic until soft, about 5-10 minutes.

Add in one quarter of the American cheese and 1/4 cup milk. Stir until the cheese has melted. Add in half of the Monterey jack and stir until melted. Keep adding the cheese and milk until incorporated and melted. Use as much milk as desired for consistency. If you want your queso thick, you'll need about 1/2 cup of milk. If you like it thinner, you'll want about 3/4 cup of milk. Add in the chopped tomato and salt to taste. Serve immediately, and reheat on the stove or in the microwave.

Source: A She Makes and Bakes creation
Picture
You may also like:
Loading...

Baked Caprese

9/4/2012

 
Picture
In the last year, I have come to absolutely love all things caprese. Even though I'm not a big fan of raw tomatoes, when you pair them with fresh basil, I could eat them all day long. When I saw this recipe in the Easy Summer Food cookbook, I wanted to try it asap. You score tomatoes, stuff mozzarella in them, and then bake them until they're warm and soft and the cheese is melted. Then you top it off with basil, olive oil, and balsamic vinegar. I love these. Baking the tomatoes tones down the fresh tomato flavor just a touch, and of course you can't go wrong with the caprese combination. I truly believe that fresh basil makes almost anything taste better. I highly recommend you make these before your basil plant dies and tomato season is over. Your mouth will thank you.

Baked Caprese Recipe
Print this recipe

Note: This recipe makes 10 tomatoes, but you can easily make it using as many tomatoes as you want. I made it with four tomatoes and scaled everything way day. It's not so much of a measuring recipe as it is a guide.

10 ripe tomatoes (I used vine-ripened tomatoes)
4 ounces mozzarella cheese, cut into 10 pieces
1/4 cup olive oil
2 tablespoons balsamic vinegar
Bunch of fresh basil leaves, torn
Salt and pepper

Preheat your oven to 325 degrees and spray a baking tray with cooking spray.

In each tomato, cut a deep X about halfway through the tomato. Push a piece of mozzarella into each X. Place the tomatoes on the tray and sprinkle with salt and pepper.

Bake in the oven for 25 minutes until the tomatoes start to soften and open. Remove from the oven, drizzle the olive oil and balsamic vinegar on top and serve.

Source: Easy Summer Food Cookbook
Picture

Garlic Cheese Bread

8/22/2012

 
Picture
When I was younger, I took piano lessons. I was not good, and my favorite part of them was my teacher, Candi, who also was my friend. When I turned 16, my mom told me that she wasn't going to pay for me to take lessons anymore because I wasn't practicing. She wasn't going to pay for me to hang out with Candi. Looking back, I don't blame her. So, ever since I turned 16 I've been going to dinner at Candi's, Angie's, and Danielle's house on Monday nights. Which means that I've been eating this garlic cheese bread for the past 13 years. Yikes. 

Monday nights are special nights for me. We don't get together every Monday anymore, but Monday nights will always hold special memories for me. We make dinner, watch some TV, talk, and laugh. One of my favorite meals over there is spaghetti. We make a box of pasta, a jar of sauce, and this garlic cheese bread. It's simple and so comforting, and truthfully it hits the spot in a way that homemade sauce just can't. I'm a foodie, but I love some childhood comfort food! While I'm usually a proponent of grating your own cheese, this bread works best with packaged cheese. It also works great with fake butter if you like that kind of thing! I normally just spread and sprinkle on until it looks good, but I measured this time if you're a recipe follower. Over time, you'll learn what works best for you. We've found that this bread works best if you bake it instead of broiling. This way, all of it gets nice and warm and melty instead of just the top. Also, we think that the prepackaged Mexican four cheese blend (cheddar, monterey jack, asadero, and queso blanco) works best. It's melty and stringy without being rubbery.

Garlic Cheese Bread Recipe
Print this recipe

1 loaf French bread
1/2 cup butter, softened
1 teaspoon garlic powder
2 cups Mexican four cheese blend

Preheat your oven to 350 degrees.

Split the loaf of French bread lengthwise. Spread the butter on both halves. Sprinkle the garlic powder on top (if you don't like a lot of garlic, use less than one teaspoon). Sprinkle the cheese on top until covered everywhere. 

Bake for 8-10 minutes until the cheese is thoroughly melted. 

To cut it without burning your hands, use a fork to hold the bread still while you cut with a serrated knife.  
Picture

PPQ: Cheddar Jalapeno Beer Bread

8/19/2012

 
Picture
This is the second to last week of Project Pastry Queen, and I chose to make something savory. I've been eyeing this beer bread for awhile, and it seemed like the perfect time to make it. If you've never had beer bread, you should. For one, it's incredibly easy to make. There's no dealing with yeast and waiting for dough to rise. It's a simple mixture of ingredients, pour the batter into a pan, and bake it. Also, you can adapt it how you like by using different beers, spices, veggies, cheese, etc. I decided to add some chunks of cheddar and jalapeno to the bread to spice it up a bit, which pairs nicely with the Sam Adams Octoberfest I used. The Pastry Queen recipe calls for a stick of butter to be added on the bottom and top of the pan, and let me tell you...it is an amazing addition. The edges get crispy and buttery. There's a hint of sweetness from the sugar, and the beer flavor really shines. The next time you're looking for a quick bread, look no further than here.  

Cheddar Jalapeno Beer Bread Recipe
Makes one 9-inch loaf
Print this recipe

3 cups all purpose flour
1 tablespoon baking powder
1 teaspoon salt
3 tablespoons sugar
1 1/2 cups cheddar, cubed
1 jalapeno, sliced and seeds removed
12 ounces good quality beer (I used Sam Adams Octoberfest)
1/2 cup butter, melted

Preheat your oven to 350 degrees.

In a large bowl, mix together the flour, baking powder, salt, and sugar. Add in the cubed cheese and sliced jalapeno. Pour in the beer and stir until combined.

Spray a 9-inch loaf pan with cooking spray. Pour half of the melted butter in the pan. Spoon the batter in the pan and pour the remaining butter on top. Place in the oven and bake for 50-60 minutes until the bumpy crust is golden brown.

Remove from the pan and serve immediately.

Source: The Pastry Queen
Picture

PPQ: Cream Cheese Peach Tart

8/6/2012

 
Picture
I had every intention of posting this recipe on Sunday, but I just couldn't gather the wherewithal to do it after participating in my second triathlon. I was so tired yesterday, and today I'm so incredibly sore. I'm waddling around at work today. Yikes!

Therefore, this week's Project Pastry Queen post is late, but it's still good. We're down to the final four weeks, and I'm excited about these last recipes. This tart was picked by Emily of A Gilt Nutmeg. I have to say that it's not my personal favorite, but the hubs liked it, which was surprising. I took it to work today and had some rave reviews from coworkers. I was expecting a little more of a cheesecake-like filling, and it's more firm than that. It does has great flavor with the cream cheese, mascarpone, peaches, and cinnamon, and it's really pretty. Plus it's not super sweet (which could explain why I didn't like it as much and my husband liked it a lot). I made a few changes to the original recipe:
1. I used a different tart crust recipe (which wasn't that great so I'm not going to share it) because I have an eleven-inch tart pan.
2. Instead of using 5-6 peaches cut in half and scored, I used three peaches cut into slices. 
3. I left the peels on the peaches because I'm lazy.
 
Otherwise I made the recipe exactly as is. If I make it again, I would play around with the filling to make it a little less dense. Maybe one less egg or substitute it out for an actual cheesecake? Now that would be over the top! I realize I haven't exactly sold this recipe, but let me stress that other people absolutely loved it. Be sure to check out Emily's page for the full recipe and the Project Pastry Queen website for everyone's take on it. Next week I'm dishing up some peach kolache (on time)...and let me tell you, it's pretty tasty! Peach season is here friends!    
Picture

Simple n Light Pasta

7/29/2012

 
Picture
First of all, I'm loving the Olympics. I love watching everyone compete, and I love the sports. However, I think it's funny that the Olympics inspires people to sit on their couches and watch TV. I guess that I went for a bike ride this morning and stood in the kitchen all day, so that can justify me sitting around, drinking wine, and watching gymnasts and swimming tonight, right? By the way, what's up with the female gymnasts wearing scruncies circa 1995? Can't they do something else to give their hair some flair?

Anyway, this pasta has nothing to do with the Olympics other than I might eat this to carbo load before my triathlon next weekend...which still has nothing to do with the Olympics, but I'm excited about it. Almost ten years ago, I spent a lot of time in Grand Cayman. There was (is?) a restaurant on Seven Mile Beach called Cimboco that had great pizza and pasta. Consequently we ate there a lot. They had this great pasta dish called simple n light, and this is my attempt at recreating it. Spaghetti, olive oil, tomatoes, basil, garlic, feta, and parmesan. Like the name says, it's simple and light. And awesome. Maybe they should rename it.

Simple n Light Pasta 
Serves 4
Print this recipe

8 ounces spaghetti or angel hair pasta
1 tablespoon olive oil
1 tablespoon butter
1 large tomato, diced
5-10 basil leaves, diced
2 garlic cloves, minced
Salt and pepper, to taste
2 tablespoons feta
2 tablespoons freshly grated parmesan

Boil your pasta in salted water to al dente. Drain and set aside. Using the same pan, melt the butter over medium heat and add the olive oil. Put the diced tomato in and cook for about a minute until softened. Add in the garlic cloves and basil and cook for about 30 seconds until fragrant. Put the pasta back in the pan and toss until coated. Add salt and pepper to taste. Plate the pasta and sprinkle on the feta and parmesan before serving.  

Dish from Cimboco in Grand Cayman
Picture

Buffalo Chicken Dip

7/19/2012

 
Picture
One of my favorite snack foods is chips and dip. Last summer we vacationed with my husband's family in the Outer Banks. Love. His family lives in Ohio, so they all drove and we flew. When we all arrived at our rental house, my mother in-law plugged in a crock pot full of this buffalo chicken dip. It was about 9 pm, but I chowed down on this dip. After a long day of flying and driving, it pairs nicely with a glass of shiraz...or four.

I've made it a few times since then, and I just love it. In fact, I had it for dinner one night. There's chicken....it's perfectly acceptable. I've served it at a few parties, and it's a big hit. I think most people really like chips and dip. I highly recommend you serve it with Fritos or another thick tortilla chip. The flavors meld better and you're not going to break a chip in the dip. Party foul! If you're feeling fancy, sprinkle a little blue cheese on top. Be prepared to share because people are going to dig in!  

For the chicken, you can use a rotisserie chicken or cook one large chicken breast (I boiled mine). By the way, if you have a stand mixer, plop the cooked chicken breast in the bowl, put the paddle attachment on, and mix on low. Your mixer will shred the chicken!!

Buffalo Chicken Dip Recipe
Print this recipe

8 ounces cream cheese, softened
1/2 cup Ranch dressing
1/2 cup buffalo wing sauce
2 cups cooked shredded chicken
1/2 cup shredded mozzarella

Stir all the ingredients together. Pour them in a greased 1 1/2 quart casserole dish and bake at 350 degrees for 20 minutes or until hot and the cheese is melted. You also can pour the mixture into a small Crockpot and cook on low until hot and cheese is melted, stirring occasionally. Serve immediately with Fritos or another thick tortilla chip.

Recipe from my mother in-law.
Picture

Caprese Pasta Salad

7/9/2012

 
Picture
I've been on a bit of a caprese kick for the past week, but how can you not be when tomatoes and basil are coming into their own? I thought of this dish last week while I was at work, and when I got home Friday I had to make it for lunch. It came together quickly and definitely hit the spot. Bright and fresh flavors, carbs, and cheese. Heavenly. Not to mention it's great at picnics since it's mayo free. 
 
I have a love/hate relationship with fresh tomatoes, and I'm generally not a fan. Therefore, I cooked the tomatoes quickly in the olive oil and garlic. Not only did it take away that strong fresh tomato taste, but it also gave the oil a great flavor. I highly recommend this, but I think you also could use fresh cherry tomatoes with great results. I know I'll be enjoying this pasta salad throughout the summer...and wishing for it this winter.

Caprese Pasta Salad Recipe
Serves 4 sides or 2 main dishes
Print this recipe

2 cups mini farfalle pasta
2 tablespoons olive oil
2 garlic cloves, minced
2 roma tomatoes, diced
10 fresh basil leaves, cut or torn into pieces
1/2 cup cubed mozzarella
Salt and pepper to taste

In a medium saucepan, boil your pasta just past al dente. When cooked, transfer to a colander and run cold water over it. Let sit until cool. 

While the pasta is cooking, heat the olive oil over medium heat and add the tomatoes. Cook for about 1 minute, add the minced garlic cloves, and cook until fragrant, about 30 seconds. Transfer the oil mixture to a bowl and place in the refrigerator to cool. 

Once the oil and the pasta are cool, combine them in a large bowl with the basil and mozzarella. Add salt and freshly cracked pepper to taste and serve. Store leftovers in the fridge. 

A She Makes and Bakes original recipe 
Picture
<<Previous
Forward>>

     Welcome!

    Cooking is fun and easy at high altitude, but baking can be frustrating. About 90% of my recipes work everywhere, but some are adjusted so us mountain dwellers can enjoy baked goods from scratch. I hope you find great recipes on here for your family, and I'll let you know if any are adjusted for high altitude. 

    Stay Updated!

    Add to your Reader:

    Get new posts delivered to your inbox:

    Enter your email address:

    Delivered by FeedBurner

    Categories

    All
    Appetizers
    Bars
    Beef
    Bread
    Breakfast
    Brownies
    Cake
    Cheese
    Chicken
    Chocolate
    Cinnamon
    Cookies
    Crackers
    Cupcakes
    Dessert
    Do It Yourself
    Drinks
    Fruit
    Ground Beef
    High Altitude
    How To
    Ice Cream
    Italian
    Main Courses
    Mexican
    Muffins
    Oatmeal
    Pasta
    Pastry
    Pie
    Pizza
    Pork
    Project Pastry Queen
    Pumpkin
    Salad
    Sauces
    Side Dishes
    Snacks
    Soup
    Sourdough
    Steak
    Vegetables

    My featured recipes on NoshOnIt

    Some Good Reads!

    Annie's Eats
    Bake at 350
    Climbing Grier Mountain
    Confections of a Foodie Bride
    How Sweet It Is
    I Am Baker
    Macaroni and Chesecake
    Pinch of Yum
    Pink Parsley
    Smells Like Home
    Smitten Kitchen
    Sunny Side Up
    The Curvy Carrot
    The Marvelous Misadventures of a Foodie
    The Pioneer Woman Cooks
All content copyright 2012-2013 She Makes and Bakes.