She Makes and Bakes
  • Home
  • About
  • Ramblings
  • Recipe Index
  • What We're Eating
  • High-Altitude Baking

Caprese Bruschetta

7/1/2012

 
Picture
I'm home from Ireland, and this was one of the first things I made. Actually, I made biscuits and gravy for my husband first thing because after eating baked beans for breakfast for the past week, we were ready for some American food. But soon after that, I made this because I've been dying for some fresh fruits and veggies. In our experience, the land of potatoes equals the land of french fries. We got fries with everything. In fact, I ordered a slice of pizza for lunch one day, and I got fries with it. Strange, but I wasn't complaining too much. They served salads with most meals, but my lettuce usually seemed to be turning brown. So I was ready for some awesome produce. Don't get me wrong though; I loved Ireland. It's a great country, and I highly recommend visiting!

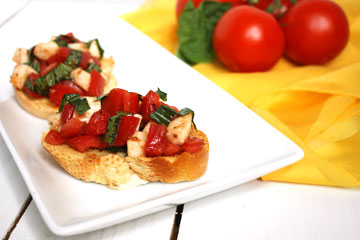
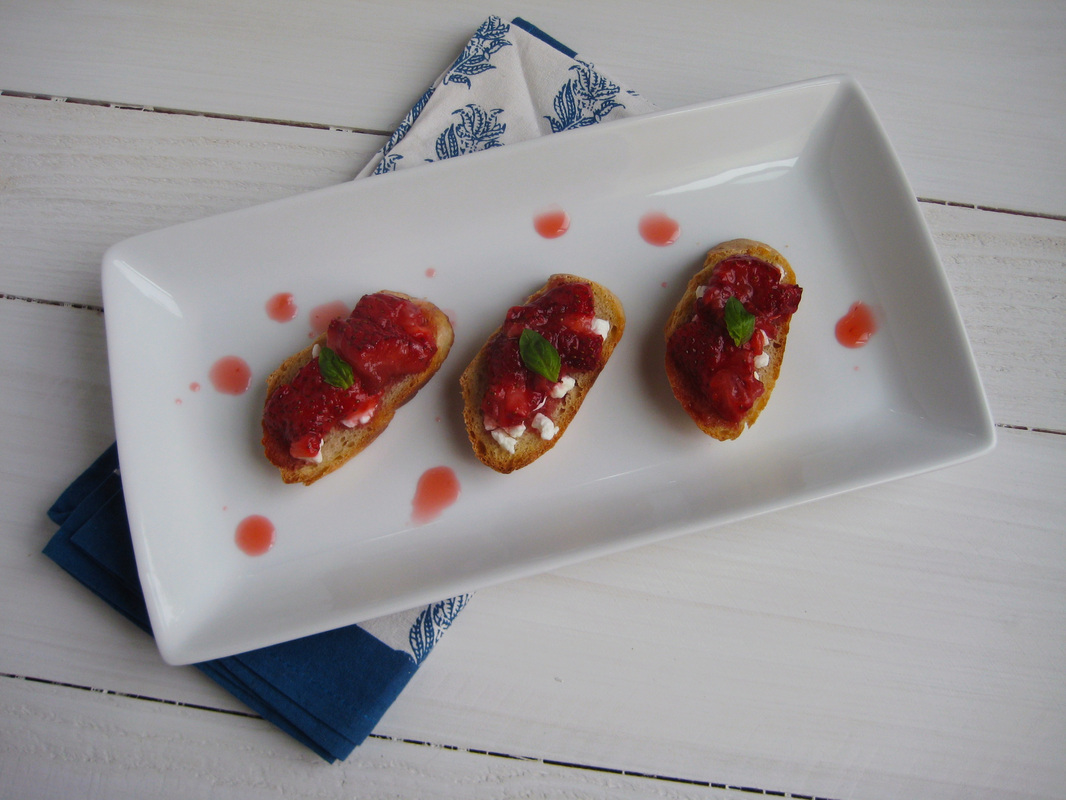
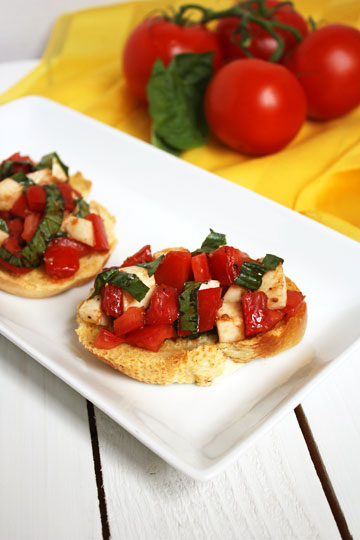
I never really used to like fresh tomatoes, and I'm still not a huge fan. However, if you mix them with basil and cheese (or cilantro and onions for that matter), I'm all in. I love caprese, and I started thinking about this on the plane. I made it in my jet-lagged state, and I was thinking you could make it for the 4th of July because it's red, white, and blue. Then I realized basil isn't blue and figured I should go back to bed. So instead make these when you're ready for something fresh. These scream summer, and I know I'll be enjoying them for awhile...especially when our tomatoes start growing in the garden.

By the way, the recipe calls for mozzarella fresca, which I found as a ball in the fancy cheese section of my local grocery store. I highly recommend this over shredded mozzarella. It has a lot more moisture than shredded, and it melts in your mouth. I don't think it's much more expensive than shredded.  

Caprese Bruschetta Recipe
Makes 4-5 pieces
Print this recipe

4 roma tomatoes, diced
4 ounces mozzarella fresca, cubed
4-6 large basil leaves, cut or torn into strips
1 large garlic clove, minced
2 tablespoons olive oil, divided
1/2 teaspoon balsamic vinegar
Salt, to taste
Freshly cracked pepper, to taste
4-5 slices of French bread or baguette

Preheat your oven to broil. Brush your bread slices with 1 tablespoon olive oil and broil in the oven until golden brown. Set aside.

In a bowl, stir together your chopped tomatoes, cubed mozzarella, basil, garlic, remaining olive oil, balsamic vinegar, and salt and pepper to taste. Spoon this mixture on top of the bread and serve.

Variations: You could use other types of tomatoes and slice instead of dice them. Instead of cubing the cheese, you could lay a slice of it on top of the bread. You also could place full basil leaves on top. Make this your own! It's easy and adaptable.

Source: A She Makes and Bakes original
Picture

Baked Onion Rings

6/28/2012

 
Picture
Is it just me or are onion rings a special treat? Personally, I'd rather have French fries, but that's because I have a weird love affair with them. I do really like onion rings, and every so often I order them when we go out to eat. They seem a little indulgent with all that fried onion and breading, but that's why this recipe is so incredible. These are baked, but they taste like they're been fried. The secret to these bad boys is the topping of crushed saltine crackers and kettle-cooked potato chips. I know, right? Who comes up with this stuff? I tell you, only those geniuses at America's Test Kitchen could come up with this. It works, and while it's slightly time consuming to do all the dipping of the onion rights, it's worth the work. And it's nice knowing you're saving yourself a few calories.    

Baked Onion Rings Recipe
Makes about 24 rings (about 4 servings)
Print this recipe

1/2 cup all purpose flour
1 egg
1/2 cup buttermilk
1/4 teaspoon cayenne powder
1/2 teaspoon salt
1/4 teaspoon black pepper
30 saltine crackers
4 cups kettle-cooked potato chips
2 large yellow onions, cut into 24 large rings, 1/2 inch thick
6 tablespoons vegetable oil

Preheat your oven to 450 degrees and get out 2 large rimmed baking sheets. Spread 3 tablespoons of oil on each.

Take out three shallow dishes for dipping. In one, place 1/4 cup flour. In another dish, mix together the egg and buttermilk and then mix in the remaining 1/4 cup flour, cayenne, salt and pepper.

Using a food processor, pulse together the crackers and chips until well blended and they resemble coarse crumbs. Place these in the third dish.

One at a time, dip your onion rings in the flour, the egg mixture, and then the cracker/chip crumbs. Make sure they get coated on all sides in each container. Place on the greased baking sheet.

Cook the rings for 15 min, flipping each ring over half way through the baking time. I've found that using a fork to flip these works much better than tongs. Drain the rings on a paper towel and serve immediately.  

Source: Barely adapted from The Best of America's Test Kitchen 2007

The Man Appetizer

6/11/2012

 
Picture
If you're a vegetarian, you're probably going to want to skip over this one. However, even I, who isn't a huge lit'l smokies fan, really liked these. After all, what can go wrong with lit'l smokies, bacon, and brown sugar that caramelize in the oven? Not much, my friends, not much. This is the perfect appetizer for those meat-loving men in your life. I made these for the Final Four way back when, and they went over in a big way. Show your dads how much you love them this weekend. Because if you were a brat in high school, as most of us were, you should make up for it with these.
 
The Man Appetizer
Makes about 35 pieces
Print this recipe

1 pound bacon (a thinner, longer slice works best)
1 package lit'l smokies (about 35)
1/2 cup brown sugar
Toothpicks

Preheat your oven to 350 degrees. 

Cut your bacon slices into thirds and wrap each third around one lit'l smokie. Secure with a toothpick, and place on a foil-lined baking sheet. Sprinkle the brown sugar on top of all the meat. There's going to be a lot of brown sugar for each piece, but that's what you want. 

Bake for 30-40 minutes or until the bacon is crispy. Serve immediately. You also can keep these warm in the crock pot by pouring a thin layer of maple syrup on the bottom, and layer the pieces on top. Set the crock pot on warm. 

Source: Bake. Eat. Repeat.   
Picture

Strawberry Basil Goat Cheese Crostini

5/14/2012

 
Picture
I read a lot of food blogs. In fact, sometimes it's hard to keep up with all of them. Some of them I'll read the posts even if I know I'm not going to like the recipe. Others I'll read only the recipes that appeal to me. It's all about time management people. Confections of a Foodie Bride is a blog that I'll read regardless of the recipe. She has great recipes and photos; this is one of her creations, and it is brilliant. I made this for Mother's Day, and we both loved it. 

First you make a basil syrup. Hello. Where have you been my whole life? I'll see you soon. Then you pour that syrup over strawberries and roast them for an hour. Wow. It's all I can say. The smell, the taste, everything is so amazing. These strawberries are placed on top of goat cheese, which is on top of a crisp baguette. And then you add more fresh basil on top. The whole thing is an explosion of brilliant flavors in your mouth. Bet you can't eat just one!

If you haven't visited Confections of a Foodie Bride, check her out. She's a genius.

Strawberry Basil Goat Cheese Crostini Recipe
Print this recipe

For the basil syrup:
1/4 cup water
1/4 cup sugar
5 basil leaves, torn into pieces

For the crostini:
12 ounces strawberries
Pinch of salt
Small baguette, sliced into thin pieces
Olive oil
4 ounces goat cheese, softened
Small basil leaves

To make the basil syrup, combine the sugar and water in a small saucepan and heat until hot and the sugar has dissolved. Remove from heat, add the basil leaves, and let sit for 15 minutes. After 15 minutes, remove the basil.

Preheat your oven to 300 degrees.

Hull your strawberries and if you have large strawberries, cut them in half. Place them in an 8x8 baking pan and pour the basil syrup over the berries. Place them in the oven and bake for one hour, until they've softened. 

Increase your oven temperature to 425 degrees. 

Brush the baguette slices with olive oil and place in the oven for 5-7 minutes until golden brown. Take them out of the oven and spread with some goat cheese. Sprinkle a bit of salt on top of the cheese. Use a spoon to lightly smash the strawberries and then spoon a couple of these on top of the goat cheese. Drizzle with additional syrup and garnish with a few small basil leaves. Good luck not eating all of them.

Source: Confections of a Foodie Bride
Picture

Tomatillo Salsa

5/9/2012

 
Picture
For many years (read almost my whole life), I have preferred Pace Picante mild salsa. I obviously had a very refined palate. A few years ago, I would have turned my nose up at this green salsa, and then unknowingly I would have deeply regretted it. This takes your basic salsa to a whole new level.

The tomatillos, onion, garlic, and jalapeno get roasted in the oven until they're brown and soft. This makes your house smell incredible, an added bonus. Once they're done roasting, you add a few more ingredients to your food processor and puree. It's super simple. The hardest part is letting the whole thing cool, although I tried it warm, and it was good. Too good. Had to hide the chips good. It's best to make it the night before you need it so it can spend the night in the fridge and all those lovely ingredients can spend the night holding hands or making out or doing whatever they do to become better friends and make a crazy good salsa.

Tomatillo Salsa
Makes about 3 cups
Print this recipe

1 1/2 pounds tomatillos, husks removed
1/2 large yellow onion, sliced
1 jalapeno, halved
6 garlic cloves, peeled
1/4 cup plus 2 tablespoons olive oil, divided
1/2 teaspoon kosher salt
1/2 bunch fresh cilantro
1 lime, juiced

Preheat your oven to 375 degrees.

Rinse your tomatillos under cold water until they are no longer sticky. If you like your salsa very mild (we're talking no heat), remove the seeds from your jalapeno. Place the tomatillos, the sliced onion, garlic cloves, and the jalapeno on a baking sheet and drizzle with 2 tablespoons olive oil. Roast in the oven for 15-18 minutes until the tomatillos have softened and are slightly charred. Every 5 minutes, using an oven mitt, reach in and shake the pan to move everything around. When the time is up, remove the pan from the oven and let cool for a few minutes. 

Place the olive oil, salt, cilantro, and lime juice into your food processor. Add in the roasted veggies and puree until everything is smooth. Taste with a chip and add additional salt if needed. Transfer to a container with a lid and store in the refrigerator.  

Source: From Valerie's Kitchen
Picture

Baked Chicken Taquitos

5/3/2012

 
Picture
These baked chicken taquitos have been going around the blog world for awhile, and there's good reason. They are delicious and easy. I saw these on Annie's Eats for the first time a year ago, and I made them within a couple of weeks. The filling is creamy and cheesy and has the right amount and mix of spices. It's also really easy to substitute or change the quantities of the ingredients. Want more cheese? Add more. Want to make them vegetarian and sub black beans and corn for the chicken? Done. Don't like cilantro? Leave it out. Want them more spicy? Add some hot sauce. Want to make them bigger? Use a bigger tortilla and add more filling (I do this one).

Regarding the chicken, I used to buy a rotisserie chicken and cut that into pieces. Now I boil a chicken breast and finely chop it. You can do whatever works best for you. The other wonderful thing about this recipe is that it freezes great and makes for a very easy weeknight meal. When you're done filling the taquitos, place them in a freezer bag, and stick them in the freezer (before baking). On a day when you get home from work and wonder what the heck you're going to make for dinner, don't sweat it. You can bake these right from the freezer. Just spray a little cooking oil on top, sprinkle on some kosher salt (don't skip this step...it's truly great), and bake for a few extra minutes than normal. You will know when these bad boys are done. They will be sizzling. I do recommend to let them cool a little before eating because these get insanely hot! When I make this recipe now, I do a double batch so I have a few dinners ready for those nights when I want something easy.  

If you're looking for other ideas for Cinco de Mayo food, check out the Recipe Index page...there's a Mexican section with some of my favorites.

Baked Chicken Taquitos
Makes about 12
Print this recipe

3 ounces cream cheese, softened
1/4 cup salsa
1 tablespoon lime juice
1 teaspoon chili powder
1/2 teaspoon cumin
1/2 teaspoon onion powder
2 cloves garlic, minced
3 tablespoons cilantro, chopped
1-2 green onions, chopped
2 cups cooked chicken, chopped or shredded
1 cup Mexican cheese (I also use cheddar or Colby Jack)
10-12 6-inch tortillas
Cooking spray
Kosher salt

Preheat your oven to 425 degrees.

In a large bowl, combine first 11 ingredients and mix together. Warm up your tortillas so you they will be easier to work with and spread 2-3 tablespoons down the middle of each tortilla. Roll up the tortilla and place seam side down on a greased baking sheet. Spray the tortillas with cooking spray and sprinkle a little kosher salt on top.
 
Bake for 15-20 minutes or until sizzling and golden brown.

Source: Annie's Eats, originally from Our Best Bites
Picture

Biscoff Banana Bites

4/24/2012

 
Picture
We were invited to a last-minute Easter brunch, and I wanted to bring something simple and delicious. These bites are very easy to make, and they were a big hit. They're pretty addicting. If you have never had Biscoff, it tastes like a sweet peanut butter, and you really have to try it. It's amazing stuff! If you're a fan of peanut butter and banana sandwiches, you'll be a fan of these. I think these would be perfect for a bridal or baby shower, too.

I used 4 pieces of sandwich bread and 1 banana, but you could make as many or as few as you need. I used a large 1-inch frosting tip to cut the bread, but you just need something to cut the bread into the small circles. If you have a donut cutter, the small cutter piece would work, too.

Biscoff Banana Bites
Print this recipe
Makes about 20 bites

4 pieces of sandwich bread
1/2 cup Biscoff spread
1 banana
1 tablespoon lemon juice

Cut your banana into slices, about 1/2 inch thick. Place the banana slices in a bowl, pour the lemon juice over them, and mix with your fingers so they're covered with the juice. This keeps them from turning brown.

Cut the bread into 1 inch circles. If you don't have a cutter, you could cut the bread into 1-inch squares, too. It doesn't have to be precise. Spread about 1 teaspoon of Biscoff on each piece of bread and place the banana on top of it. Serve immediately or cover with plastic wrap until ready to serve. Store in the refrigerator.  

A She Makes and Bakes original
Picture

Pizza-Stuffed Mushrooms

4/22/2012

 
Picture
If you hate mushrooms, sorry about this one. But, I loooove mushrooms, and I love them on and in a lot of foods. Pizza is one of my favorites. When I saw this recipe on Lauren's Latest, I was stoked. I love cheese, pepperoni, and shrooms, and what could be better. The beauty of this recipe is that you really can customize it to your desire. Anything that you like on top of your pizza, just chop into small pieces and throw in the filling. I used red onions and pepperoni. The original recipe called for black olives, but I don't play that way. Ick. So I left them out. Easy peasy. We had these for the Final Four basketball games, but you could have these anyday. They're so good and easy to make.
 
Pizza-Stuffed Mushrooms
Print this recipe

12 white mushrooms (the larger they are, the more filling you can put in them!)
4 ounces cream cheese softened
1/4 cup grated mozzarella
1/4 teaspoon dried basil
1/8 teaspoon dried oregano
1/4 teaspoon garlic powder
salt and pepper to taste
1/4 cups pepperoni, diced
2 tablespoons each of additional fill ins (onion, green pepper, olices, ham, sausage, etc.)

Preheat oven to 350 degrees. Spray a cast iron skillet or sheet pan and set aside.

Wash the mushrooms and remove the stem (they should pop out of the cap). If you run the mushrooms under water, make sure you drain any water out of the cap.

In a small bowl, combine the cream cheese, mozzarella, and spices. Mix together until combined. Stir in the pepperoni and other fill-ins and scoop into the mushroom caps.

Place in your sprayed pan and bake for 20 minutes. After the time is up, switch your oven to broil and brown the tops.

Source: Lauren's Latest
Picture

Meatball Rolls

4/10/2012

 
Picture
As I've mentioned before, I love pizza dough because I can use it for so many different recipes. Last week I was trying to come up with something simple and quick for dinner. I had some pizza dough in the freezer, and I wanted to try something new. This recipe is pretty stellar because it tastes a lot like a meatball sandwich without all that mess. 

Side note: You should never have meatball sandwiches when you're trying to impress someone. It's pretty hard to impress when you have cheese stringing out of your mouth and sauce dripping down your face. There's just no pretty way to eat meatball sandwiches or sliders until now.

This has the mozzarella cheese tucked inside a flavorful meatball tucked inside pizza dough. It doesn't get much better or easier to eat than this. We had these for dinner, but they would make a great appetizer, too.  

Meatball Rolls
Print this recipe

1/2 recipe pizza dough (recipe makes 2)
1/3 cup Italian bread crumbs
3 tablespoons fresh parsley
Pinch red pepper flakes
3 garlic cloves, minced
1/4 teaspoon onion powder
1 egg
2 tablespoons ketchup
2/3 cup grated parmesan
salt and pepper
1 pound ground beef
2 string cheese sticks cut into 12-14 pieces
1-2 tablespoons olive oil
Italian seasoning
Grated parmesan cheese

Preheat your oven to 400 degrees and lightly grease a 9-inch pie plate or cake pan.

In a large bowl, combine the bread crumbs, parsley, red pepper, garlic, onion powder, egg, ketchup, parmesan, and salt and pepper. Add in the ground beef and mix until everything is well combined.

Scoop out 1 tablespoon of the meatball mixture. Place a piece of cheese in the middle and roll the meat around the cheese so the cheese is sealed inside. Repeat until you have 18-20 balls. (You can form the rest of the meat into larger balls and freeze them to use later in spaghetti or meatball sliders.) Refrigerate the meatballs for 10 minutes.

Divide the pizza dough into 18-20 pieces. Take a piece of dough, place the meatball inside it, and wrap the dough around it, pinching the seams to seal. Place the balls seam side down in your pan. When you have all the balls in the plate, brush with 1-2 tablespoons of olive oil and sprinkle italian seasoning and parmesan cheese on top. Bake for 20 minutes.
 
Meatballs adapted from Giada.
Picture

Nutella Strawberries

4/9/2012

 
Picture
While I'm not a huge Nutella (hazelnut cocoa spread) fan, I do love it with strawberries. I'd never smear it on a piece of toast, but if you put it on some fruit, I'll eat it till the cows come home....or something along those lines. In my opinion, this tastes just as good as chocolate-dipped strawberries, and it's a lot easier. And I think it's healthier too, but don't quote me on that. 

I followed a "recipe" from Kirbie's Cravings, but I figured out some tips out along the way that make it easier. From the top, cut the strawberries in half about three-quarters of the way down. Use a pastry bag with a flat tip (like the basket weave or rose petal tip). This makes it easier to get the Nutella in the strawberry since you're not trying to fit a huge round tip into the middle. I squeezed out about 1/2-1 teaspoon of filling into each berry and moved the bag from left to right so that it would squeeze out through the sides where I cut.

If you don't have pastry bags, you could put some nutella in a sandwich bag, cut off the tip and squirt it in. I think it'll be messier because you won't have the stability/control of the tip, but I'm sure it can be done. You also could add more Nutella, but I loved having just the taste of it inside the berry. 

Nutella Strawberries
Print this recipe

Pint of strawberries, rinsed
1/2 cup Nutella

Pat the strawberries dry and cut off the leaves/stem. This will give the strawberry a flat surface to sit on. From the top, cut the berries in half but only cut about three-quarters of the length down. 

Fill a pastry bag fitted with a flat tip with the Nutella. Gently open the strawberry from the top, place your pastry bag inside it (about half-way down), and fill the strawberry with 1/2-1 teaspoon of Nutella while moving the bag from left to right so the filling comes out of the cuts. You can add more filling if you'd like. Repeat with the remaining strawberries.
 
Source: Kirbie's Cravings 
Picture
<<Previous
Forward>>

     Welcome!

    Cooking is fun and easy at high altitude, but baking can be frustrating. About 90% of my recipes work everywhere, but some are adjusted so us mountain dwellers can enjoy baked goods from scratch. I hope you find great recipes on here for your family, and I'll let you know if any are adjusted for high altitude. 

    Stay Updated!

    Add to your Reader:

    Get new posts delivered to your inbox:

    Enter your email address:

    Delivered by FeedBurner

    Categories

    All
    Appetizers
    Bars
    Beef
    Bread
    Breakfast
    Brownies
    Cake
    Cheese
    Chicken
    Chocolate
    Cinnamon
    Cookies
    Crackers
    Cupcakes
    Dessert
    Do It Yourself
    Drinks
    Fruit
    Ground Beef
    High Altitude
    How To
    Ice Cream
    Italian
    Main Courses
    Mexican
    Muffins
    Oatmeal
    Pasta
    Pastry
    Pie
    Pizza
    Pork
    Project Pastry Queen
    Pumpkin
    Salad
    Sauces
    Side Dishes
    Snacks
    Soup
    Sourdough
    Steak
    Vegetables

    My featured recipes on NoshOnIt

    Some Good Reads!

    Annie's Eats
    Bake at 350
    Climbing Grier Mountain
    Confections of a Foodie Bride
    How Sweet It Is
    I Am Baker
    Macaroni and Chesecake
    Pinch of Yum
    Pink Parsley
    Smells Like Home
    Smitten Kitchen
    Sunny Side Up
    The Curvy Carrot
    The Marvelous Misadventures of a Foodie
    The Pioneer Woman Cooks
All content copyright 2012-2013 She Makes and Bakes.