She Makes and Bakes
  • Home
  • About
  • Ramblings
  • Recipe Index
  • What We're Eating
  • High-Altitude Baking

Key Lime Cupcakes

5/31/2012

 
Picture
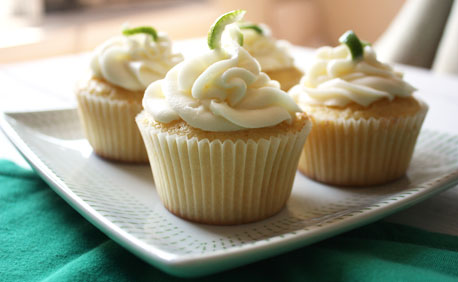
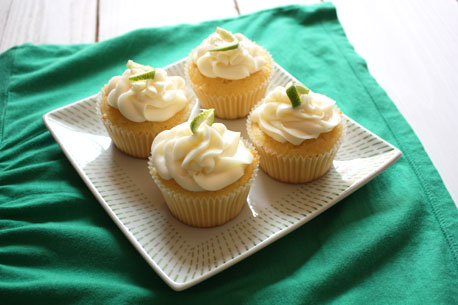
Happy Friday! Do you have any fun plans this weekend? We are relaxing this weekend--the in-laws were here last weekend, so we're going to take it easy. Although I'll be baking a lot to get ready for some fun posts while I'm in Ireland in two weeks! Whatever your plans are, you should make these cupcakes.

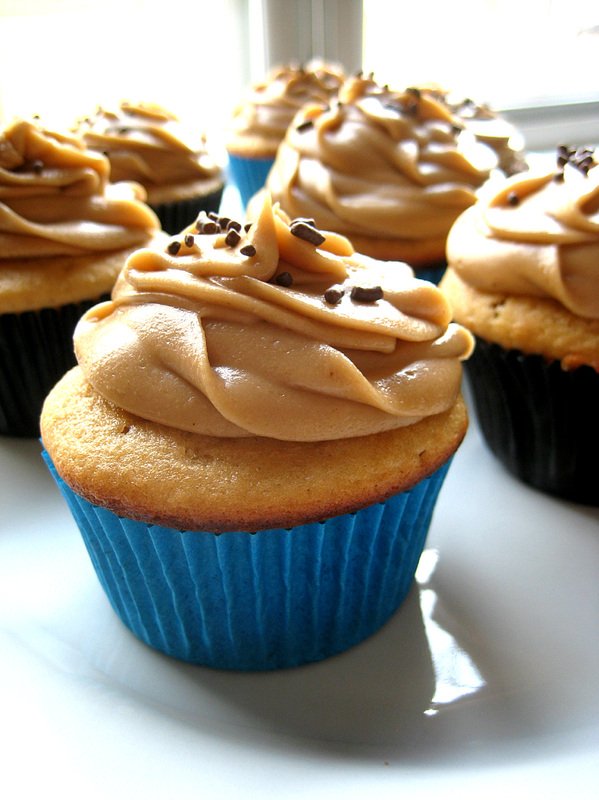
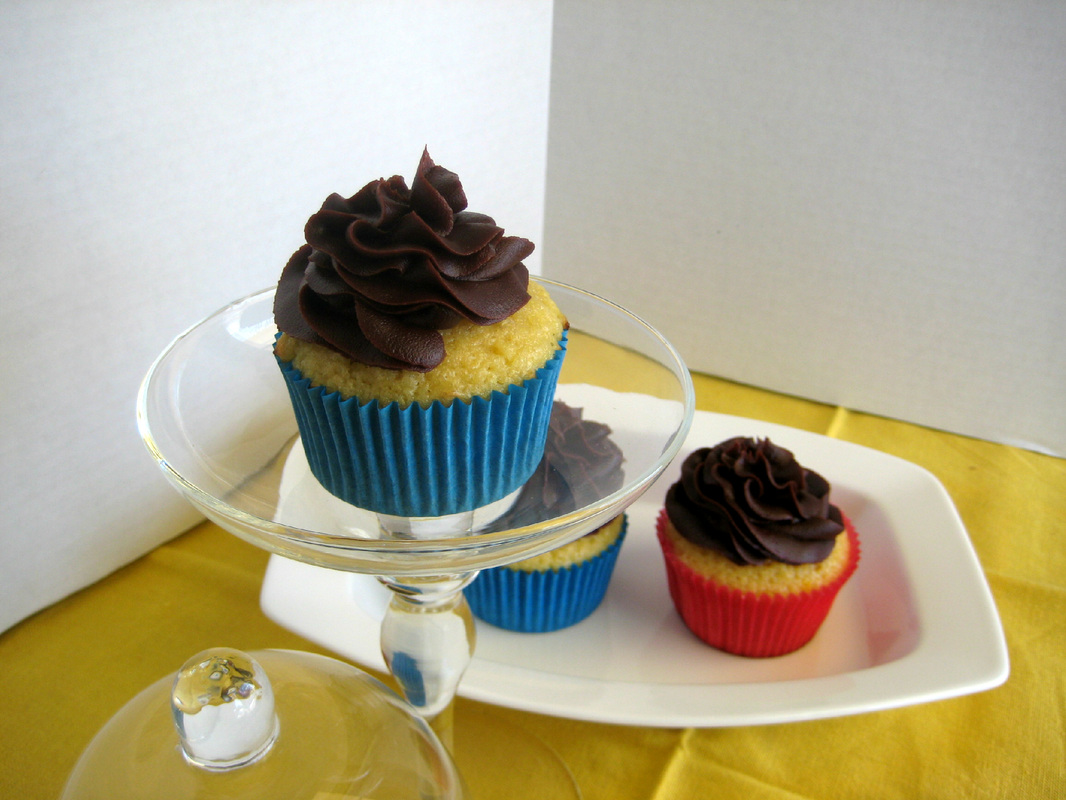
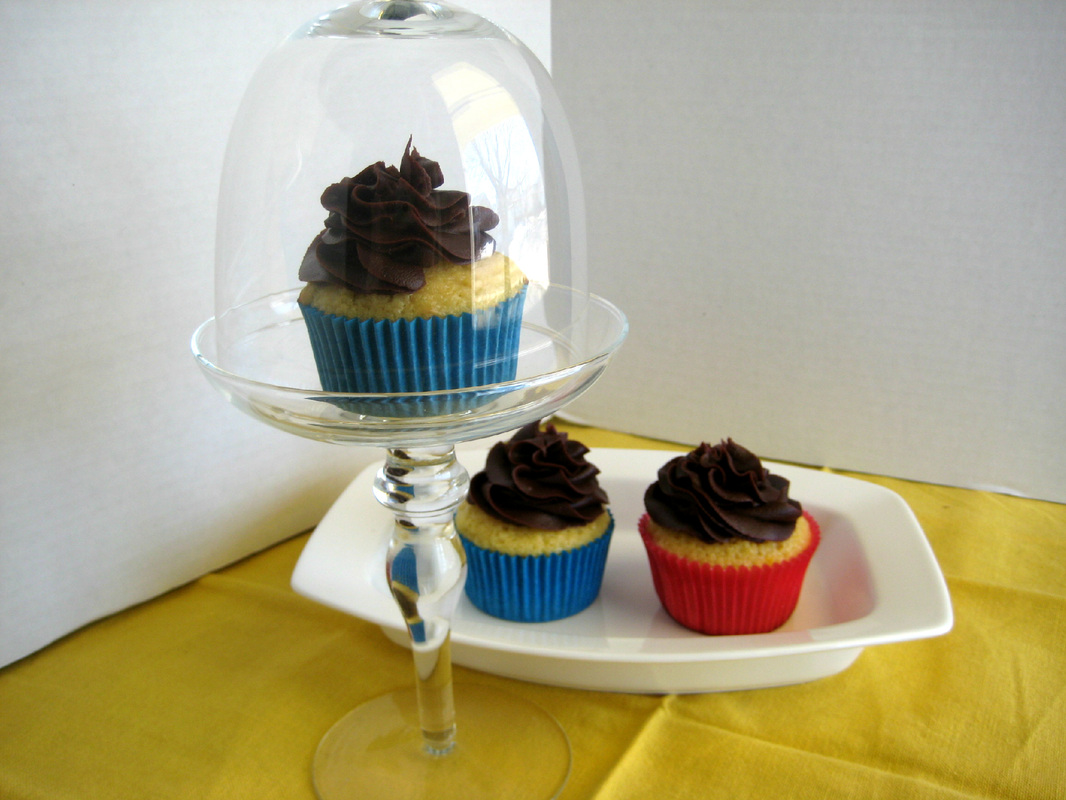
I have a side bakery business, and these are one of my most popular cupcakes. If you like key lime and tart flavors, you'll love these cupcakes. It's a vanilla cupcake, a key lime curd filling, and a cream cheese frosting. People rave about these. They take a little while to make because of all the components, but it's not too bad. I usually make the cupcakes and curd one day and then make the frosting, fill, and frost the next day. These are perfect for summer, and they would be a big hit at your next BBQ. 

The vanilla cupcake recipe is what I've created for high altitude, so if you're not at high altitude, don't use it. Use your favorite from scratch recipe or even a box mix. You'll make up for the box mix by making your own curd and cream cheese frosting (please don't buy that in the can--gross!). This recipe makes 12-14 but you can easily double it to make 24-28 cuppies.

Key Lime Cupcakes Recipe
Makes 12-14
Print this recipe

For the Cupcakes (high altitude):
1 1/2 cups cake flour
1 1/4 teaspoon baking powder
1/4 teaspoon salt
8 tablespoons butter
1 cup minus 3 tablespoons sugar
2 eggs plus 1 egg white
1 cup buttermilk
1/4 cup instant vanilla pudding mix

For the Key Lime Curd (any altitude):
1/4 cup key lime juice (about 10 key limes)
1/2 tablespoon key lime zest
1 egg
2 tablespoons + 2 teaspoons sugar
1/4 cup butter, softened and cut into two pieces

For the Cream Cheese Frosting (any altitude):
3/4 package cream cheese (6 ounces)
6 tablespoons butter
12 ounces powdered sugar (about 2 3/4 cups)
1/8 teaspoon salt
1 teaspoon vanilla

Garnish:
1 lime with rind removed, sliced, and twisted

To make the high-altitude cupcakes, preheat your oven to 375 degrees and place cupcake liners in your cupcake pan(s). Mix together the flour, baking powder, salt, and instant vanilla pudding mix and set aside. In a mixing bowl fitted with the paddle attachment, cream together your butter and sugar. Add the eggs one at a time until incorporated. Scrape down the sides of the bowl. With the mixer on low speed, add the flour mixture and buttermilk in two additions, starting and ending with the dry ingredients. Mix on low until incorporated, scrape down the sides of the bowl, and mix for another 10-15 seconds. Divide the batter into the prepared muffin liners. You want to fill each liner about 2/3 full.

Bake for 15-17 minutes or until a toothpick inserted into the middle comes out clean. Cool in the pans for 5-10 minutes and remove to a wire rack. Cool completely before filling and frosting.

If you're not a high altitude, use your favorite scratch vanilla cupcake recipe or box mix and cool completely before proceeding.

To make the key lime curd
, whisk together the key lime juice, zest, egg, and sugar in a mixing bowl set on top of a saucepan with simmering water (this is the double boiler method). Add butter and whisk until thickened and smooth (a thermometer would read 160-170 degrees). Strain through a fine mesh strainer into a clean bowl and cover with plastic wrap to chill. It will pipe into your cupcakes much easier if it's chilled.

To make the cream cheese frosting, in your mixing bowl fitted with the paddle, cream together the butter and cream cheese until smooth. Add the vanilla and salt and mix until incorporated. Add the powdered sugar one cup at a time and mix until smooth. It's best to weigh your powdered sugar because your amount in cups will depend on your humidity. If you don't have a kitchen scale, you'll want the frosting to be thick enough to pipe onto the cupcakes. Store leftover frosting in the fridge or freezer.

To assemble the cupcakes, use an apple corer or a knife to cut a hole in the center of your cupcakes. You don't need to go to the very bottom of the cupcake. Fill the hole with the chilled key lime filling. You can do this with a spoon, a pastry bag, or a sandwich bag with the corner snipped off. You don't need to place cake over the hole as the frosting will cover it. Pipe frosting on top of the cupcake. Garnish with lime twists or sprinkles.

Sources: 
Cupcakes adapted from Annie's Eats
Key Lime Curd adapted from Confections of a Foodie Bride
Cream Cheese Frosting from The Pioneer Woman Cookbook 
Picture
You may also like:
Loading...

PPQ: Cinnamon Apple Cake

5/13/2012

 
Picture
This week's Project Pastry Queen was chosen by Emily of A Gilt Nutmeg. It's actually supposed to be mini cinnamon apple loaves with a Calvados glaze, but like usual I adapted it. I don't have mini loaf pans, and I didn't want to buy disposable ones. However, I think this would be awesome for holiday gifts and am going to keep this one in mind. I put this cake into my bundt pan and made one big cake instead.

This is a really good apple cake recipe. It's very flavorful and (sorry for those of you who hate this word) moist. The original recipe calls for pecans to be mixed into the batter. Instead, I placed them at the bottom of the bundt pan, sprinkled a few tablespoons of brown sugar on top of them, and then poured the batter on top. I love doing this because you get a candied nut on the top of your cake. If you don't like nuts in your cake, just omit them. Also, I didn't have any calvados (apple brandy) for the glaze, so I subbed it with 1/4 teaspoon of cinnamon. It was a very good glaze!  

I adapted this for high altitude, so if you want the regular recipe check out A Gilt Nutmeg. Be sure to check out the Project Pastry Queen website to see everyone's take on this week's recipe.
Picture
Cinnamon Apple Cake Recipe (High Altitude)
Print this recipe

1 cup pecans
3 tablespoons brown sugar
1 1/4 cups canola oil
1 3/4 cup sugar
3 eggs
1 teaspoon vanilla
3 cups all-purpose flour
1/2 teaspoon cinnamon
1/2 teaspoon nutmeg
Scant 1/2 teaspoon baking soda (just a little less)
1 teaspoon salt
3 cups cored, peeled, and diced apples (about 3 apples)

Glaze:
1/4 cup butter
1/3 cup packed brown sugar
1 tablespoon light corn syrup
1 tablespoon Calvados (apple brandy, optional)
1/4 teaspoon cinnamon (optional)

Preheat your oven to 350 degrees. Spray a bundt pan with Baker's Joy.

Chop your nuts and sprinkle them on the bottom of your bundt pan. Sprinkle the brown sugar over them. In a large bowl, combine the oil, sugar, eggs, and vanilla and mix until combined. Add the cinnamon, nutmeg, baking soda, and salt and stir until incorporated. Add in the flour and once it is all combined, fold in the apples. 

Pour the batter over the nuts/sugar in the pan and place in your preheated oven. Bake for 60-70 minutes until a toothpick comes out clean. Let cool for about 20 minutes before flipping the cake out of the pan.

To make the glaze, in a saucepan, melt the butter and add the brown sugar, corn syrup, Calvados, and cinnamon. Simmer the mixture over medium-low heat until it thickens slightly, about 2 minutes. Spoon it over the cake.

Source: The Pastry Queen
Picture

Flaky Cream Biscuits

5/10/2012

 
Picture
Just look at those layers. Yum!

Do you ever buy a container of heavy whipping cream for a recipe and then have at least half of it left? This happens to me pretty frequently. I’ll buy cream for a chocolate ganache and use a cup of it, but I don’t want to waste the leftover. Cream isn’t super expensive, but it’s enough that I don’t want to pour it down the drain. The answer to this leftover cream problem is to make these biscuits.

These took me about 10 minutes to make when I got home from work, and then I stuck the cut biscuit dough in the freezer for an upcoming weekend breakfast. I used up my leftover cream, and I don’t have to eat all (or any) of the biscuits right away. These will last for a couple of months in the freezer, and you can pull out as many as you want, thaw, and bake them. Usually, on a Friday night I will take a few of them out of the freezer, place them on a greased baking sheet, and let them defrost in the fridge overnight. Saturday morning we can have fresh, flaky, layered, buttery biscuits that rise nice and tall and make your house smell great.

The secret to getting the layers in these biscuits is the folding method. It may seem intimidating, but it's really easy, and it doesn't take much time, especially once you get the hang of it. You could use a rolling pin, but I found it was faster and easier to use my hands because I don't want to get the dough too thin. I want my biscuits big and tall. Also make sure that your butter and cream are very cold and stay cold. You can make these the night before you need them or right before you want to bake them. They’re pretty versatile; I like knowing I have these beauties waiting for me in my freezer.

Flaky Cream Biscuits
Print this recipe

2 tablespoons vinegar
1 cup cold heavy cream
1/2 cup cold butter
1 3/4 cup all-purpose flour
1 tablespoon sugar
2 1/4 teaspoons baking powder (2 3/4 teaspoons*)
1/4 teaspoon baking soda (1/2 teaspoon*)
1/2 teaspoon salt

Stir the vinegar into the cream and refrigerate it to keep it cold. Whisk the dry ingredients into a large bowl. Cut the cold butter into 1/4 inch pieces and add to the dry ingredients. Using your fingers or forks, work the butter into the dry ingredients until it resembles coarse crumbs. Add the cream mixture and stir until it forms into a ball. Turn the dough onto a clean surface and pat into a rectangle, leaving the dough about 3/4 of an inch thick. Fold the top edge of the dough down 1/3 of the way and fold the bottom end up like you're folding a letter (see below). Pick the dough up and place the smooth edge on the left (you'll be rotating it 90 degrees). Pat the dough into a rectangle and repeat the folding process. You'll do this a total of four times. After you've done 4 folds/turns, pat the dough into a rectangle about 3/4 of an inch thick. Using a pizza wheel, cut into 12 or 15 biscuits. Separate the biscuits, place them on a greased cookie sheet, and let them chill in the fridge for about 15 minutes while the oven is preheating. When the oven reaches 450 degrees, place the biscuits in the oven and bake for about 14-18 minutes or until the biscuits are golden brown. Let the biscuits cool for about 3 minutes before serving.

If you make these the night before you want to bake and eat them, place plastic wrap over the sheet pan and keep in the fridge overnight. Take them out of the fridge about 30 minutes before you want to bake them.

If you want to freeze these for later, place them on a sheet pan and freeze them for 30 minutes. After 30 minutes, remove them from the sheet pan and place them in a freezer bag. The night before you want to bake them, take them out of the freezer, place the biscuits on a greased pan, cover with plastic wrap, and let them thaw in the fridge overnight. Take them out of the freezer about 30 minutes before you want to bake them. You also can take them out of the freezer, place them on a greased baking sheet, and let them thaw on the counter for about 3 hours. Don't bake them while they're frozen or they won't bake/rise evenly.

*The baking soda and powder in parenthesis are adjusted for high altitude. The original recipe wasn’t baking up tall enough for me, so I added a little more to both. Try the regular version first and if they're not tall enough, try the * version.

Source: Peter Reinhart's Artisan Breads Every Day
Here's the visual on how to make the dough. Cut your butter into pieces.
Picture
Add the butter to your dry ingredients, and mix it in using a fork or your fingers until it resembles coarse crumbs.
Picture
Add the cream and form in into a ball (not pictured, sorry). Then dump the dough onto your clean counter and pat it into a rectangle. You want the dough to be 1/2-3/4 inch thick, so don't make it too big.
Picture
You also can use a rolling pin, but since I want thick layers, I just pat it with my hands. Now we're going to do the folds, which is also what you do when making croissants. Take the top of the rectangle and fold it down 1/3 of the way (like a letter).
Picture
Then take the bottom of the rectangle and fold it up, on top of the first part (again, like you're folding a letter).
Picture
Pick up the dough and place the smooth edge on the left.
Picture
Now you'll pat this into a rectangle and start the folding process again. You'll do this four times. After the fourth fold, pat the dough into another rectangle and leave the dough about 3/4 of an inch thick. Using a pizza wheel, cut the dough into 12 or 15 pieces. You could cut it into circles, but you'll waste dough, so I opt for the square biscuits instead.
Picture
Because of the layers in the dough, you really can't combine all the scraps and shape them into another ball. This is another reason I go with the square biscuits.
Picture
Now you can separate these and bake all of them right away, put them in the fridge for the morning, or put them in the freezer for another day.
Picture
Delicious!

PPQ: Peanut Buttercups with Peanut-Penuche Icing

4/15/2012

 
Picture
That title is just a fancy way of saying peanut butter cupcakes. If you love peanut butter, these are the cupcakes for you. This is a peanut butter cake with some chocolate thrown into the middle and a peanut butter frosting. Think inside out peanut butter cup. If you aren't from the South or you're apparently uneducated on various forms of candy/fudge (like me) and have never heard of penuche, it's a peanut fudge candy (yes, I had to Wikipedia it because I had zero clue...and I still don't know how to pronounce it).

This penuche frosting is good...it tastes like peanut butter caramel fudge. Winner in my book! Although, next time I would pair the cupcake with a chocolate frosting for a better contrast in flavors. I would do this cake with chocolate frosting and this frosting with a chocolate cake. Hmmm...so many options...must start baking. The cake is nice and moist and has a tender crumb. It must have been good because I ate an entire cupcake while I was taking pictures. Literally--the camera was in my right hand and the cupcake was being devoured while in my left hand. I guess that's one good thing about having a crappy point and shoot camera! 

Jen of Sweet Morris picked this recipe for this week's Project Pastry Queen, and it came along at a great time. I was just thinking that I needed to post another cupcake recipe on here. My recipe is for high altitude, so check out Jen's blog for the regular recipe if you live pretty much anywhere else in the world. Ah, the joys of living at a mile high. The recipe says it makes 12 cupcakes, but I got 18 out of it. It also calls for a bittersweet chocolate bar cut into pieces, but I was all out so I used semisweet chocolate chips. I also added an extra 1/2 cup of powdered sugar to my frosting because I wanted it to be thicker. These changes are noted in my recipe below. Also, check out Project Pastry Queen to see everyone else's take on these delicious peanut butter cupcakes.  
Picture
Peanut Butter Cupcakes at High Altitude
Makes 18 cupcakes
Print this recipe

For the Cake:
1 3/4 cups all purpose flour
2 1/4 teaspoons baking powder
1/4 teaspoon salt
1 1/4 cups packed brown sugar
6 tablespoons butter, softened
1/3 cup peanut butter
1 cup + 2 tablespoons milk
1 teaspoon vanilla
3 eggs
1 cup bittersweeet or semisweet chocolate chips

Preheat the oven to 375 degrees. Line 18 muffin cups with liners and set aside. Using a mixer with the paddle attachment (or a hand mixer), combine the flour, baking powder, salt, and sugar. Mix until incorporated. Add the butter, peanut butter, milk, and vanilla and mix until combined. Add in vanilla and eggs one at a time until well incorporated. Fill the cupcake liners 1/3 of the way with the batter. Add in a few chocolate chips (about 10-12) and top with more batter until the cups are 2/3 filled. Bake for 15-17 minutes or until a toothpick comes out clean. Let the cupcakes cool in the pan for 10 minutes and cool at least 5 additional minutes before frosting

For the Frosting:
1/4 cup butter
1/4 cup peanut butter
1/4 cup milk
1 cup packed brown sugar
1/8 teaspoon salt
1 teaspoon vanilla
1 cup powdered sugar

In a medium saucepan over medium heat, combine the butter, peanut butter, milk, brown sugar, and salt. Stir to combine, bring to a low boil, and let it boil for 1.5 minutes without stirring. Remove from heat and let sit for 30 minutes (but not longer). After 30 minutes, stir in the vanilla and powdered sugar, pour into a mixer fitted with the paddle attachment, and mix on medium speed until smooth and creamy. This will take a couple of minutes. At this point, I put the frosting in a piping bag and placed it in the freezer for about 10-15 minutes until it was cool. This helped it to stiffen so it would keep its shape when I piped it on the cupcakes.
Picture

PPQ: Tropical Carrot Cake

3/18/2012

 
Picture
This week's Project Pastry Queen was chosen by Emily of A Gilt Nutmeg. She chose the tropical carrot cake with coconut-cream cheese frosting. This is an intense, three-layer cake, but it's a great special occasion cake. Easter maybe? If you like coconut and carrot cake, you'll love this cake. I love the addition of the macadamia nuts that give it some texture, and it has great flavor. It's also very moist. This isn't my favorite carrot cake recipe, but I do like it a lot. However, this is not your typical cream cheese frosting. It's not very sweet. I added more powdered sugar than called for, and it's still not very sweet. I would use my go-to cream cheese frosting recipe next time. I modified the recipe for high altitude, so if you're at a normal altitude, check out this post for the regular recipe.

Another note, I have never used or heard of sweetened cream of coconut (Coco Lopez) before. I did some research, and it's in a can in the drink section of the grocery store. Super Target sells it in the baking aisle. If you can't find it at the store, like me, try your liquor store in the mixers section. Mine had it and saved me from having to make another trip.  

Tropical Carrot Cake at High Altitude (5280 feet)
Print this recipe
1 cup macadamia nuts
3 cups flour
3 cups sugar
2 1/4 teaspoon baking soda
1 teaspoon salt
1 tablespoon cinnamon
1/2 teaspoon nutmeg
1 1/2 cups sweetened flaked coconut
5 eggs
2 tablespoons vanilla
1 3/4 cups canola oil
2 cups shredded carrots
20 oz can crushed pineapple, drained
1/2 cup sweetened cream of coconut

Coconut-Cream Cheese Frosting
3 8-ounce packages of cream cheese
2 cups powdered sugar
1/4 cup heavy whipping cream
1/4 sweetened cream of coconut
1/2 teaspoon salt

Preheat the oven to 375 degrees. Place the nuts on a baking sheet in a single layer and toast for 7-9 minutes until golden brown. Cool.

In a large bowl, combine flour, sugar, baking soda, salt, cinnamon, nutmeg, coconut, and nuts. In another bowl, combine the other ingredients. Pour the wet ingredients into the dry ingredients and stir until combined.

Pour the batter into three 9-inch cake pans that have been sprayed with Baker's Joy (or you can line the pans with parchment paper, grease with butter, and dust with flour). Bake for 25-30 minutes or until a toothpick inserted into the cake comes out clean. Let cool completely.
 
To make the frosting, combine cream cheese with powdered sugar into your mixer with the paddle attachment (or use a hand mixer). Mix on medium speed until combined (about a minute or two). Add in the rest of the ingredients and continue mixing until combined and lumps are removed.

To frost, place a small bit (about 2 tablespoons) of frosting to the serving plate and place the first cake layer on top, bottom side down (this small bit of frosting ensures the cake won't slide off the serving plate). Spread a generous layer of frosting on top of this layer. Place the second layer on top, spread more frosting on top, and place the third layer on, bottom side up (so you have an level top). Frost the top and sides of the cake with an even layer of frosting and decorate. Store in the fridge for up to four days but serve at room temperature.
Picture
Pin It

Bailey's Cupcakes

3/6/2012

 
Picture
What could be better than Bailey's in a cupcake with a Bailey's chocolate truffle frosting? Nothing. Absolutely nothing. Trust me on this one. This is the perfect adult cupcake, and you should make it for St. Patrick's Day and every other day when you need a kick. I had to remind myself to not taste the cupcake batter too much, because you definitely could get a buzz from that batter. The frosting will harden after it is piped or spread on the cupcakes, so the best way to eat these is to warm them slightly in the microwave for a few seconds until the frosting is a little softer. They're still very delicious without heating them up though.

This cupcake recipe is adapted for high altitude, and this is my go-to vanilla cupcake recipe, just slightly adapted. The addition of the vanilla pudding mix helps to keep them moist, a problem I have at my altitude. I have included the recipes for both low and high altitude, so make sure you're following the correct one! I've never made the low-altitude recipe at sea level, so I'm assuming it works based on where I found it and the comments that were made on that blog. The original recipe makes 24 cupcakes, but I rarely need that many, so I halved it.

High-Altitude Bailey's Cupcakes (5280 feet)
Print this recipe
Makes 12-14 cupcakes

1 1/2 cups cake flour
1 1/4 teaspoon baking powder
1/4 teaspoon salt
8 tablespoons butter
1 cup minus 3 tablespoons sugar
2 eggs plus 1 egg white
1/2 cup Bailey’s Irish cream
1/2 cup buttermilk
1/4 cup instant vanilla pudding mix

Mix together the flour, baking powder, salt, and instant vanilla pudding mix and set aside. In the bowl of your mixer, cream the sugar and butter together until light and fluffy. Add the eggs one at a time until incorporated. Scrape down the sides of the bowl. Combine the buttermilk and Irish cream. With the mixer on low speed, add the flour mixture and liquids in two additions, starting and ending with the dry ingredients. Mix on low until incorporated, scrape down the sides of the bowl, and mix for another 10-15 seconds. Divide the batter into the prepared muffin liners. You want to fill each liner about 2/3 full.

Bake at 375 degrees for 15-17 minutes or until a toothpick comes out clean. Cool in the pans for 5-10 minutes and then remove to wire racks to cool completely before frosting.  
 
Low-Altitude Bailey's Cupcakes
Print this recipe
Makes 12-14 cupcakes

1 1/2 cups cake flour
1 1/2 teaspoons baking powder
1/4 teaspoon salt
8 tablespoons butter
1 cup sugar
2 eggs plus 1 egg white
1/4 cup + 1 tablespoon Bailey's Irish cream
1/4 cup + 1 tablespoon buttermilk 

Mix together the flour, baking powder, and salt and set aside. In the bowl of your mixer, cream together the sugar and butter until light and fluffy. Add the eggs one at a time until incorporated. Scrape down the sides of the bowl. Combine the buttermilk and Irish cream. With the mixer on low speed, add the flour mixture and liquids in two additions, starting and ending with the dry ingredients. Mix on low until incorporated, scrape down the sides of the bowl, and mix for another 10-15 seconds. Divide the batter into the prepared muffin liners. You want to fill each liner about 2/3 full.

Bake at 350 degrees for 18-22 minutes or until a toothpick comes out clean. Cool in the pans for 5-10 minutes and then remove to wire racks to cool completely before frosting.

Bailey's Truffle Frosting
Makes enough for at least 12 cupcakes

8 oz good semisweet chocolate (I used E. Guittard)
1/2 cup Bailey’s Irish cream
2 tablespoons sugar
2 tablespoons corn syrup
2 tablespoons butter

In a saucepan, mix together the Irish cream, sugar, and corn syrup. Heat over medium until sugar has dissolved and mixture is very hot. Pour over chocolate and let sit for 2 minutes, giving the chocolate time to melt. Stir until chocolate has melted, add the butter, and stir until melted. If the chocolate won't fully melt, you can heat it in the microwave for 30 seconds. Let the frosting sit for about 10-20 minutes, stirring periodically. It will firm up as it cools. If it hardens too much, simply reheat for about 10 seconds until it's spreadable again. Pipe onto cooled cupcakes.
 
Source: Cupcakes adapted from Annie's Eats, who adapted it from Confections of a Foodie Bride. Frosting is a She Makes and Bakes creation.
Picture
Pin It
Forward>>

     Welcome!

    Cooking is fun and easy at high altitude, but baking can be frustrating. About 90% of my recipes work everywhere, but some are adjusted so us mountain dwellers can enjoy baked goods from scratch. I hope you find great recipes on here for your family, and I'll let you know if any are adjusted for high altitude. 

    Stay Updated!

    Add to your Reader:

    Get new posts delivered to your inbox:

    Enter your email address:

    Delivered by FeedBurner

    Categories

    All
    Appetizers
    Bars
    Beef
    Bread
    Breakfast
    Brownies
    Cake
    Cheese
    Chicken
    Chocolate
    Cinnamon
    Cookies
    Crackers
    Cupcakes
    Dessert
    Do It Yourself
    Drinks
    Fruit
    Ground Beef
    High Altitude
    How To
    Ice Cream
    Italian
    Main Courses
    Mexican
    Muffins
    Oatmeal
    Pasta
    Pastry
    Pie
    Pizza
    Pork
    Project Pastry Queen
    Pumpkin
    Salad
    Sauces
    Side Dishes
    Snacks
    Soup
    Sourdough
    Steak
    Vegetables

    My featured recipes on NoshOnIt

    Some Good Reads!

    Annie's Eats
    Bake at 350
    Climbing Grier Mountain
    Confections of a Foodie Bride
    How Sweet It Is
    I Am Baker
    Macaroni and Chesecake
    Pinch of Yum
    Pink Parsley
    Smells Like Home
    Smitten Kitchen
    Sunny Side Up
    The Curvy Carrot
    The Marvelous Misadventures of a Foodie
    The Pioneer Woman Cooks
All content copyright 2012-2013 She Makes and Bakes.