She Makes and Bakes
  • Home
  • About
  • Ramblings
  • Recipe Index
  • What We're Eating
  • High-Altitude Baking

Tomato Pumpkin Soup

11/1/2012

 
Picture
When I was in Paris a couple of weeks ago, I spent a lot of time confused. I hate feeling like an idiot American when I don't speak the language. And, to be frank, I couldn't even understand French. The only familiarity I have with French is Beauty and the Beast (yes, I'm talking about the Bonjour song) and cooking terms. While bonjour got me pretty far, I don't think mise en place would carry me quite the same way. Therefore, when we walked around to find a restaurant, we would look for English menus. It was much less painful than pulling out my yellow French dictionary to try and figure out what I was about to order.
 
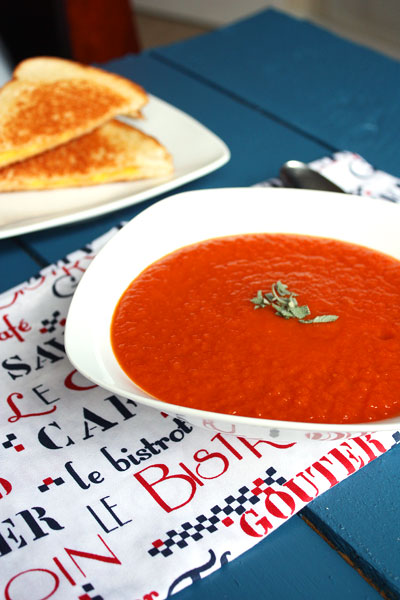
While we did all this walking around to find restaurant, we kept passing one that had a sign for tomato pumpkin soup. While we never stopped in and had a bowl, I was definitely intrigued. Enough that it meant I wanted to make some at home. I have absolutely no idea if this tastes anything like theirs, but I think it's pretty dang good. Plus, after I made it, I realized that it's vegan. I don't really intend for anything to be vegan, but I feel like this opens some options to those on restricted diets, which is pretty cool. Even though there is no cream in it, it's pretty creamy due to the pumpkin. It mainly tastes like tomato soup but has a hint of pumpkin. It's a great fall soup and perfect with a grilled cheese sandwich or some crackers.

Tomato Pumpkin Soup Recipe
Serves 6-8
Print this recipe

Note: I used cooking stock because that's what I had, but feel free to use vegetable stock or chicken stock/broth. Puree your soup to the consistency you like and if you like thinner soup, you may want to add more stock/broth.

1 tablespoon olive oil
1/2 while onion, diced
2 (28 ounce) cans of diced tomatoes
1 (15 ounce) can pumpkin puree
1 tablespoon tomato paste
1 tablespoon brown sugar
2 teaspoons fresh sage, diced
1 tablespoon flour
1 cup cooking stock or vegetable stock
Salt and pepper to taste
Pinch cayenne

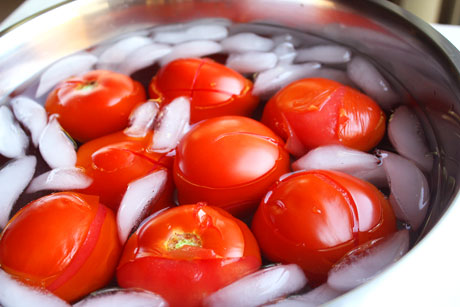
In a large pot, heat the tablespoon of oil over medium heat. Add the onion and cook for 5-7 minutes or until soft. Drain one can of tomatoes and keep the juice. Add the drained tomatoes, tomato paste, brown sugar, and sage and cook for 10 minutes. This will help to concentrate the tomato flavor before you add in everything else. Stir in the flour and cook for one minute. Add in the reserved tomato juice, the other can of diced tomatoes with the juice, the can of pumpkin, and the stock. Simmer for 20 minutes. Puree in batches in a food processor or a blender until smooth or is the consistency you prefer. Add in salt and pepper to taste and the pinch of cayenne. If you like thinner soup, add in more cooking stock. 

Source: Greatly adapted from America's Test Kitchen  
Picture

Tomato Cobbler with Gruyere Biscuits

9/17/2012

 
Picture
I'm not going to lie...the first time I saw this on Pink Parsley's blog, I definitely turned my nose up at it. Tomato cobbler? Weird and gross. The second time I saw it on Annie's Eats, I turned my nose up again, but maybe it wasn't quite as high. It kind of stuck in the back of my mind. Well maybe, I thought. My biggest hang up was (is) the fact that I'm not a total tomato lover, as I've previously mentioned. I especially don't like fresh tomatoes. And I don't like tomato skin in my cooked tomatoes. So I stored it in my mind for another year.

This summer I've really come around to eating more and more tomatoes. So I thought about the tomato cobbler yet again and decided to make it. Oh my. For one, your house will smell absolutely incredible while you bake it. That alone makes this dish worth the effort. There's something about the caramelized onions mixed with the garlic mixed with the butter from the biscuits that is to die for. It's not a pool of tomato juice with soggy biscuits on top. Not at all. The biscuits are light, fluffy, and crispy on top with plenty of amazing gruyere in and on them. I even liked the roasted tomatoes in the cobbler. It gave each bite a bit of freshness. The whole dish is quite wonderful, although the hubs turned his nose up and said it was weird. Maybe he just needs a couple of years to adjust to the idea like I did.

Tomato Cobbler with Gruyere Biscuits Recipe
Makes a 9x13 dish
Print this recipe

Note: I cut this recipe in half and baked it in a 1.5 quart baking dish for about 50 minutes. This takes a bit of time to prep and bake, so you could caramelize the onions the day before and keep them in the fridge. Then just put everything together and bake. Also, if you love caramelized onions, you definitely should double that part of the recipe!

For the filling:
2 tablespoons extra virgin olive oil
2 tablespoons butter
2 medium onions, thinly sliced
4 garlic cloves, minced
1 teaspoon fresh thyme, chopped
3 pounds cherry or grape tomatoes
3 tablespoons all purpose flour
1/4 teaspoon red pepper flakes
Salt and pepper

For the biscuits:
2 cups all purpose flour
2 teaspoons baking powder
Kosher salt
1/2 cup butter, cold and chopped into pieces
1 cup grated gruyere cheese, plus 2 tablespoons for sprinkling
1 1/2 cups cold heavy cream

To make the cobbler filling, heat olive oil and butter over medium heat in a large pan and add onions. Cook, stirring occasionally, until caramelized (about 25-30 minutes). Add the garlic and thyme and cook until fragrant, about 1-2 minutes. Let cool.

Preheat your oven to 375 degrees.

In a large bowl, toss tomatoes, flour, red pepper flakes, and onion mixture. Pour into a greased 2 quart baking dish or a 9x13 pan.

To make the biscuits, in a large bowl, combine the flour, baking powder, and salt. Add in the butter and incorporate it using two knives, a fork, or a pastry blender until it resembles coarse crumbs. Mix in the cheese, and add in the cream. Stir with a fork until the dough forms into a large clump (it will be sticky). Using an ice cream scoop, 1/4 measuring cup, or a large spoon, drop clumps of the biscuit dough on top of the cobbler filling. Sprinkle the top with the remaining 2 tablespoons of cheese.

Bake for one hour to one hour and ten minutes or until the filling is bubbling and the biscuits are golden brown. Transfer to a wire rack and let cool 20 minutes before serving. 

Source: Annie's Eats and Pink Parsley, originally from Martha Stewart Living
Picture

Breaded Chicken Skewers with Grilled Romaine

9/6/2012

 
Picture
I realize that grilling season is "officially" over, but it was still 90 degrees in Colorado today. So let's fire the grill up and go! This is some of the best chicken I've had in quite some time. Instead of doing a typical flour, egg wash, bread crumb breading, you make a simple dressing, toss the chicken in that, and then add the bread crumbs. Then, instead of frying or baking the chicken, you grill it on skewers. Oh man, it was tender, juicy, and had great flavor and crunch from the bread crumbs. 

I realize that grilling romaine may seem a little strange. Even my husband looked at me like you're asking me to grill lettuce? But don't skip this step. It brings out the sweet smokiness of the lettuce and enhances the flavor. Plus, it's something different. I highly recommend you try this meal before it gets cold and dark outside!

Breaded Chicken Skewers with Grilled Romaine Recipe
Print this recipe

1/4 cup extra virgin olive oil, plus more for drizzling
2 tablespoons red wine vinegar, plus more for drizzling
2 tablespoons chopped fresh oregano
1 tablespoon minced shallot or red onion
1 teaspoon minced garlic
1/4 teaspoon red pepper flakes
Kosher salt
1 head Romaine lettuce, quartered lengthwise
1 1/2 pounds boneless, skinless chicken breasts, cut into chunks
1 1/2 cups breadcrumbs
1/4 cup grated parmesan cheese

Preheat a grill to medium high heat and soak 8 wooden skewers in water (so they don't burn on the grill).

In a medium bowl, stir together the oil, vinegar, oregano, shallot, garlic, red pepper flakes, and 1 1/4 teaspoons salt. Drizzle the cut sides of the lettuce with about 1 teaspoon of this mixture.

Add the chicken chunks to the rest of the mixture in the bowl and toss. Add the breadcrumbs and toss until the chicken is coated. Place the chunks on the skewers, leaving space between each piece. 

Grill the skewers until the chicken is cooked through, about 8-10 minutes. Also grill the romaine, turning it once, until marked and slightly wilted, about 1-2 minutes. Put the grilled romaine on plates and drizzle additional olive oil and red wine vinegar on top. Season with salt, add the chicken skewers, and sprinkle the parmesan on top of everything. 

Source: Food Network  
Picture

Baked Caprese

9/4/2012

 
Picture
In the last year, I have come to absolutely love all things caprese. Even though I'm not a big fan of raw tomatoes, when you pair them with fresh basil, I could eat them all day long. When I saw this recipe in the Easy Summer Food cookbook, I wanted to try it asap. You score tomatoes, stuff mozzarella in them, and then bake them until they're warm and soft and the cheese is melted. Then you top it off with basil, olive oil, and balsamic vinegar. I love these. Baking the tomatoes tones down the fresh tomato flavor just a touch, and of course you can't go wrong with the caprese combination. I truly believe that fresh basil makes almost anything taste better. I highly recommend you make these before your basil plant dies and tomato season is over. Your mouth will thank you.

Baked Caprese Recipe
Print this recipe

Note: This recipe makes 10 tomatoes, but you can easily make it using as many tomatoes as you want. I made it with four tomatoes and scaled everything way day. It's not so much of a measuring recipe as it is a guide.

10 ripe tomatoes (I used vine-ripened tomatoes)
4 ounces mozzarella cheese, cut into 10 pieces
1/4 cup olive oil
2 tablespoons balsamic vinegar
Bunch of fresh basil leaves, torn
Salt and pepper

Preheat your oven to 325 degrees and spray a baking tray with cooking spray.

In each tomato, cut a deep X about halfway through the tomato. Push a piece of mozzarella into each X. Place the tomatoes on the tray and sprinkle with salt and pepper.

Bake in the oven for 25 minutes until the tomatoes start to soften and open. Remove from the oven, drizzle the olive oil and balsamic vinegar on top and serve.

Source: Easy Summer Food Cookbook
Picture

Pappa al Pomodoro Soup

8/29/2012

 
Picture
It all started with me going to the library, which happens about every couple of weeks. I love to browse the cookbook section and see what catches my eye. Last week, it was a Easy Summer Food cookbook that looked too good to resist. Mainly because I am not even remotely close to being ready for fall. Yes, I am a little sick of the 62 days and counting of 90+ degree weather in Colorado, but it's going to be snowing before I know it. And I am definitely not ready for that! So Easy Summer Food sounded fantastic.

We have three large tomato plants growing in the garden, but last week we had only red cherry tomatoes and a whole lot of green Roma and regular tomatoes. I saw this soup recipe and hightailed it to the store to buy tomatoes on the vine, two pounds of them to be exact. It's not really that much unless you get distracted by a friend and misread the scale and buy almost six pounds of tomatoes. Um, what? Six pounds. I paid almost $15 for those bad boys, and now I have a ton waiting to be picked. Fail. So I made this soup, I made salsa, I made baked caprese tomatoes. And now I have to come up with more recipes to use up the tomatoes in the garden. Major problems, I know.  

So this Tuscan soup really is a great summer dish. You can serve it hot or cold (I prefer hot), it takes less than an hour, uses fresh herbs, and has amazing fresh flavors. It screams I came out of your garden. Even my I-hate-soup-when-it's-hot-outside husband loved it. The wonderfully unique thing about this soup is the dried, grilled bread that gets mashed into the soup, giving it more texture and flavor. I recommend you try this before tomato season is over!

Pappa al Pomodoro Soup Recipe
Serves 4
Print this recipe

Notes: This recipe calls for dried bread. If you only have fresh bread, bake the bread at 300 degrees for about 10-15 minutes until it's dried. I actually used French bread because that's what I had, but sandwich bread would work great, too.

2 pounds tomatoes, peeled and chopped
1 1/4 cups vegetable stock
1 teaspoon sugar
1/3 cup extra virgin olive oil
4 spring oregano
4 sprigs basil
4 slices dried bread, crusts removed
2 garlic cloves cut in half
Kosher salt and freshly ground black pepper
Grated parmesan cheese to serve

Place your peeled and chopped tomatoes in a saucepan and add the stock, sugar, 2 tablespoons of the olive oil, and the leaves from the oregano and basil. Add salt and pepper and heat slowly to a boil. Reduce the heat, cover, and simmer for 30 minutes.

Meanwhile, toast the bread over a grill or grill pan until it has grill marks, and rub the garlic on the bread. Place it on a plate, drizzle the remaining oil over it and mash it with a fork until it's in small bits.

After the soup has simmer for 30 minutes, add the bread and stir over low heat for about 5 minutes until it has slightly thickened. Add more salt and pepper to taste and top with grated parmesan cheese if desired.

Source: Easy Summer Food Cookbook
Picture

How to Peel Tomatoes

8/27/2012

 
Picture
I'm going to be sharing some tomato recipes this week, so I wanted to give a quick tutorial about how to peel tomatoes first. Get out your vegetable peeler. No wait, don't. I was just kidding. Peeling tomatoes is really easy, and no veggie peeler is required.

First, get out a large pot, fill it with water, and heat it on high until boiling. Meanwhile, cut a small, shallow X on the bottom of your tomatoes. Also fill a large bowl with ice water.
Picture
When the water is boiling, place the cut tomatoes into the pot. Let them sit in the water for 30-45 seconds. You should start to see the skin peeling away from the X you cut. Use a slotted spoon to remove the tomatoes and place them into the ice water. Let them sit there for about a minute or two to cool and then you can easily peel the skin off of the tomatoes with your fingers. This method also works for peaches!
Picture
Forward>>

     Welcome!

    Cooking is fun and easy at high altitude, but baking can be frustrating. About 90% of my recipes work everywhere, but some are adjusted so us mountain dwellers can enjoy baked goods from scratch. I hope you find great recipes on here for your family, and I'll let you know if any are adjusted for high altitude. 

    Stay Updated!

    Add to your Reader:

    Get new posts delivered to your inbox:

    Enter your email address:

    Delivered by FeedBurner

    Categories

    All
    Appetizers
    Bars
    Beef
    Bread
    Breakfast
    Brownies
    Cake
    Cheese
    Chicken
    Chocolate
    Cinnamon
    Cookies
    Crackers
    Cupcakes
    Dessert
    Do It Yourself
    Drinks
    Fruit
    Ground Beef
    High Altitude
    How To
    Ice Cream
    Italian
    Main Courses
    Mexican
    Muffins
    Oatmeal
    Pasta
    Pastry
    Pie
    Pizza
    Pork
    Project Pastry Queen
    Pumpkin
    Salad
    Sauces
    Side Dishes
    Snacks
    Soup
    Sourdough
    Steak
    Vegetables

    My featured recipes on NoshOnIt

    Some Good Reads!

    Annie's Eats
    Bake at 350
    Climbing Grier Mountain
    Confections of a Foodie Bride
    How Sweet It Is
    I Am Baker
    Macaroni and Chesecake
    Pinch of Yum
    Pink Parsley
    Smells Like Home
    Smitten Kitchen
    Sunny Side Up
    The Curvy Carrot
    The Marvelous Misadventures of a Foodie
    The Pioneer Woman Cooks
All content copyright 2012-2013 She Makes and Bakes.