She Makes and Bakes
  • Home
  • About
  • Ramblings
  • Recipe Index
  • What We're Eating
  • High-Altitude Baking

Brown Butter Cinnamon Rum Pancakes

2/25/2013

 
Picture
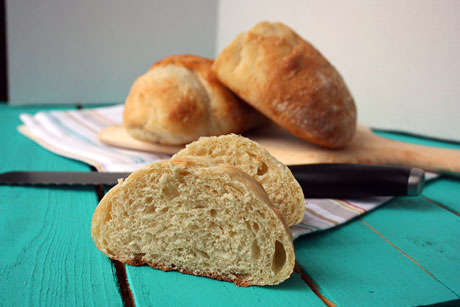
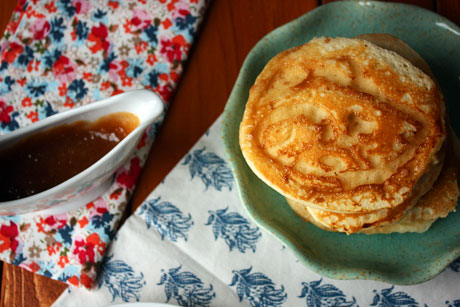
I must confess that I am obsessed with this brown butter cinnamon rum sauce. Even though it's not actual rum...just rum extract. It's warm and homey and amazing, and I want to bathe in it. Or drink it. Or put it in everything...it started with a cake and then it led to these apple pie cinnamon rolls, and now I've put it in and on my pancakes. And I don't regret it one iota.

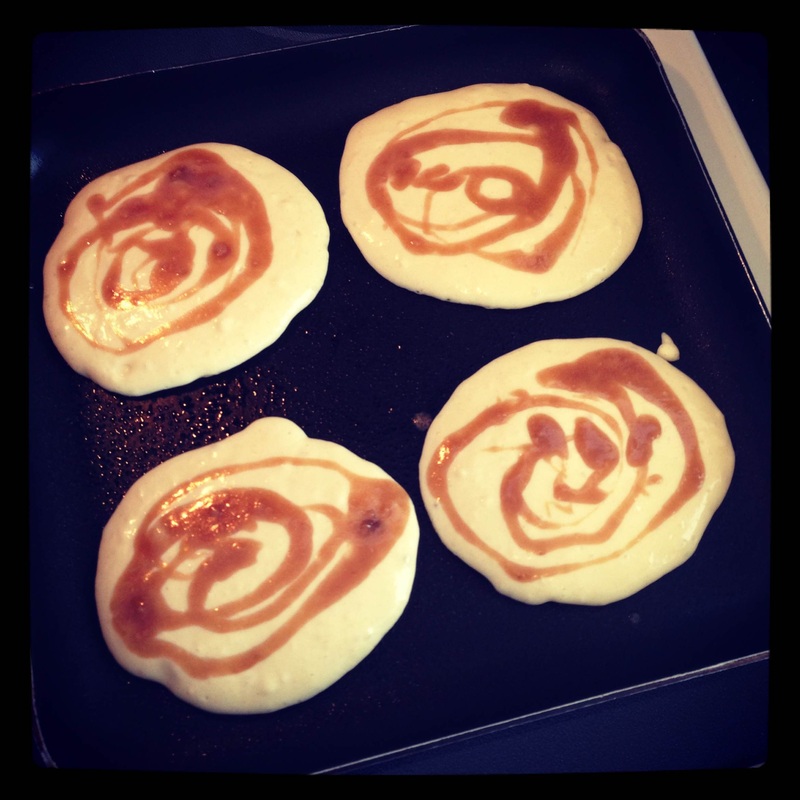
I took my regular pancake recipe and then while they were cooking, I drizzled this sauce on top of the uncooked side. The sauce is a little thick, which is perfect when you drizzle it onto the pancake batter. If you want to drizzle it over your pancakes before you shovel them into your mouth, you could add a little water to it if you want it to be runnier. It's amazingly perfect either way and the best way to start a weekend morning. 
Picture
Brown Butter Cinnamon Rum Pancakes Recipe
Makes about 12 pancakes
Print this recipe

For the pancakes:
1 1/2 cups all-purpose flour
3 1/2 teaspoons baking powder
1/2 teaspoon salt
1 tablespoon sugar
1 1/4 cups milk
1 egg
3 tablespoons melted butter, cooled

For the brown butter sauce:
1/4 cup butter
1/2 cup sugar
1 tablespoon flour
Pinch of salt
1/4 cup water
1 teaspoon vanilla
1/4 teaspoon rum extract
1/8 teaspoon cinnamon

Make the pancake batter first. In a large bowl, combine together the flour, baking powder, salt, and sugar. Whisk in the egg, milk, and cooled melted butter until just combined. Set it aside and make the sauce.

In a medium saucepan melt the butter. Stir and watch as it gets foamy and then starts to turn brown. When it turns into a dark honey color and smells nutty, quickly stir in the sugar, flour, and salt. Gradually add the water. Bring to a boil and cook and stir for 2 minutes. Remove from heat and add in the extracts and cinnamon.

Heat a griddle or skillet over medium heat and spray with cooking spray. Drop 1/4 cups of the batter on the griddle. Drizzle about 1-2 tablespoons of the sauce on top of the pancakes. Let them cook for 2-3 minutes until bubbles appear on the top of the pancakes and the underside is golden brown. Flip the pancakes and let them cook for 1-2 minutes longer until golden brown.

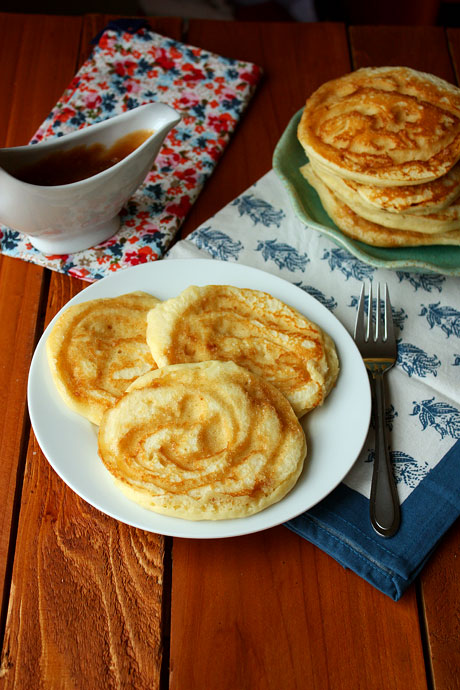
Serve immediately with the rest of the sauce or let them rest on a wire rack so they remain crisp.

If the sauce is too thick to use as a syrup, whisk in up to 1/4 cup more water to thin it.

Sauce adapted from Taste of Home Fall Baking Cookbook
Picture
You may also like:
Loading...

The Best Chocolate Frosting

2/24/2013

 
Picture
For years I have been searching for the best chocolate frosting recipe. Essentially I wanted something that looked like the chocolate frosting you can get in the can but it needed to taste better (although I loved that frosting when I was a kid). I wanted it to be dark in color and super chocolatey. I wanted it to not taste like sour cream (like many of them do). I wanted it to taste like canned chocolate frosting...but not.

And then I finally found it. Well actually I found it months and months ago but I never tried it until a few weeks ago. And then I kicked myself for not trying it sooner. I do this a lot unfortunately. The secret ingredient is Ovaltine. I realize this is pretty unorthodox, but it totally works.

I could happily eat this frosting with a spoon. If you're looking for the perfect chocolate frosting, look no further. You've found it.

By the way, a year ago I started this little blog on a day when I had nothing to do at my office. Here I am a year later, laid off from that job, but happily running a bakery and living my dream. I love all of you guys. It's so much fun to do this; read your comments; feel your love on Facebook, Twitter, Instagram, and Pinterest; and stalk my stats on Google Analytics to see how many people are reading and what you guys are checking out! I'm addicted, and I love it! Thanks for everything! You are the best!  
Picture
The Best Chocolate Frosting Recipe
Makes enough for one 8-inch or 9-inch cake or 24 cupcakes
Print this recipe

Note: You can make this in a stand mixer, food processor, or with a hand mixer.

12 tablespoons butter, room temperature
1/2 cup unsweetened cocoa (use Dutch Process if you have it)
1/2 teaspoon salt
2 1/2-3 cups powdered sugar
2 tablespoons milk
2 teaspoons vanilla
Scant 1/2 cup heavy cream
1/3 cup rich chocolate Ovaltine powder

In a mixer or food processor, cream together the butter, cocoa, and salt until well combined. Scrape down the sides of the bowl and add in 2 1/2 cups of the powdered sugar, milk, and vanilla and mix until smooth.

In a separate bowl, whisk the Ovaltine into the cream and then add that into the mixing bowl while it's running on low. Blend until well combined and smooth. If it's grainy, mix longer or put in the fridge and let it firm up a bit and then remix. Add up to another 1/2 cup powdered sugar if needed.

From Confections of a Foodie Bride who adapted it from the Joy the Baker cookbook
Picture
You may also like:
Loading...

Chicken Parmesan Sandwiches

2/21/2013

 
Picture
I don't know if you ever read the What We're Eating page, but I had these sandwiches listed on there for about 3 weeks in a row. Not because we loved them that much (although we did) but because I never could get around to making them. So when I finally did, I was so happy. They were amazing! As I've mentioned many times before, my husband hates pasta, so I can never get away with chicken parmesan and spaghetti. So just like I fill my meatball craving with meatball sandwiches, I can now fill my chicken parm craving with these sandwiches. It's a win win (especially because I love bread!).

I pan fried these but you could just as easily bake them (and they'd be healthier, too). That's what I'll probably do next time, but I was in the mood to use some hot oil. I pounded a large chicken breast out pretty thin, and that was enough for 2 large sandwiches...and we both only ate half of our sandwich. Next time, I'll just make one sandwich that we can split with a side or salad. I also highly recommend you make these with homemade ciabatta. It really took it over the top! 

Chicken Parmesan Sandwiches Recipe
Makes two sandwiches
Print this recipe

1 large chicken breast
1/4 cup all purpose flour
Salt and pepper
1 egg, beaten
1 cup panko breadcrumbs
1/4 teaspoon garlic powder
1/4 teaspoon onion powder
Vegetable oil

For the sandwiches:
Mozzarella cheese slices
1/2 cup marinara sauce
Sandwich bread or homemade ciabatta
1/4 cup butter, softened
1/4 teaspoon garlic powder

Pound the chicken breast out until it is a uniform thickness, about 1/4 inch thick. Cut the chicken in half so you have two pieces. Mix together the flour, salt, and pepper, and spread it out on a plate. Place the beaten egg in a large wide bowl. Mix together the panko, garlic powder, and onion powder. Place those in a large wide bowl or on a plate. Dredge each chicken breast through the flour so it's coated on both sides, then through the egg, and then through the seasoned panko. Make sure the panko covers the entire breast. Place on a plate.

If you want to fry the chicken: Pour enough oil in the skillet to cover about 1/2 inch. Heat it over medium heat until the oil is almost smoking. If you drop a breadcrumb in the oil to test it, it should sizzle. Once your oil is hot, use tongs to place the chicken breasts in the pan. If they don't fit side by side, do them one at a time. Let them cook for about 3-4 minutes until they're golden brown. Carefully flip the chicken over and cook for another 2-3 minutes until golden brown. The chicken should be 165 degrees on the inside (but check them temperature when it's not in the pan). Take the chicken breast out of the oil and place on a paper towel to drain any grease.
 
If you want to bake the chicken: Preheat your oven to 400 degrees. Place the breaded chicken on a sheet pan and bake for 20 minutes until a thermometer inserted into the chicken reads 165 degrees.

Meanwhile, spread the softened butter on the bread, sprinkle with garlic powder, and place it butter side down on a pan over medium heat until golden brown and toasted, about 1-2 minutes.

Place the cheese on top of the bottom piece of bread, place the chicken on top of it, pour 1/4 cup of hot marinara on top of the chicken, and top it with the second piece of bread. Serve immediately.
Picture
You may also like:
Loading...

Ciabatta

2/19/2013

 
Picture
Let me start by saying that this ciabatta tastes like no other ciabatta I've ever had. The ciabattas that I've had are tough and chewy. This ciabatta is soft and incredible. It's not that I don't like those other ciabattas, but it's just that I love this bread. It's probably one of my favorites, and that's coming from a girl who eats a lot of bread. Oodles and oodles of bread.

The only reason I don't eat this bread every week is because it takes a little bit of planning. You have to make a biga ahead of time. What is a biga you ask? A biga is a per-ferment that is similar to a sourdough (but it's not sour). It gives great flavor and texture to the bread and helps it last longer (yay!). A biga is just four simple ingredients that you have to mix together using a spoon (no mixer required) and then place in your fridge overnight. It's really simple, but you have to think about it. That, generally, is my downfall. I wish I was better at thinking ahead of time because this bread is so worth it.

Just a note that this is a very wet and sticky dough. While it's rising, you are going to have to spray a spatula with cooking spray and stretch and fold the dough. Stay with me. It's easier than it sounds. All you do is put the spatula under the dough and then lift and fold the dough on that side in toward the middle. Then you rotate the bowl 90 degrees and do it again. You'll want to do this a total of 8 times. The reason you'll do this is to help strengthen that sticky and stretchy dough so it's a bit easier to work.
Picture
Picture
Picture
Picture
Essentially this seems like a hard bread, but it's really not. And it's worth every bit of effort as soon as you take a bite. Making bread is easy; let's do it!

Ciabatta Recipe
Makes 4 loaves
Print this recipe

Make the biga a day before you make the ciabatta.

For the biga:
1/4 teaspoon active dry yeast
1/4 cup warm water
1 3/4 cups (8.7 ounces) bread flour
1/2 cup + 2 teaspoons cool water

For the ciabatta:
2 teaspoons active dry yeast
1 1/4 cup plus 1 tablespoon (10.5 ounces) warm water
3 cups plus 2 tablespoons (14 ounces) bread flour
2 1/2 teaspoons salt
1 biga recipe

To make the biga, dissolve the yeast in warm water in a small bowl. Let it sit for about five minutes until it's creamy. Measure the flour into a large bowl and make a well in the center of the flour. Add the yeast mixture as well as the cool water and stir it together with a large wooden spoon. Mix until sticky and well combined. Cover tightly and place in the fridge overnight.

To make the ciabatta, add the yeast and warm water in the bowl of your mixer. Let sit for five minutes until it's foamy and then add in the biga and flour and mix on low speed with the paddle attachment until well blended. Let sit for another five minutes and then add the salt. Switch to the dough hook and mix until a smooth and soft dough forms. It will be sticky. Place the dough in an oiled bowl, cover, and let rise for about an hour until doubled.

After an hour, spray a rubber spatula with cooking spray. Place the spatula under the dough in the bowl, lift it on one side and fold the dough over itself toward the middle. Turn the bowl 90 degrees and repeat. Do this 8 times. Cover the bowl and let rise for 30 minutes. After 30 minutes, repeat the lift and fold technique for 8 more turns. Cover and let rise for 30 more minutes.

Preheat your oven to 500 degrees. Cover two sheet pans with parchment paper and generously dust with flour.

Generously dust your counter with flour and place the dough on the counter gently. Be careful to not completely deflate the dough. Flour the top of the dough and divide in quarters. Take one piece of dough and place the long cut side up. Press it into a 6x3 inch rectangle (it doesn't have to be perfect). Fold the shorter sides of the dough toward the center like you were folding a business letter (in thirds). Gently transfer the folded dough to the dusted sheet pan, seam side down. Repeat with the other three pieces of dough. Place two loaves on each sheet pan. Use your finger tips to gently press down into the dough and dimple it (like you were pushing down on piano keys or a keyboard). Let rise for 30 minutes and dimple it again.

Spray the loaves lightly with water from a spray bottle and place the cookie sheet into the oven. Bake for 5 minutes, spraying the loaves with water twice more in the first 5 minutes. Reduce the heat to 475 degrees and bake for another 10-15 minutes until the loaves are golden brown and sound hollow when tapped. Cool loaves to room temperature before slicing and serving.

Source: Cook Street School of Culinary Arts 
Picture
You may also like:
Loading...

Vanilla Maple Cookies

2/17/2013

 
Picture
While I realize that late February doesn't exactly scream maple to most people, I just needed to share these cookies. They are a dream. Can I share a secret with you all real quick? I used to hate maple. I'm not really sure why, but I loved it as a kid and then I stopped loving it. I though that it smelled disgusting and the thought of putting it on anything made me queasy. And I wasn't even pregnant.

However, one day I was watching an awful reality show on VH1 with models as the contestants. The funny thing about it was that if they answered the trivia questions wrong, they had to eat something that they'd never dream of eating. Ever. One of the "punishment" foods was pancakes with maple syrup. The model about had a heart attack at the prospect of having to eat all those carbs and sugar and butter, oh my! That was the first time in years where I could stomach the thought of maple syrup. I have no idea how that awful show brought me back to the maple love, but I'm thankful I was watching it that morning!

These cookies have just a hint of maple in the cookie and the frosting, which plays well with the vanilla flavor, especially from the white vanilla chips. These cookies are a bit on the sweet side with that frosting, but they're definitely worth it! Soft, chewy, and a great little dessert. Although I'm sure models would say otherwise!

Vanilla Maple Cookies Recipe
Print this recipe

For the cookies:
1 cup shortening
1/2 cup butter, softened
2 cups brown sugar, packed
2 eggs
1 teaspoon vanilla
1 teaspoon maple flavoring/extract
3 cups all purpose flour
2 teaspoons baking soda
2 cups white baking chips

For the frosting:
1/4 cup butter, softened
4 cups powdered sugar
1 teaspoons maple flavoring/extract
4-6 tablespoons milk

Preheat your oven to 350 degrees.

In the bowl of your mixer, cream together the shortening, butter, and brown sugar until light and fluffy. Add in the eggs one at a time, scraping down the side of the bowl as needed. Mix in the vanilla, maple flavoring, and baking soda. Once incorporated, add in the flour until just combined. Fold in the baking chips.

Roll into one-inch balls and place on an ungreased cookie sheet 2 inches apart from each other. Bake for 8-10 minutes or until they just start to turn brown and remove from the oven. Let them sit on the baking sheet for two minutes and then remove to a flat surface to cool.

While the cookies are cooling, make the frosting. Cream together the butter and powdered sugar. Add in the maple flavoring and then the milk a little bit at a time until it's a good consistency for spreading. Be careful you don't add too much or it won't harden. Mix until smooth and spread on top of the cooled cookies. Let dry for a few hours to harden the frosting before packaging in an air-tight container or plastic bag with wax paper in between the layers of cookies.

Source: Barely adapted from Taste of Home
Picture
You may also like:
Loading...

Homemade Breakfast Sandwiches

2/14/2013

 
Picture
My husband absolutely loves breakfast sandwiches. So every now and then when I'm feeling like a nice wife, I'll buy the frozen ones for him (which he absolutely loves). You know the ones that come four to a large box and cost approximately 84 dollars? That *might* be a slight exaggeration, but those suckers are expensive!

I knew that I could make them taste just as good and be a lot more cost efficient. Not to mention saving all that packaging waste. And guess what, they're easy. You certainly don't have to make four of them, but I made them on a Monday, stuck them in sandwich bags, and placed them in the freezer. The night before my husband wanted one, I placed it in the fridge. He took it to work the next morning and heated it up for 55 seconds in the microwave. Guess what, they tasted better than the prepackaged ones. I used American cheese, but I'm thinking cheddar would be great or even pepper jack to give it a little kick! There's so many different ways to play around with this recipe.

Homemade Breakfast Sandwiches
Makes 4
Print this recipe

4 English muffins
4 eggs
8 ounces breakfast sausage
4 slices cheese (I used American but cheddar or pepper jack would be great, too)

Cut the sausage into 1/2 inch slices and press down into wider patties. Cook for about 10-15 minutes on medium heat, flipping halfway through, until cooked through. Remove to a paper towel to drain. If you want your muffins toasted, toast them.

Crack one egg into a small bowl and scramble together with some salt and pepper. Heat a small skillet over medium heat and spray with cooking spray. Pour the mixed egg into the skillet and cook for one minute without stirring. Flip it over and cook for another 30 seconds. Fold the egg into quarters and place on the English muffin. Place the sausage patty on top and add a slice of cheese. Top with the other half of the English muffin. Serve.

To eat later, reheat in the microwave for 45-60 seconds or in the toaster oven for about 5 minutes until warm and the cheese has melted. If you want to freeze them, place them in separate bags in the freezer and let thaw in the fridge overnight before warming.
Picture
You may also like:
Loading...

Heart Sugar Cookies

2/12/2013

 
Picture
Happy Valentine's Day (almost)! Are you ready? If not, may I suggest these adorable sugar cookies? I've never really decorated sugar cookies up until a couple of years ago, and I've definitely gotten better with practice. Lots and lots of practice! I even think they're pretty fun now, which completely surprises me.

These are great for teachers, kids, and the people you love...or like...or even just tolerate. Even better is that they taste good! Let's look at how to do this.
Picture
You'll need a batch of royal icing, split into the colors you want. You'll want to keep some of it in bags and flood the rest and place it in squeeze bottles. See how to do that here. I prefer to use a number 3 tip to outline the cookies and a number 2 tip to draw any details on after they dry.
Picture
You'll also need cookies. I did hearts and then scalloped circles. When the scalloped circles came out of the oven, I lightly pressed the heart cutter into the circles so I could outline it easier (instead of drawing it by hand).
Picture
Outline the cookies using the icing from the bags and let them rest for about 20 minutes or so.
Picture
Next you want to flood the cookie with icing from the squeeze bottle.
Picture
Then move it to the sides using a toothpick. Once the cookie is flooded, you can add details to it right away using the flooded icing (like polka dots or hearts) or let it sit for several hours and pipe details on top later.
Picture
To make the polka dots, right after you flood the cookie drop small amounts of another color icing on top using the squeeze bottles. It would have been helpful if I had darker colors...
Picture
To make hearts, place a toothpick at the top (or side of) of each polka dot and drag it through the dot and subsequent dots without picking up the toothpick. It will make a heart. Let these cookies dry overnight before packaging. 
Picture
To pipe details on top of the cookies, wait until they dry for at least a few hours and then pipe details on top. Let them dry overnight before packaging.

Sugar Cookie Recipe
Makes about 40 cookies
Print this recipe

1 cup butter
1 cup powdered sugar
1 egg
2 teaspoons vanilla
3/4 teaspoon salt
1/2 teaspoon nutmeg
2 1/2 cups all purpose flour

In the bowl of an electric mixer, cream together the butter and powdered sugar until combined. Add in the egg and mix, scraping down the sides of the bowl. Add the vanilla, salt, and nutmeg and mix until incorporated. Add in the flour and mix until combined. Place the dough in plastic wrap and chill until firm.

Preheat your oven to 375 degrees.

Roll the dough out to 1/4 inch thickness on a floured counter. Cut with cookie cutters and place on a greased cookie sheet. It is helpful to freeze the cookies for 8-10 minutes before baking as they will hold their shape better. Bake for 8-10 minutes; the cookies will not brown. Remove from the pan and let cool completely before decorating.

Royal Icing Recipe

4 tablespoons meringue powder
Scant 1/2 cup water
1 pound powdered sugar, sifted
1/2-1 tablespoon corn syrup
Few drops of clear extract (I use clear vanilla)

Place the meringue powder and water in the bowl of your stand mixer. Use the paddle attachment to beat it until it's combined and foamy. Add in the sifted powdered sugar and beat on low until combined. Add in the corn syrup and extract and beat on high until the icing is thick and glossy. It should have stiff peaks. Divide the icing into bowls to tint, and make sure to keep it covered.

Cookies adapted from Annie's Eats
Icing recipe from Bake at 350
Picture
You may also like:
Loading...

Chocolate Chip Cookie Dough Truffles

2/11/2013

 
Picture
Have you experienced these beauties yet? If you are a lover of chocolate chip cookie dough, then you will adore these. Eggless chocolate chip cookie dough is covered in chocolate, making the most amazing treat. I love to make a big batch of these and keep them in my freezer. On a day when I need a pick-me-up (read everyday), I just let it thaw for a few minutes and then take a wonderful bite. It's pure bliss.

I have a feeling I'm going to need one or two of these tomorrow. The hubs is sick and has an injured back, which means that he's snoring at night. Which means that I'm not sleeping. Normally I'd push him and tell him to roll over, but with his back, he can't. And if I do, then I feel like a big jerk. A huge jerk. So I sigh and try to sleep but wake up feeling exhausted. Here's hoping that everything gets better quickly, but if not, it's nice knowing I can pop a truffle in my mouth when I need that burst of energy at 3 in the afternoon. Yes, I know that it's not exactly good for you, but it's saved me the last few days!

Chocolate Chip Cookie Dough Truffles Recipe
Print this recipe

8 tablespoons butter, softened
3/4 cup brown sugar, packed
2 1/4 cups all purpose flour
14 ounce can sweetened condensed milk
1 teaspoon vanilla
1/2 cup mini chocolate chips
1 1/2 pound semisweet or bittersweet chocolate, chopped
Mini chocolate chips for garnish

In the bowl of a mixer, cream the butter and sugar until light and fluffy. Mix in the flour, sweetened condensed milk, and vanilla until fully incorporated. Add in the mini chocolate chips until combined, cover with plastic wrap, and chill in the fridge until firm enough to form balls.

Once chilled, form the dough into one-inch balls. Place on a piece of wax paper on a cookie sheet and chill in the freezer for 1-2 hours (or longer if needed).

When you're ready to dip the balls, melt the chocolate in the microwave in 30 second intervals, stirring in between. Once melted, use a fork to dip the ball into the chocolate. Tap gently against the side of the bowl and then flip the ball over so that the side touching the fork is on top. Add a little more chocolate if needed on the top to smooth it. Drop some mini chocolate chips on top if using for garnish. Store in the fridge or freezer.

Tips: If the chocolate cools too much, it won't cover the truffles as smoothly. If that happens, you can warm up the chocolate again.

To avoid fingerprints on these, use rubber gloves when handling.

Source: Annie's Eats
Picture
You may also like:
Loading...

Strawberry Crumb Bars

2/10/2013

 
Picture
I don't know about you all, but I'm ready to start growing food in my garden. I've seen that some of you are lucky enough to do this, but in Colorado we can't plant anything outside until Mother's Day...three months away. Sigh. So until I can do that, I'm pretty excited about frozen fruit. I think it still has great flavor, and it's perfect in baked bars like these.

In fact, these bars are pretty perfect themselves. See that pan in the background? I took these to a Superbowl party last week. Nine adults devoured these during the game, and they were complaining about how they couldn't stay away from them. I don't make these very often because they are insanely addictive. The lovely crumb combined with the sweet but not-too-sweet strawberries along with a bit of almond extract in them just pushes them over the edge. I highly recommend you make these for your sweetie on Thursday. He or she will love you even more...and if you're worried about having a giant pan of these in the house tempting you, the recipe splits nicely in half and you can bake it in a 9x9 pan instead. I pretty much always have to do that modification because these go just a little too quickly at my house!
Picture
Strawberry Crumb Bars Recipe
Makes a 9x13 pan
Print this recipe

3 cups all purpose flour
1 1/2 cups sugar, divided
1 teaspoon baking powder
1/4 teaspoon salt
1/4 teaspoon cinnamon
1 cup shortening
2 eggs
1 teaspoon almond extract
1 tablespoon cornstarch
4 cups strawberries (fresh or frozen), cut in half

Preheat your oven to 375 degrees and grease a 9x13 baking dish.

In a large bowl, stir together the flour, 1 cup of the sugar, baking powder, salt, and cinnamon. Add in the shortening and mix with a pastry cutter, fork, or two knives until the mixture resembles coarse crumbs. Add the eggs and almond extract. Press 2/3 of the mixture into a greased 9x13 pan.

Note: If you're using frozen berries, don't thaw first.

In another bowl, combine the remaining 1/2 cup sugar and the cornstarch. Stir together. Add in the strawberries and gently stir until coated. Spoon these over the crust. Sprinkle the remaining crumbs over the strawberries. 

Bake for 40-50 minutes or until bubbly and golden brown. Remove from oven and let cool completely before serving.

Barely adapted from Taste of Home
Picture
You may also like:
Loading...

Red Velvet Cupcakes

2/7/2013

 
Picture
It's the time of year for every food blogger to post something red velvet, so I figured I had better jump on the wagon. The L-O-V-E holiday is coming up in less than a week, and if you haven't made one of these, it's about time! What's the deal with red velvet you ask? Well, it's a buttermilk cake with a hint of cocoa in it. It definitely doesn't taste like chocolate. It's a bit tangy, and when paired with cream cheese frosting, it's pretty incredible. Plus, it's pretty. And we all love that, right?

I have tried several red velvet cake recipes, and this is my favorite by far. They have great flavor, they're not dry, and they are bright red. Last year I made mini green velvet cupcakes for St. Patrick's Day, so know that you can substitute out the food coloring if you want to go with something different. It was a fun change! I almost always use gel food color, but with these you'll need the liquid. Do yourself a favor and buy the separate bottle of red food color that is one ounce. Perhaps if you don't have to measure anything, maybe you can do a better job of avoiding getting red dye everywhere. Including on your hands and under your nails. Or maybe that's just me who does that every.single.time!

Red Velvet Cupcakes Recipe
Makes about 20
Print this recipe

*If you're baking at high altitude, please follow the * adjustments!

For the cupcakes:
1 cup shortening
1 3/4 cup sugar
2 1/4 cup cake flour
1 1/4 teaspoon salt
2 eggs (*3 eggs*)
1 cup (*plus 2 tablespoons*) buttermilk
1 teaspoon vanilla
1 teaspoon (*3/4 teaspoon*) baking soda
1 1/2 teaspoon white vinegar
1 ounce red food color
1 1/2 teaspoons cocoa powder 

For the cream cheese frosting:
1 1/2 packages cream cheese (12 ounces)
3/4 cup butter
1 1/2 pounds powdered sugar
1/4 teaspoon salt
2 teaspoons vanilla

Preheat your oven to 350 degrees (*375 degrees for high altitude*).

In your mixing bowl fitted with the paddle attachment, cream together the shortening and sugar. In a large liquid measuring cup, combine the eggs, buttermilk, vanilla, baking soda, vinegar, and salt. Add the flour into the mixing bowl in three additions, alternating with the wet ingredients. Start and end with the flour. Once combined, stir together the red food color and cocoa powder in a small bowl. Add into the batter and mix just until incorporated.

Divide the batter into muffin tins with liners, filling each with about 1/4 cup of batter. Bake for 15-17 minutes (*12-15 minutes*) or until a toothpick comes out clean. Cool in the pan for a few minutes and then remove from the pan to cool completely.

While the cupcakes are cooling, make the cream cheese frosting. In your mixing bowl fitted with the paddle, cream together the butter and cream cheese until smooth. Add the vanilla and salt and mix until incorporated. Add the powdered sugar in three additions and mix until smooth. Pipe onto cooled cupcakes.

Source: The Pioneer Woman Cooks cookbook
Picture
You may also like:
Loading...
<<Previous
Forward>>

     Welcome!

    Cooking is fun and easy at high altitude, but baking can be frustrating. About 90% of my recipes work everywhere, but some are adjusted so us mountain dwellers can enjoy baked goods from scratch. I hope you find great recipes on here for your family, and I'll let you know if any are adjusted for high altitude. 

    Stay Updated!

    Add to your Reader:

    Get new posts delivered to your inbox:

    Enter your email address:

    Delivered by FeedBurner

    Categories

    All
    Appetizers
    Bars
    Beef
    Bread
    Breakfast
    Brownies
    Cake
    Cheese
    Chicken
    Chocolate
    Cinnamon
    Cookies
    Crackers
    Cupcakes
    Dessert
    Do It Yourself
    Drinks
    Fruit
    Ground Beef
    High Altitude
    How To
    Ice Cream
    Italian
    Main Courses
    Mexican
    Muffins
    Oatmeal
    Pasta
    Pastry
    Pie
    Pizza
    Pork
    Project Pastry Queen
    Pumpkin
    Salad
    Sauces
    Side Dishes
    Snacks
    Soup
    Sourdough
    Steak
    Vegetables

    My featured recipes on NoshOnIt

    Some Good Reads!

    Annie's Eats
    Bake at 350
    Climbing Grier Mountain
    Confections of a Foodie Bride
    How Sweet It Is
    I Am Baker
    Macaroni and Chesecake
    Pinch of Yum
    Pink Parsley
    Smells Like Home
    Smitten Kitchen
    Sunny Side Up
    The Curvy Carrot
    The Marvelous Misadventures of a Foodie
    The Pioneer Woman Cooks
All content copyright 2012-2013 She Makes and Bakes.