It always amazes me when people say they're scared of making bread. Why oh why. Yeast is your friend, and homemade bread is so much better and cheaper than store bought. Let me say that the only kitchen fear I can think of is stacking cakes. Mainly because you do this for weddings, and mainly because brides can be ca-ra-zy! I don't want to "ruin" a wedding. No siree.
Anyway, I have been making bread for years, and the longer you do it, the better you get. For the longest time, I used my bread maker, and it worked great. When I got a Kitchen Aid mixer, I started using that, and it was even easier. I have taken some bread classes, so I'm here to pass my knowledge along to you so that you aren't scared anymore. Please note that these tips are based on my experience and what I've been told. So don't yell at me and tell me I'm wrong. Thanks.
1. I think a lot of people get hung up on what type of yeast to use. I know I have. Here's the thing: it doesn't matter if you use instant (aka bread machine yeast) or active dry yeast if you make your dough the same way. If you always stir your yeast into the liquid, it doesn't matter which type you buy. This is a very general statement, and I know some people will argue with me, but this always works for me.
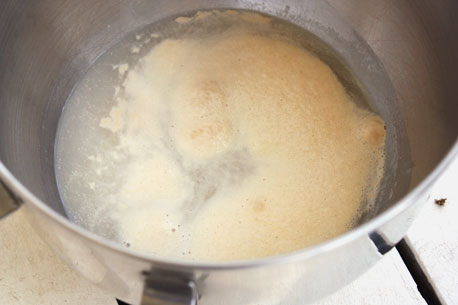
2. If you're using new yeast (either a new jar or a packet), you'll need to proof your yeast to make sure it's alive. Yes, yeast is alive. Proofing it means pouring it into the warm water or milk, adding some sugar, and letting it sit for about 5-10 minutes. If it's alive, it'll bubble and get foamy (like the picture below). If it doesn't do anything, you have a bad batch or it's old. I make a lot of bread, so I always buy a jar. Once I know it's ok, then I don't have to proof it again. You can use the yeast, water/milk, and sugar measurements from your recipe to proof your yeast. Do not skip this step because nothing is more frustrating than going through the whole bread-making process to have your loaves be dense and not great because your yeast didn't work. Also, if you're using packets, you need to proof each packet. Don't assume that if one packet was ok that the other two will be ok as well.
Anyway, I have been making bread for years, and the longer you do it, the better you get. For the longest time, I used my bread maker, and it worked great. When I got a Kitchen Aid mixer, I started using that, and it was even easier. I have taken some bread classes, so I'm here to pass my knowledge along to you so that you aren't scared anymore. Please note that these tips are based on my experience and what I've been told. So don't yell at me and tell me I'm wrong. Thanks.
1. I think a lot of people get hung up on what type of yeast to use. I know I have. Here's the thing: it doesn't matter if you use instant (aka bread machine yeast) or active dry yeast if you make your dough the same way. If you always stir your yeast into the liquid, it doesn't matter which type you buy. This is a very general statement, and I know some people will argue with me, but this always works for me.
2. If you're using new yeast (either a new jar or a packet), you'll need to proof your yeast to make sure it's alive. Yes, yeast is alive. Proofing it means pouring it into the warm water or milk, adding some sugar, and letting it sit for about 5-10 minutes. If it's alive, it'll bubble and get foamy (like the picture below). If it doesn't do anything, you have a bad batch or it's old. I make a lot of bread, so I always buy a jar. Once I know it's ok, then I don't have to proof it again. You can use the yeast, water/milk, and sugar measurements from your recipe to proof your yeast. Do not skip this step because nothing is more frustrating than going through the whole bread-making process to have your loaves be dense and not great because your yeast didn't work. Also, if you're using packets, you need to proof each packet. Don't assume that if one packet was ok that the other two will be ok as well.
3. When you add the yeast to the liquid, you want the liquid to be warm. You know the trick of seeing if a bottle is too hot for a baby by testing it on the inside of your wrist? That's what you want to do for bread. It should be around 100 degrees, and you'll know if it's too hot or cold by using that neat little trick. If your liquid is too cold, it will take forever to work. If your liquid is too hot, it will kill the yeast. So be like goldilocks and make sure it's just right.
4. Bread making is much easier if you have a machine to do it for you, especially if you're working with a very tough dough. Stand mixers are expensive (but so worth the cost), but bread machines are pretty inexpensive. Also, you can go to Goodwill and get one there for super cheap. All of their appliances are tested to make sure they work before they're put on the sales floor. Heck, if you live in the Denver area and don't have a bread machine, let me know and you can have mine. It's just hanging out in my crawl space.
5. If you're using a bread machine, use the dough setting because you can shape and bake it yourself. It'll be prettier that way. Put the ingredients into the pan according to the manufacturer's instructions (mine were liquids at the bottom, dry ingredients, and the yeast in a well on top) and hit start.
6. There are two main types of bread: regular (baguettes, French, sourdough, etc.) and enriched. Enriched dough has eggs and/or butter in it. Generally it is stickier than regular dough. I also think that it's probably not called regular dough, but I can't think of a better or more accurate word. Sorry.
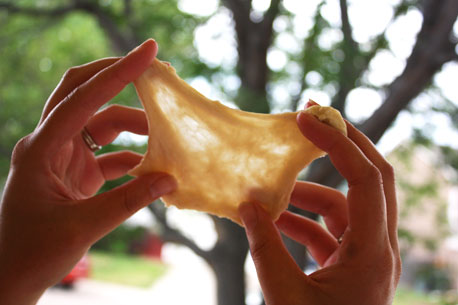
7. The best way to tell if your "regular" dough has been kneaded enough is the window test. Take a small portion of dough and stretch it out. When you hold it up to the light, you should be able to see through it without having it tear. At that point, it's fully kneaded and ready to rise.
4. Bread making is much easier if you have a machine to do it for you, especially if you're working with a very tough dough. Stand mixers are expensive (but so worth the cost), but bread machines are pretty inexpensive. Also, you can go to Goodwill and get one there for super cheap. All of their appliances are tested to make sure they work before they're put on the sales floor. Heck, if you live in the Denver area and don't have a bread machine, let me know and you can have mine. It's just hanging out in my crawl space.
5. If you're using a bread machine, use the dough setting because you can shape and bake it yourself. It'll be prettier that way. Put the ingredients into the pan according to the manufacturer's instructions (mine were liquids at the bottom, dry ingredients, and the yeast in a well on top) and hit start.
6. There are two main types of bread: regular (baguettes, French, sourdough, etc.) and enriched. Enriched dough has eggs and/or butter in it. Generally it is stickier than regular dough. I also think that it's probably not called regular dough, but I can't think of a better or more accurate word. Sorry.
7. The best way to tell if your "regular" dough has been kneaded enough is the window test. Take a small portion of dough and stretch it out. When you hold it up to the light, you should be able to see through it without having it tear. At that point, it's fully kneaded and ready to rise.
8. Dough rises and loaves (shaped dough) proof. If your dough over-rises, it's not a big deal. You can punch it down and then shape it. If your loaves or rolls over-proof, you will need to punch them down, reshape them, and let them proof again. If you put over-proofed loaves into the oven, they will collapse and you'll have not so good bread. This is super frustrating, so don't do it.
9. A lot of breads bake best in a moist, steamy oven. If the recipe says to steam the oven, you can easily do that by spraying water in your oven with a squirt bottle. You'll want to do this a couple of times in the first 10 minutes. This keeps the crust of the bread from setting too quickly.
10. Your first shaped rolls and/or loaves are not going to be beautiful. It's ok because they'll taste great. Just go with it. If you made hundreds of loaves every day like bakeries do, you would have beautiful loaves, too. The more you make, the better they look.
11. Dough loves to rise in warm, humid environments. My bread rises really fast in the summer when my house is 86 degrees (I wish I was exaggerating). My bread rises really slow in the winter when my house is 68 degrees. You can get your bread to rise faster by placing it in the oven and placing a pan of boiling water under it. Make sure the oven and the oven light are off. The steam and warmth will help your bread to rise if you don't want to wait all day.
12. You really can't skip the dough rising step, but you can speed up the loaves proofing step. This is due to the beauty of oven spring. Many recipes say that your loaves should proof until they're doubled in size. I rarely do this. I usually give them about 20-30 minutes and then I place them in the preheated oven. They'll finish rising in the hot oven.
13. Check your oven the first time you bake a loaf of bread or rolls. If the bottom of them gets too brown, place another pan under the one you're baking the bread on. This will keep the bottoms from getting too done. I do this for all my bread.
14. Get yourself some parchment paper, and bake all your bread on parchment. You don't want to have to scrape your bread off of a pan. This will make you angry.
I hope some of these tips will help you to be more confident about using yeast. It's good stuff, and nothing makes your house smell better than baking bread. Do you have any other questions about baking bread? I'd love to answer them! Conquer your fear!
