She Makes and Bakes
  • Home
  • About
  • Ramblings
  • Recipe Index
  • What We're Eating
  • High-Altitude Baking

Butterscotch Spice Cookies

11/26/2012

 
Picture
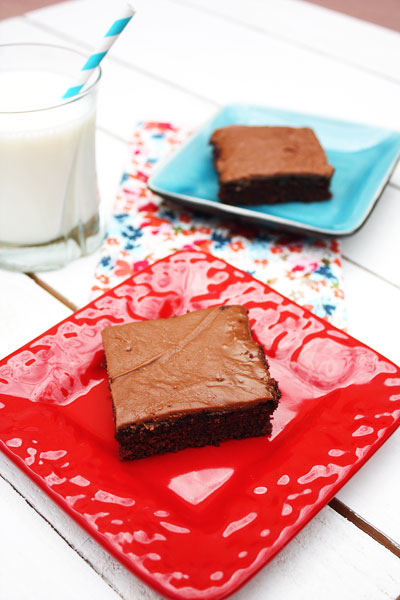
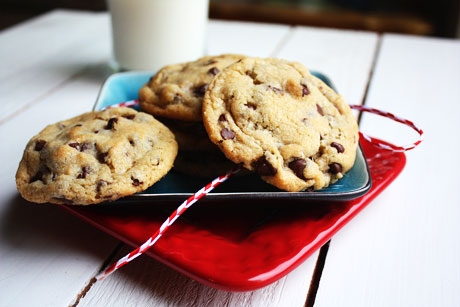
I am doing a happy dance tonight because we just ordered a new refrigerator! I am super stoked. It's so much bigger than the one we have now, and the freezer is on the bottom. It'll be nice to not have to squat to get things out of the fridge. Plus, since we are getting this new one, we will have a refrigerator in the garage now. No more having to borrow space in other people's fridges and freezers. Things are looking up for this holiday baking season!

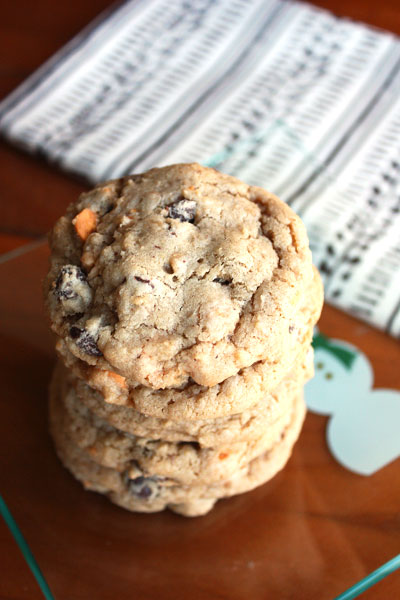
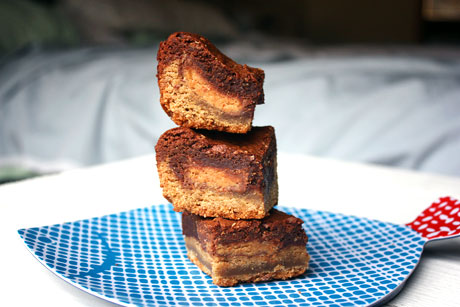
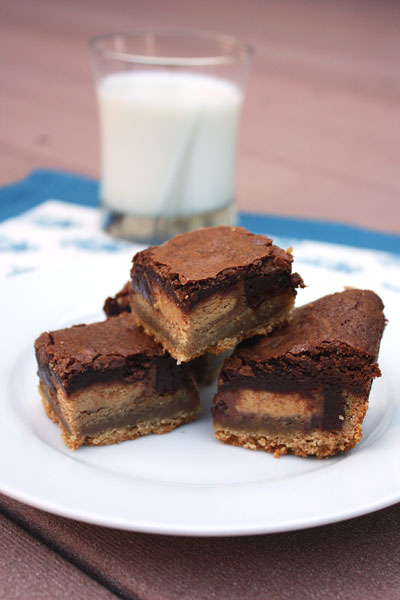
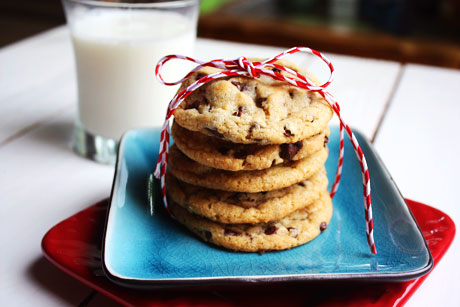
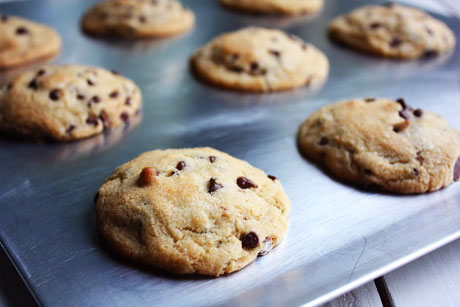
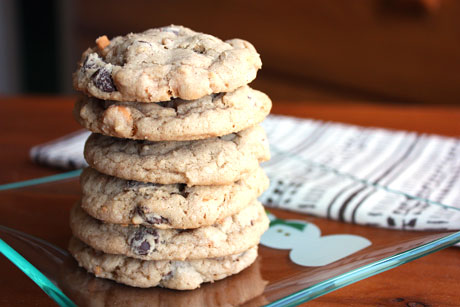
Anyway, these cookies. People love these. It's a spiced cookie that has chocolate chips, butterscotch chips, and toffee pieces in it. They're soft, chewy, and have a great blend of flavors. While these aren't my personal favorites (because I'm not a big butterscotch fan), I know a lot of people who absolutely love them. I always make a huge batch of them over the holidays. Cookies are one of my favorite things to bake, so I'm looking forward to sharing a lot of cookie recipes with you guys in the coming weeks. Stay tuned!

Butterscotch Spice Cookies Recipe
Makes about 5 dozen
Print this recipe

1 cup butter, softened
1 cup sugar
1 cup brown sugar, packed
3 eggs
1 tablespoon vanilla
2 teaspoons cinnamon
1 teaspoon baking soda
1/2 teaspoon salt
Pinch ginger
Pinch nutmeg
Pinch cloves
3 3/4 cups all purpose flour
1 1/2 cups semisweet chocolate chips
1 cup butterscotch chips
1 cup chopped walnuts (optional)
1/2 cup English toffee bits

Preheat your oven to 350 degrees.

In a mixing bowl, cream together the butter and sugars until fluffy. Add in the eggs one at a time until blended. Scrape down the bowl as needed. Add in the vanilla, cinnamon, baking soda, salt, ginger, nutmeg, and cloves and mix until combined. Add in flour and mix on low until incorporated. Fold in the chocolate chips, butterscotch chips, toffee bits, and walnuts (if using).
 
Form the dough into one-inch balls and place on an ungreased baking sheet two inches apart from each other. Bake for 12-14 minutes or until lightly browned. Let cool on the pan for one minute and then remove to a wire rack or a flat surface to cool.

Source: Taste of Home Fall Baking Cookbook 2010
Picture

Homemade Hot Cocoa Mix

11/8/2012

 
Picture
I've heard stories about how the economy is, shall we say, not so good, but it really hasn't affected me personally until about a week ago. My company is struggling and has done lay-offs the last three years. While that was pretty terrible for those laid-off and those of us left behind, it didn't hit home too much. However, last week they announced they were closing the office on Fridays (yay!) and cutting everyone's pay significantly (boo!). We are all part-time employees now. They are hopeful that things will come around and we can return to full-time work, but you just never know. So, what does this mean for me? Some good, some bad. Not working on Fridays means more time to work on the blog and my bakery business. While that's nice, it means a lot less money, which means that people are going to be getting a lot of homemade gifts this year for Christmas.
 
I actually love giving homemade food gifts, and while it does save money, I think it's a nice way to show people that you love them and were thinking of them while you were making and packaging their gift. I also love making gifts for other people to give to their friends, but that's another story. This hot cocoa gift is perfect for a gift. It's simple to make, it lasts a long time, it has two kinds of chocolate plus cocoa and vanilla sugar, and it makes a bulk quantity, so you can give it to many people. I made this last spring and gave it to my mom for her birthday. She's still enjoying it. And, if you don't like to share, and you drink a lot of hot cocoa, please make this and use it yourself. It's so much better than the packets you can buy or any of the standard mixes/syrups. My personal favorite way to drink this is with warm milk and a shot of Bailey's. Now that hits the spot, especially on Fridays when I don't have to go to work! 

Homemade Hot Cocoa Mix
Makes about 19 cups of mix, about 75 mugs of cocoa.
Print this recipe

If you have vanilla sugar on hand, use that. If not, you can easily make your own. I highly recommend making a lot of it and storing it in your pantry. It lasts for a long time, and you can easily refill the canister with more sugar to make more. My new favorite use for it is in pie crust.

2 vanilla beans
4 cups sugar
1 1/2 pounds good-quality semisweet chocolate, chopped
9 ounces good-quality bittersweet chocolate, chopped
2 cups Dutch process cocoa powder 

Split the vanilla beans lengthwise and scrape the middle out. Place the sugar in a large container that has a lid. Use your fingers to work the beans and middle filling into the sugar. Cover and let sit at least overnight. Remove the bean pods (you can use these to make more vanilla sugar).  

Combine the chopped chocolates in your food processor and process for four second pulses until the chocolate is very finely ground. If you don't process this until it's very fine, the chocolate won't dissolve in the milk. Add in the cocoa powder and vanilla sugar and process until combined. Store in an airtight container for up to six months. 
 
Serving instructions: Stir two tablespoons of the mix with 8 ounces of milk in a small saucepan over medium heat until the milk is warm and the cocoa is dissolved. Serve immediately.

Smaller Batch (2 1/2 cups):
To make a more manageable personal size, use the following quantities and the same instructions above. I recommend you make the 4 cups of vanilla sugar as above, but you'll only need to use 1 cup of it. Use the rest of the sugar for cookies, cakes, pies or anything where you want extra vanilla flavor.
1 cup vanilla sugar
6 ounces good-quality semisweet chocolate, chopped
2 1/4 ounces good-quality bittersweet chocolate, chopped
1/2 cup Dutch process cocoa powder

Source: Annie's Eats who got it from Confections of a Foodie Bride
Picture

Chocolate Oatmeal Cookies

11/7/2012

 
Picture
Years and years ago, I dated this boy. This boy loved to bake, and chocolate oatmeal cookies were his specialty. In fact, he baked way more than I ever did. We eventually went our separate ways, and I found myself wishing I had that recipe. I loved those cookies, and I'd eat them for breakfast, lunch, dessert, and midnight snacks. They were chewy and crunchy, and I loved the chocolate/brown sugar flavor. I searched and searched for a recipe that was similar, and one day I found one in my friend's Hershey's cookbook. 

Funny this is, I reconnected with him on Facebook and got his recipe. I made his cookies last year (which include a packet of chocolate pudding mix) and I liked my new version much better! His cookies were a little too cake-like, and I liked my chewy texture better. One of my favorite things about having oatmeal in my cookies is that it helps me to be good and not eat cookie dough. I love cookie dough...perhaps a little too much. But I do not enjoy eating uncooked oatmeal. I've used both quick cooking oats and old-fashioned oats in this recipe, and they both work great in the final cookie. I know this is a recipe I'll be making for years and years. I'm thankful to the boy for leading the way. 

Chocolate Oatmeal Cookies Recipe
Makes about 4 dozen cookies
Print this recipe

1 cup butter, softened
1 cup brown sugar, packed
1 1/2 cups sugar
2 eggs
2 teaspoons vanilla
1 teaspoon baking soda
1/2 teaspoon salt
1/2 cup cocoa powder
1 1/2 cup all purpose flour
3 cups oats
1/2 cup chopped walnuts
1/2 cup semisweet chocolate chips

In the bowl of an electric mixer fitted with the paddle attachment (or using a hand mixer), cream together the butter and sugars until soft and mixed. Add in the eggs one at a time, scraping down the sides of the bowl as needed. Add in the vanilla, baking soda, and salt, and mix on low until combined. Incorporate the cocoa powder and flour and mix on low. Once combined, add in the oats and mix. Mix in the walnuts and chocolate chips and mix until just incorporated.

Form the dough into one-inch balls and place on an ungreased cookie sheet about 1-2 inches apart. Bake for 11-12 minutes until set, but don't overbake. Let them cool for one minute on the sheet and then remove them to a flat surface to cool. Store in an airtight container or bag.

Source: Barely adapted from Hershey's
Picture

Candy Brownies

11/4/2012

 
Picture
Also known as leftover candy brownies...why not take some gooey, fudgy brownies and add in some leftover Halloween candy? Or, if you're like me, you could go out and buy some candy to put into these and then try to pass it off as leftovers. Either way, they're de.lic.ious. I'm not a total Halloween scrooge like I used to be. True, we don't turn on our porch light or dress up, but we do buy one bag of candy. Then I tell our neighbors to stop by. So I'm a selective scrooge.

These brownies are super easy, and it can use up a lot of your extra candy. It certainly doesn't add to the I'm eating too much candy dilemma, but they taste great. I had about seven leftover peanut butter cups, and then I went and bought two large bags of M&Ms and two large Snickers bars. I chopped up the cups and bars and threw them in the brownie mix with one bag of M&Ms. After I spread the batter in the pan, I sprinkled the other bag of M&Ms on top. I love how colorful they are. My brownie recipe is a one-bowl, really easy to make recipe with the use of a microwave, but if you don't have the time or desire, use a box mix. Just throw your leftover candy into the brownie batter. I think this would work great with all chocolate candy. You can chop any large pieces of candy into bite-size pieces. I would not recommend throwing any non-chocolate candy in there. In my mind, these would just not work with Starburst or Smarties, but I could be wrong. If you try it, let me know.

And if you don't have any leftover candy, I highly recommend you go buy some and make these. I know I don't regret my purchase! I'll be making these all year round. We both adore them!

Candy Brownies Recipe
Makes a 9x9 pan
Print this recipe

1/2 cup butter
6 ounces bittersweet chocolate chips or coarsely chopped
3/4 cups sugar
2 eggs
1/2 tablespoon vanilla
1/2 cup + 2 tablespoons all-purpose flour
1/4 teaspoon salt
1-2 cups of chocolate candy, coarsely chopped

Preheat your oven to 350 degrees. Line a 9x9 pan with aluminum foil, leaving a few inches hanging over the sides (this foil will turn into handles to lift the brownies out of the pan later). Spray the foil generously with nonstick spray, paying special attention to the corners and sides.

In a large microwave-safe bowl, add the chocolate and butter. Microwave for 30-second intervals until melted and smooth, stirring in between. Add the sugar and vanilla into the bowl with the chocolate and whisk until incorporated. Add in the eggs and whisk until thick and glossy (about a minute). Stir in the flour and salt until just combined. Fold in the chopped candy. Pour the batter into the prepared pan and bake for 25-30 minutes. Twenty five will result in gooey brownies, and thirty minutes will be more set in the center. Let cool.

Adapted from The Pastry Queen cookbook
Picture

Peanut Butter Cookie Cup Brownies

9/19/2012

 
Picture
Well, hello, best brownies ever. See the bottom layer? That's peanut butter cookies. That middle layer? Oh yes, those are peanut butter cups. And the top layer is a wonderful bit of fudgy brownie. I really wasn't sure what to call these. If these are slutty brownies, then maybe these guys should be called skanky brownies? Peanut butter lover brownies? Unbelievably awesome brownies? I'm not sure, so for now, I'll go with the description: peanut butter cookie cup brownies.

These are pretty easy to make and don't really take too much time, so I suggest you get into your kitchen as soon as possible to get them made. The sooner you make them, the sooner you can eat them!

Peanut Butter Cookie Cup Brownies Recipe
Makes a 9x9 pan
Print this recipe

For the peanut butter cookie layer:
1/2 cup sugar
1/2 cup brown sugar
1/2 cup peanut butter
1/2 cup butter-flavored shortening
1 egg
1 1/4 cup all purpose flour
3/4 teaspoon baking soda
1/2 teaspoon baking powder
1/4 teaspoon salt
1 teaspoon vanilla extract
1 teaspoon almond extract

For the middle layer:
16 regular size peanut butter cups

For the brownie layer:
1/2 cup butter
6 ounces bittersweet chocolate chips or coarsely chopped
3/4 cups sugar
2 eggs
1/2 tablespoon vanilla
1/2 cup + 2 tablespoons all-purpose flour
1/4 teaspoon salt

Preheat your oven to 350 degrees. Line a 9x9 pan with aluminum foil, leaving a few inches hanging over the sides (this foil will turn into handles to lift the brownies out of the pan later). Spray the foil generously with nonstick spray, paying special attention to the corners and sides.   

To make the cookie dough, in a mixing bowl, cream together the butter-flavored shortening, peanut butter, and sugars. Add in the egg and mix until combined. Stir in the baking soda, baking powder, salt, vanilla extract, and almond extract. Mix in the flour until combined. Press the dough into the bottom of the pan.

Place the 16 peanut butter cups on top of the peanut butter cookie dough in one layer.

To make the brownies, in a microwave-safe bowl, melt the stick of butter. Add the chocolate and let sit for 30 seconds to 1 minute. Stir and if the chocolate isn't fully melted, microwave for 30-second intervals until smooth, stirring in between. 

In a mixing bowl, mix together sugar, eggs, and vanilla until incorporated. Add in the butter/chocolate and mix until thick and glossy (about a minute). Stir in the flour and salt until just combined. Pour on top of the peanut butter cup layer.

Bake for 30 minutes if you like fudgy brownies; bake for 35-40 minutes if you like them a little more cooked and firm.  

Peanut butter cookies adapted from Betty Crocker
Brownies from The Pastry Queen cookbook
Picture

Chocolate Sheet Cake

9/3/2012

 
Picture
In junior high, I had to take three electives: typing (boring but useful), wood shop (ha! I remember absolutely nothing about that class), and home economics (I remember this cake and sewing a pillow). So while I want to say that this cake was the best thing to come of that year, it probably was typing. Yawn. We'll say it was this cake to be more exciting though. I remember it fondly, and we made it a lot in my house. I remember that the original recipe called for oleo, which shows you how old school the recipe was.

I haven't had this cake for years, so when I made it this weekend, I was pleasantly surprised and impressed about exactly how good it is. It's super moist (sorry for those of you who hate that word) and it's really chocolatey, even though it doesn't call for a ton of chocolate. This is a cake that you can whip up in under an hour, and that includes making the frosting and frosting it. Plus, it doesn't require a hand or electric mixer. Although I'm a big fan of fancy pretty layer cakes, there's something to be said about a from-scratch sheet cake that can be made and eaten in an afternoon. We need more of those in our lives I think.

Chocolate Sheet Cake Recipe
Makes a 9x13 cake
Print this recipe

*Note: If you're making this at a higher altitude, your cake will sink in the middle unless you change the amount of baking soda to 2 1/4 teaspoons. I sprayed my cake pan with regular cooking spray, but I think that if you want to flip this cake out of the pan and decorate it, you probably should use baking spray or grease/flour.

For the cake:
2 cups sugar
2 cups flour
1 cup butter
1/4 cup unsweetened cocoa powder
1 cup water
1/2 cup buttermilk
2 eggs
1 tablespoon baking soda*
1 tablespoon vanilla
1/4 teaspoon salt

For the frosting:
1/2 cup butter
1/4 cup unsweetened cocoa powder
6 tablespoons milk
1 pound powdered sugar (about 4 cups)

Preheat your oven to 400 degrees.

To make the cake, mix flour and sugar together in a large bowl and set aside. In a medium saucepan, combine the butter, cocoa powder, and water. Heat until it comes to a boil and pour it over the flour mixture. Mix together. Add the rest of the cake ingredients and stir until incorporated. Pour it into a greased 9x13 pan.

Bake for 20 minutes or until a toothpick inserted into the cake comes out clean.

Five minutes before the cake is done, heat the butter, cocoa powder, and milk in a medium saucepan until it boils. Don't use a wooden spoon to stir this mixture or it will taste like wood. Remove from heat, add in the powdered sugar, and beat by hand until smooth. Pour over the hot cake. Let cool slightly before serving.

Source: My junior high home economics class.
Picture

PPQ: Death by Chocolate Cake

8/26/2012

 
Picture
This is the last post of Project Pastry Queen, and I've really enjoyed cooking recipes out of The Pastry Queen Cookbook. You definitely should check it out if you haven't already--there are so many great recipes. This chocolate mousse cake was the perfect way to end the project. It starts with a dense, rich, flourless bittersweet chocolate cake. Then it's topped with a milk chocolate mousse that's light and silky, and the whole thing is topped with a bittersweet chocolate ganache. Bonus--if you use gluten free chocolate, you can make this cake gluten free. Sad thing--if you're pregnant or immunocompromised, no dice on this one. It has raw eggs in the mousse.

Rich really would be an understatement. I had three bites, and I was good. But those three bites were incredible. The other great thing about this cake is that you can freeze it. Technically, you're supposed to freeze it before you add the ganache and then add the ganache to the frozen cake before you serve it. However, I froze the entire thing (minus one piece) and will serve it at a party I'm throwing on Tuesday. I think it'll be fantastic. Don't make this for a cookout or BBQ as the cake needs to stay cold or it will melt.

Check out our grand hostess, Shawnda of Confections of a Foodie Bride, for the full recipe. I made the following changes:

1. I used Bailey's in the cake (yes, you can taste it and it's gooood).
2. I made my cake in a 9-inch springform pan, which I thought worked marvelously. Once the cake was cool, I poured the mousse on top and froze the whole thing. When I was ready to add the ganache, I didn't have to invert the cake out of the pan.
3. I had to bake the cake for 50 minutes, and it was still really fudgy. I'm not quite convinced it was fully cooked. You'll want to watch that.
4. The ganache is supposed to fully cover the sides, but I love the look of dripping ganache, so I went that route instead.

If you want to check out my other Project Pastry Queen recipes, check this out. Be sure to check out the Project Pastry Queen website to see everyone else's take on the recipe. Thanks Shawnda, for creating such a great project! What's up next?
Picture

Mint Chip Ice Cream for Two

8/16/2012

 
Picture
Two years ago, my mom gave me a cute little mint plant. It was about three inches tall and just one measly plant. Two years later, it has taken over my life...er...flower box. I kind of knew that mint was aggressive and took things over, but I guess I didn't realize it to this extent. It has exploded, and I'm not really a huge mint user. I love it in mojitos, and I love some mint chip ice cream. And that's about it for my mint usage. However, I never thought about making my own mint chip ice cream until I posted a picture of my crazy mint plant on Instagram and someone suggested it. (PS, I love Instagram...follow me! Emily_SheMakesandBakes)
 
I'm so glad I got the ice cream suggestion because it is fantastic. It has a wonderful fresh mint flavor that you don't get from the ice cream at the store. It's not artificially colored, and you can choose what kind or how many chips to put in the ice cream. It takes a tad longer than other ice creams to make because you have to steep the mint in the hot milk mixture to extract the flavor, but it's so worth it! As usual, I scaled it down for two servings because I'd rather have a large variety of ice creams in my freezer than a lot of one kind. The notes below tell you how to make a bigger batch.
 
Mint Chip Ice Cream for Two Recipe
Makes two cups
Print this recipe

Note: To make six cups of this ice cream, multiply all the ingredients by three but only use 5 egg yolks. Follow the same process.

2/3 cup whole milk
2/3 cup heavy cream
1/3 cup sugar, divided
Pinch of salt
1/2 teaspoon vanilla extract
1/2 cup packed fresh mint leaves
2 egg yolks
1/3 cup mini chocolate chips

In a medium saucepan over medium heat, combine the milk, cream, salt, vanilla, and half of the sugar. Bring to a boil and remove from heat. Add in the mint leaves and let them steep for 20-30 minutes. Remove the mint leaves and return the mixture to a boil.

While the milk mixture is reheating, whisk the egg yolks with the remaining sugar until pale and thick.

When the mixture has come to a boil, slowly whisk it into the eggs. When you have whisked in approximately two-thirds of the milk mixture, return everything to the saucepan. Using a spoon, stir the mixture constantly over low heat until it thickens and coats the back of a spoon. Don't let it boil. Pour the mixture through a fine mesh strainer into a clean bowl. Cover and refrigerate until thoroughly chilled, about a few hours. Churn according to the manufacturer's instructions. During the last couple of minutes, add in the chocolate chips.

Source: Adapted from Cuisinart
Picture

Double Chocolate Chip Cookies

8/14/2012

 
Picture
I think every blogger has to post a chocolate chip cookie recipe, and this is mine. I spent years trying to find the perfect recipe, and turns out I had to look no further than my boss. She makes the perfect cookies, and now I do, too. This is a soft, chewy cookie that stays that way for days. There is a strong vanilla flavor, which pairs really well with the chocolate and brown sugar. I've had many people tell me repeatedly they are the best cookies they've ever had. I happen to agree. Even my husband, who doesn't really eat desserts will eat a *batch* of these cookies. I'm happy to know that whenever I have kids, I have this recipe in my back pocket. Already I make them so often that I have the recipe memorized. 

There are a couple of things worth mentioning about these cookies. First, don't substitute butter for the butter-flavored shortening. I realize that butter is best, but not in this case. The shortening really lends itself to soft cookies, and you still get to have that butter flavor. Secondly, you want to underbake these cookies (and all cookies) to keep them soft. Therefore, take them out when they're barely turning brown and then let them rest on the pan for one minute to firm up a bit. Don't let them sit on the pan for more than a minute or they'll get really flat. After the one minute is up, you'll remove them to a flat surface. Before I had granite countertops, I placed them on foil on top of my counter. Now I just put them directly on my counter. If you put them on a wire rack, they'll fall through so don't do that.

By the way, if you have a hard time baking cookies (eg, the bottoms or edges are brown or uneven), I suggest using Airbake pans. You don't have to grease them, use parchment, or a SilPat, and the cookies bake beautifully every time because there are no edges to trap the heat (and other fancy reasons I'm not aware of). I bake all my cookies on these, and I love them...I have two sets. PS, I'm not getting paid to say that, I just love them and think everyone should use them.    
Picture
Double Chocolate Chip Cookies Recipe
Makes about 36 cookies
Print this recipe

3/4 cup brown sugar, packed
3/4 cup sugar
1 cup butter-flavored shortening
2 eggs
1 teaspoons baking soda
1 teaspoons salt
1 tablespoon vanilla extract
2 cups flour
1 cup regular size chocolate chips
1 cup mini chocolate chips

Preheat your oven to 375 degrees.

In a bowl of a mixer, cream the shortening and sugars until fluffy. Add in the eggs one at a time. Mix in the baking soda, salt, and vanilla, and add in the flour until just incorporated. Stir in the chocolate chips.

Form two tablespoons worth of dough into a ball and place on an ungreased baking sheet about two inches apart from each other. Bake for 9 minutes until barely golden brown. Remove from oven, let rest for one minute on the pan, and then remove to a flat surface (I place them on my clean counter or aluminum foil on my counter). Let them cool.

Source: My boss, Sharon, adapted from Nestle Tollhouse
Picture

Roasted Strawberry & Chocolate Ice Cream

7/30/2012

 
Picture
Do you think Olympians eat ice cream? If not, they definitely should. Missy Franklin lives in my neck of the woods, and I'd love to give her some of this stuff. She seems really nice and fun; I think she'd like it. PS, I think the swimming relays are one of the most exciting things to watch. I'm on the edge of my seat and holding my breath to see who will come on top. Can we have a relay every night please?  

Since it's the last day of National Ice Cream month, I had to give you guys another ice cream recipe. After my first foray into roasted strawberries, I knew that I wanted to include them in as many things as possible. Enter this ice cream. Since chocolate and strawberries pair so well together, I figured I would roast some strawberries in a simple syrup (which turned them into a very tasty jam) and then add them into a super creamy chocolate ice cream while it was churning. The result is a wonderful dark strawberry flavor in every bite that's mixed with cold, creamy, rich chocolate. I scaled this recipe down to two cups (because I like to have a wide variety of ice cream flavors available), so excuse me while I go finish the bowl. Dinner schminner; I'll just have this please. 

Roasted Strawberry & Chocolate Ice Cream for Two 
Print this recipe

Note: This recipe is scaled down to make two cups. If you want to make a full recipe, multiply everything by three but use 5 egg yolks. 

For the ice cream:
2/3 cup heavy cream
1 tablespoon Dutch process cocoa powder
2 ounces semisweet chocolate, chopped
1/3 cup milk
2 tablespoons sugar
2 tablespoons brown sugar
Pinch of salt
2 egg yolks
1/4 teaspoon vanilla extract

For the roasted strawberries: 
2 cups strawberries, hulled and diced in half
1/4 cup sugar
1/4 cup hot water

To make the ice cream base, in a medium saucepan over medium high heat, whisk together 1/3 cup of the cream and the cocoa powder until the cocoa powder is dissolved. Bring it to a boil and then reduce the heat to medium low and let boil for 30 seconds, whisking constantly. Remove from the heat and whisk in the semisweet chocolate until melted and smooth. Stir in the remaining 1/3 cup of cream and pour into a medium sized bowl. Place a fine mesh strainer over the bowl. 

In the same pan, mix together the milk, sugar, brown sugar, and salt over medium high heat. Meanwhile whisk the egg yolks together. When the milk mixture is warm, slowly pour two-thirds of it into the egg yolks, whisking constantly. Then pour the egg yolk mixture back into the pan while stirring. Continue to heat it over medium high heat, stirring with a spoon, until the mixture has thickened and coats the back of the spoon. Do not let it boil. Once it has thickened, remove it from heat and pour it through the fine mesh strainer into the chocolate mixture. Stir together and add in the vanilla extract. Once everything is incorporated, cover with plastic wrap and chill in the refrigerator. Once completely chilled, churn according to the manufacturer's instructions. 

While the ice cream base is chilling:
To make the roasted strawberries, preheat your oven to 400 degrees.

Place your cut berries on a sheet pan, combine the hot water and sugar, and pour on top of the berries. Cook them in the oven for 10-15 minutes until softened. Let them cool, and add them to your ice cream during the last few minutes of churning. 

Store your ice cream in an airtight container in the freezer until ready to serve. 

Adapted from David Lebovitz's The Perfect Scoop  
Picture
<<Previous
Forward>>

     Welcome!

    Cooking is fun and easy at high altitude, but baking can be frustrating. About 90% of my recipes work everywhere, but some are adjusted so us mountain dwellers can enjoy baked goods from scratch. I hope you find great recipes on here for your family, and I'll let you know if any are adjusted for high altitude. 

    Stay Updated!

    Add to your Reader:

    Get new posts delivered to your inbox:

    Enter your email address:

    Delivered by FeedBurner

    Categories

    All
    Appetizers
    Bars
    Beef
    Bread
    Breakfast
    Brownies
    Cake
    Cheese
    Chicken
    Chocolate
    Cinnamon
    Cookies
    Crackers
    Cupcakes
    Dessert
    Do It Yourself
    Drinks
    Fruit
    Ground Beef
    High Altitude
    How To
    Ice Cream
    Italian
    Main Courses
    Mexican
    Muffins
    Oatmeal
    Pasta
    Pastry
    Pie
    Pizza
    Pork
    Project Pastry Queen
    Pumpkin
    Salad
    Sauces
    Side Dishes
    Snacks
    Soup
    Sourdough
    Steak
    Vegetables

    My featured recipes on NoshOnIt

    Some Good Reads!

    Annie's Eats
    Bake at 350
    Climbing Grier Mountain
    Confections of a Foodie Bride
    How Sweet It Is
    I Am Baker
    Macaroni and Chesecake
    Pinch of Yum
    Pink Parsley
    Smells Like Home
    Smitten Kitchen
    Sunny Side Up
    The Curvy Carrot
    The Marvelous Misadventures of a Foodie
    The Pioneer Woman Cooks
All content copyright 2012-2013 She Makes and Bakes.